@will, What an excellent, concise explanation!!!
At the moment (and moments are changing very fast)... no 3D printer has enough AI to accept a picture of a table, recognize what the top is, what the legs are and flip it over and tear it apart and lay it down as described in Will's explanation. The point being, there is a lot of work that the human has to do and the Ultimaker doesn't help with any of that.
In the meantime, I'll see if I can locate the bit on printing food and confections. I still want to print a RibEye steak!
My apologies. I did come down a little hard, but I really thought you were teasing us and still not sure that you aren't. 😆 Maybe you came here first to get some input, but it was pretty clear to me that you hadn't read the Ultimaker pages yet or watched even the most fundamental YT on 3D printers.
To my knowledge, I've only read of one company that is attempting to print a steak. But, they are doing it in the hopes of printing the steaks for sale... not making the printer available for sale. I've also heard of chocolate and other confectionary (semi-liquid) type things being printed. Beyond that, I haven't heard of any general ability to print any other food-stuffs. But... I don't really follow that kind of thing. There is a whole world out there that hasn't crossed my news feeds.
You might want to start there and it sounds like you have to get buy-in from your wife. The fact that you (and your wife) seem to think that a 3D printer is going to print out your next automobile in metal, print drone parts and relieve you of all cooking duties might be a little optimistic. You might want to start back-peddling on your expectations and those of the purse-string holder.
Something like this printer falls under your pocket-change budget at $200US.
https://www.creality.com/products/creality-ender-3-v3-se
Frankly... about the only thing that the Ultimaker can do that this one won't is safely print ABS plastic. That's it! And even that is a cheap fix to add that if/when you want. You could print parts for your drone all day long. Food and metal will also not be available, but the Ultimaker doesn't do those either (to my knowledge) at $8200. With this $200 Creality, you can get your feet wet, see what this 3D Printing is all about and it won't hurt if you kick it to the side of the road.
If you are just dying to spend more, you ought to look at both of the Bambu Lab X1C and Creality K1 Max. The competition between these two companies have heightened the entire 3D Printer game considerably and left Ultimaker in the dust. Both are using AI scanning technology that isn't even hinted at on the Ultimaker. They're faster, have carbon filtering, the cameras and the Bambu has the multiple roll option like the $11,500 Ultimaker. The Bambu with that feature is about $1800. It is arguably the state of the art. The Ultimaker is kind of like IBM... Big name in its day, but not really relevant anymore.
When you start doing some research on metal and/or food printers, by all means, please share them here. I'd be curious.
3 lines of code = InqPortal = Complete IoT, App, Web Server w/ GUI Admin Client, WiFi Manager, Drag & Drop File Manager, OTA, Performance Metrics, Web Socket Comms, Easy App API, All running on ESP8266...
Even usable on ESP-01S - Quickest Start Guide
As you know, I am humble follower of you, when it comes to 3D printing, but at risk of looking really stupid (again), a couple of comments about your TronXY 'review' surprised me -perhaps I misunderstood.
No one but Dave really should read this, unless... you're wanting to make a silly mistake and are considering purchasing this printer.
You definitely keep me on my game! My main take-away was, don't buy this printer unless you really are a masochist or a tinkerer wanting a project just getting it to work. I was long winded as I tend to be, but it doesn't really surprise me you want even more. As usual, there is a-lot to unpack from your posts. Let's see if I can oblige...
Aside (kind-of) - My wife got me a semester long class in working with clay... free-hand and wheel turning. I think she's trying to blunt/soften my technical side. 😆 I wanted to make some texture rollers to make patterns in the clay. They take a long time to print, so I wanted to get both of my printers going to make some. Yesterday alone, I had the opportunity (let's use an optimistic word for what I really think) to have to re-level and re-zero the printer several times. I'm beginning to get a sense of the problems.
My Prusa uses a coated metal flex-plate that is magnetically attached to the bed. It sticks down hard while printing, but can removed easily enough and bent to make the part just pop off. It is almost bullet proof in its workings. The TronXY uses a glass plate that is screwed down. As such, either things pop off while printing and make spaghetti (not to be confused with food - @darup) or if I use glue-stick, they're seem almost permanently attached. Having to pry them off, any little force cause the Z-axis to move out of spec. Apparently the auto-leveling that I added to the print start-up code is not sufficient to re-establish a baseline and things go down hill from there.
3D Printer Firmware 101
Understand, I'm only at class 102 level, so use salt and pepper with this. Maybe @will can chime in if I stray too far from reality.
The Master of Self Delusion
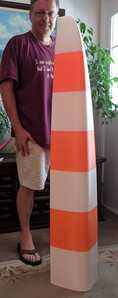
At one point, I had this idea that I was going to actually 3D print a cruising catamaran hull similar to:
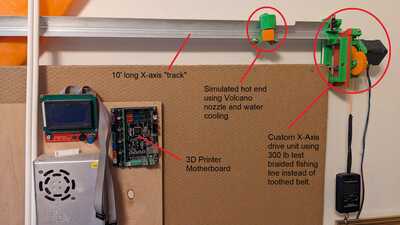
... but WAY bigger. The hull, needing standing room height, etc I decided I needed a 3D printer that had a build space of 10x10x10 feet! As a starting point, I built up a working X-axis for the printer.
Not to tangent too far, but the most common boards originally were based on the Arduino Mega. So, this falls into what we are all used to here on this forum... compiling MPU code. I downloaded the Marlin source code and started configuring it for this Terra Printer. There are some things that must be changed in the source code using #define statements and compiled in. Some parameters can't be changed except via re-compiles. Somethings can be defaulted and using GCODE can be updated and saved in non-volatile memory (NVM) and still others can be change in the GCODE of a print.
It is my understanding that in Marlin, the maximum acceleration parameters are the type that can be updated and stored in NVM.
Now, in regard to the TronXY. It uses some 32bit Arm processor and as such I don't have (nor want) all the tools required to compile and burn this MPU. As it comes from them, it uses some proprietary firmware that is not Marlin or Klipper and as such has no documented way of changing these acceleration parameters.
Kinematics / Dynamics for Printers 101
What really bothers me about the TronXY is that they obviously set these parameters so low so that the printer would not show some bad behavior for customers or reviewers. 150mm/sec/sec is ridiculously slow for any type of printer.
There are two aspects that this setting is used to protect from happening:
- In the case of stepper motors if you ask them to accelerate/decelerate a heavy mass too quickly, you'll exceed their output and you miss steps. This causes the print to shift and be offset some points.
- Swinging these heavy masses around quickly can also start exciting resonant frequencies of the printer and cause ringing in a print. This is evident as waves in a surface you're expecting to be nice and strait.
Bed Slingers like my Prusa are handicapped because the Y-stepper motor is expected to move the heavy metal bed AND a potentially heavy print. Yet even with this severe handicap, they have these settings set to 3000 mm/sec/sec.
CoreXY designs like the TronXY was expressly designed to eliminate this problem the X and Y axis motors are fixed to the frame and their sole mass that they have to move around is the cross-bar and hot-end. In the case of the TronXY, it is even lighter because it uses a Bowden design where the extruder stepper motor is also moved to the frame and doesn't get shoved around. IOW, the TronXY should be able to shove around the head at far higher accelerations (like 2x, 5x, etc) more than the Prusa's 3000 mm/sec/sec.
Just as a comparison... the Creality K1 Max moves its CoreXY design around with a direct drive extruder on the head at 20,000 mm/sec/sec... albeit with far larger stepper motors than the TronXY.
Back to your questions specifically in case the above didn't address them in general.
I note you coment on firmware limitations, but if you run 'your own' Marlin, what firmware is still present?
Marlin is the firmware that will replace the proprietary firmware that is currently on the TronXY. They have supplied me with the pre-compiled version of the Marlin and say that I can burn it by putting it on a SD card and turning on the printer. Kind of like upgrading the CMOS on a PC I guess. I haven't done it yet, because the printer is kind of working.
However. does this mean there is a Marlin config file that is close enough, with maybe a little tweaking?
The Marlin config file is only valid if is applied to a Marlin firmware on the printer.
Perhaps the TronXY display is a bit smarter and gets in the way?
The upgraded touch screen display on the Pro version is very nice. Far nicer than the dial/button 4 line LCD display on my Prusa. I hope the Marlin firmware version uses it as nicely as the proprietary firmware... but I doubt it will be as graphical.
On my PC, I have config files for Marlin 2.1.2, not 2.1.2.1, sbut as a guide, I had a quick look for the TronXY ones, and found this snippet for the XS5A
Since I don't have their modified version of the source code, and don't even know which version it is based, I'm not sure what config files can be used. Its quite common for companies to modify the Marlin code to their printers. My Prusa also uses Marlin.
At first glance, those numbers look a lot higher then 150mm/sec2.. ?(Equivalent Ender 3 rates in Marlin config file are { 500, 500, 100, 5000 } and { 6000, 6000, 200, 20000 } )
There is no way for me to see what the values are in proprietary firmware. I am simply going by the Cura printer configuration supplied by TronXY for what they want Cura to use for those accelerations. I don't actually know what the maximum setting are in the firmware without doing an exhaustive print test upping the accelerations in Cura and seeing if it speeds up and when it stops speeding up.
Whether you have to bolt the machine to half a ton of concrete to stop it jumping round the room isn't mentioned.
🤣 You joke... but I had planned on bolting two sides of the Terra Printer to my workshop's corner foundation/retaining walls 9' tall that are 8" thick of steel and concrete.
Bed levelling (or perhaps I should say trammelling) process seemed a bit topsy-turvy.This will be a 'teaching grandmothers to suck eggs' part of the note
🤣 I thought this was a deep southern (USA) expression that no-one else would know... especially considering the ocean separating us. What a hoot!
We're going to get dirty down here in the weeds with this part.
Fundamentally the leveling is doing the same thing. As you note things are a little different (Relativity applies 😉) The nozzle is fixed in Z and the bed moves. A few other things are different also.
- It uses some kind of distance sensor. Not magnetic and not touch. Its got to be ToF or Infrared distance, but I would have thought both of those might get confused if the bed is hot.
- Auto leveling for printer calibration process works like:
- It homes by hitting the limit switches on the X and Y (0, 0).
- It moves to the center and raises the bed until the sensor detects the bed. The nozzle is about 7 mm above the bed at this point.
- It then automatically goes through a 4x4 grid, lowering and raising the bed until the sensor sees it. It displays a chart of the distances relative to the initial center being Z=0 height.
- It has six screws: 3 along the front, 3 along the back, but none in the middle front to back.
- You then WAG a guess of which screws and how much to turn. Since the screws are not where the 4x4 grid aligns. And since any adjustment on one screw causes the center to also move, every one of the numbers will be different when running the auto again. So its pretty much like picking yourself up by your bootstraps.
- Also it appears I have about a 0.5mm arc running from front to back... which eats most of the 0.6mm allowable.
- After we finally get a OK leveling, we then do a Z distancing.
- This homes again
- Moves to the center
- Uses the sensor to get above the bed again... ~7mm
- Then you electronically move the bed up till it is one paper thickness away from the nozzle.
- It stores this relative number.
Now, where this becomes a don't ever buy this printer issue:
- I had a print on it overnight. I removed it... pretty much by brute force. I then did the auto level above. Remember this is purely a diagnostics thing, and no settings are changed because I re-run it. It said it was now out of spec. Because of me removing the print.
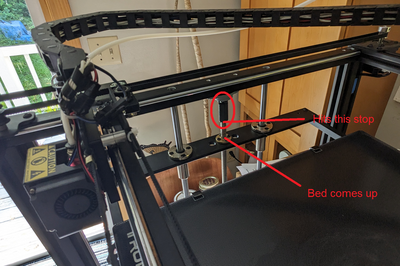
- There is NO z-hard limit switches. The printer will happily drive the glass bed into the nozzle. The solution (from the Internet, not TronXY) is to print your own stop and place it on the Z drive screws. Brilliant... IF YOU ALREADY HAVE A WORKING PRINTER!
- Now, you have calibrate these precisely because if they're too tall the bed won't come up high enough to do your first layer. If you make them too short the bed hits the nozzle. Fortunately, the six adjustment screws can help in that precision. But none of this disaster is discussed by TronXY. If you don't have these stops, you're taking a wild guess that one end is higher than the other.
- Because I have these I can turn off the printer and manually turn both z-axis till it hits these stops. This morning, (after removing the print) I noted that one had to be turned more than the other.
- Now that both have been leveled, I re-ran the auto level and it said that we were back in the sloppy 0.6mm spec.
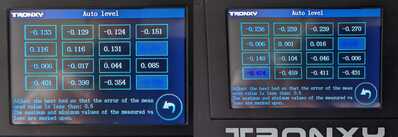
- Now, want to see something really special. I ran the auto-level back to back. Didn't touch the printer except to press the touch screen buttons.
Note how dissimilar they are... I can only assume the sensor is not very consistent. Isn't that special?
So in essence, between prints, I must turn it off, manually raise the bed until it hits the 3rd party Z stops, turn it back on and hope that then next sensor reading falls within the critical first layer height. I routinely get prints where the bed is too close and blocks the nozzle spitting out anything. Other times, it is too high and I get spaghetti.
And yes, I added the auto leveling to pre-print GCODE. However, as I mentioned, I don't believe it changes the settings. On my Prusa, they use the auto leveling (7 x 7 grid) to actually adjust the Z positions of the head as it moves across the print. On the first layer, you can see the Z-steppers move up and down as it prints. IOW, they're making the print fit the bed, and not leveling the bed to be flat.
The TronXY isn't flat and it doesn't compensate... and its a crap-shoot whether I get a print or not. I have to watch the first layer and make sure it gets down right. I estimate I get about 20% the first time.
The Prusa... it fire and forget. I routinely walk away after pressing print. I don't even wait for it to heat up!
In practice, the best z offset value seems very close to the thickness of a sheet of my cheap laser printer paper!!
What I've been using. But even that fails about 50% of the time. The Prusa does a running calibration - I displayed it above in a previous post, but it prints while you fine tune the height watching how the bead lies. You get a precision Z height to 3 decimal places. It is so precise, that I have a different height for ABS versus PLA for optimum, bullet-proof sticking. TPU and Polycarbonate seems to be pretty tolerant of either setting.
Perhaps I am being rather careless in my approach, but it seems to work, at least to my limited expectations.
It really shouldn't be that problematic. My son has the old Ender-3 without any kind of leveling probe and he doesn't seem to have any gripes.
I'd be surprised if even you made it down this far! 🤣
VBR,
Inq
3 lines of code = InqPortal = Complete IoT, App, Web Server w/ GUI Admin Client, WiFi Manager, Drag & Drop File Manager, OTA, Performance Metrics, Web Socket Comms, Easy App API, All running on ESP8266...
Even usable on ESP-01S - Quickest Start Guide
I know what you mean about separating a print from a glass bed. I have an old-style hey hunting knife (you might call it a Bowie knife) which I often use to separate parts from the print bed.
There are three ways to facilitate removal:
1) wait until the glass is cold and then it'll pop off easier
pros - no damage to model or glass
cons - wait ? are you kidding ? who has time to wait ? !!
2) for delicate or large surface area prints, delicately slide the sharp edge of the knife up to the edge of the part and try to wedge it lightly into the joint between the glass and the part. Put one hand to hold the sharp pointy end against the model and use the other hand to press the knife edge against the model and lift slowly. The knife edge should dig into the part and produce an upward lift on that corner of the part, helping to beak the vacuum seal between the part and the glass (which vacuum was caused by the melted glue)
pros - often works to lift one corner so the part can be pried ff safely
cons - can separate layers on the model because you can never get the blade precisely onto the bed/part interface because of the shape of the knife
- can potentially break the glass if prier is inebriated or angry
3) for relatively strong parts with low bed area, I turn the knife sideways and give the part a sharp blow with the back (dull) edge of the blade. The inertia thereby imparted will often twist the part off of the glass.
pros - minimal twisting or load on the build plate
cons - has to be strong enough to survive the blow, Weak parts will break or shatter.
The TronXY sounds very difficult to work with, I'm sure you'll harvest a lot of useful parts when it's disassembled.
You may be interested to know that the K1 samples at 25 locations around the build plate and sets the Z offset all by itself. I love that feature because I always found bed levelling and offset to be horribly nerve-wracking (for both me and the printer).
Anything seems possible when you don't know what you're talking about.
Hi @inq,
Thanks for your explanation ... it is great to learn a lot more, though I shall need a lot more time & coffee to take it all in.
-----------
I should declare that I am not presently thinking of buying a TronXY (or any other 3D printer) ... mainly just discussing in case there is something you can do to enable yours to regain a little credibility, and also for me to learn a little more which may come in handy, sooner or later. So if you are not interested, please feel free to say so.
--------
An immediate query, if I may.
I haven't looked at the details, so I am presently assuming that this is a 'similar story' to my little Ender, do doesn't the Marlin software completely replace the mainboard software?
In other words, the 'complete set' to reprogram your board is only an Internet connection away...
- Marlin source from Github
- VS Code editor
- Platformio add in to VS Code
- (maybe Python to run a script or two ... I can't remember if this was an issue here or for something else)
- An SD (maybe micro?) card to transfer from the PC to the printer motherboard
To do a rough check. I watched the first 12 or so minutes of :
www.youtube.com/watch?v=agOv6DsOz04
and whilst there are small details that are different, it looked pretty familiar.
------------
I realise, that even in the Ender, enough software to read a micro SDcard might remain resident ---- (I haven't 'bricked' the board yet, but they might be luck or maybe some bootstrap from SDcard software is 'protected'!) ...
I had the impression it was the whole software package, at least from the point of view of driving stepper motor controllers, etc., so that in theory, you have the whole source code on your PC, once you downloaded from GitHub.
-----------
And, in case I do have this wrong as well, why would the Marlin config files have stuff that the board can't handle? Those #defines do not look like commented out options.
--------------
Do I have this all wrong again?
Best wishes. Dave
Hi @inq,
Another quickie ... by my standards .. 😏
Googling tronxy shows them selling a distance sensor ..
https://www.tronxy3d.com/products/tronxy-blue-auto-leveling-sensor-for-x5sa-xy-2-pro-x5sa-pro
If you have one of these, and the limited info on the webpage is accurate, then I think it consists of a coil, which is the resonant part of an oscillator (like a pendulum in a clock, but electronic not mechanical resonance). Bringing the coil near to a material, especially an electrically conductive material, will cause the resonant frequency to change. The glass plate won't affect it much, so it is probably detecting the aluminium plate underneath.
--------
So far, I have managed to remove prints from my glass plate with the 'paint scraper' like tool, sometimes combined with a small block of wood as a mallet. With PLA, this is usually fine, and doesn't appear to harm the 'speckled' glass top. My few attempts with PET-G were a bit more stubborn, and I used a glue stick to reduce how firmly it stuck. This needs a little refining!
Maybe, you could clip a flexible sheet on top of your glass? Obviously, a magnetic one is not going to be attracted to glass or aluminium?
---------
I am dubious as to whether the levelling software is actually working, at least as intended. Whilst your 'errors' are larger than the ones I have seen, unless there are some kind of 'reasonableness' checks, I can't see why it can't cope with a mm or more.
I did spend some time playing with the Marlin options in this area, as there is more than one strategy to choose from, etc. The one I have seems to be working, but may still not be the 'optimal'. As my z sensor is some XY distance from the nozzle, there are some parts of the bed that can't be probed.
There are different options to minimise this 'blind spot' problem.
My interpretation of the (limited) documentation, is that one option gets as many samples as it can, and then uses extrapolation and interpolation to guess what the rest of the bed looks like ... this is the one I am using.
The other assumes the bed is very consistent, and that you have gone to some trouble to give it a 100% coverage of height values, so it doesn't need to extrapolate.
As I am lazy, and I know the Ender 3 has its stability limits, I let it measure the bed at the start of each print, and guess what it can't see. I have never used every mm of the bed, so small errors at the edges would go unnoticed, but so far it seems to work. I wonder if there is 'wrong' option problem on yours?
-------
My Ender 3 Neo doesn't have a z limit switch either .. it relies on the CRTouch (Creality's spin on BLTouch), which is a physical touch sensor. It is only active during a homing/distance sensing command, so in theory, it too can drive the nozzle into the bed. However, the Marlin software rejects 'normal' commands with negative Z values, so providing the printer has been 'homed' since the z motor was last powered on, it should be 'difficult' to drive it into the bed.
Admittedly, this is not foolproof. Pausing a print can power down the z motor, and on resumption, it is possible if the z position has been manually changed. Luckily, it seems to have survived this mishap, but I do have a print with a v shaped hole in the top!
------
Best wishes, Dave
I haven't looked at the details, so I am presently assuming that this is a 'similar story' to my little Ender, do doesn't the Marlin software completely replace the mainboard software?
Yes, it is literally a C program loaded on an MPU just like us doing on an Arduino or ESP32. Most motherboards were 8 bit Arduino Mega compatibles until version 2.0 of Marlin that also allowed 32 bit CPU's like Arm in the case of this TronXY. So if I load TronXY's Marlin binary that they have already compiled, it'll replace their proprietary one. They also have Klipper.
https://github.com/MarlinFirmware/Marlin
In other words, the 'complete set' to reprogram your board is only an Internet connection away...
Yes, as a last resort. I'm hoping that their version will just self install as they said it should. And if those max should be updatable using GCODE.
There are several other things I'd like to do and it might require me to get the source code and modify it.
I had the impression it was the whole software package, at least from the point of view of driving stepper motor controllers, etc., so that in theory, you have the whole source code on your PC, once you downloaded from GitHub.
Yes, it is the entire code and it it works on all kinds of printers... bed slingers, Core-XY, Core-XZ, Deltas, string printers, and with tons of different drivers, sensors, even driving chamber heaters. Highly configurable.
And, in case I do have this wrong as well, why would the Marlin config files have stuff that the board can't handle? Those #defines do not look like commented out options.
Maybe I'm not getting your question, but it is because of the above... a lot of things get commented out or uses different values that are based on the processor of the board 8/32 bit, many other things, drivers A4988, TMC2209, etc. How many drivers and steppers. Even how many on an axis... Ender 3 has only 1 Z-stepper. Others have two like my Prusa or this TronXY. Some Voron's have 4 Z steppers. The geometry to handle a Core-XY is totally different than a Cartesian design is totally different from a Delta design.
If I'm not catching your nuance, try again? 😊
VBR,
Inq
3 lines of code = InqPortal = Complete IoT, App, Web Server w/ GUI Admin Client, WiFi Manager, Drag & Drop File Manager, OTA, Performance Metrics, Web Socket Comms, Easy App API, All running on ESP8266...
Even usable on ESP-01S - Quickest Start Guide
If you have one of these, and the limited info on the webpage is accurate, then I think it consists of a coil...
Mine is black and they make a distinction on their website that it works differently, but don't say how.
There are different options to minimise this 'blind spot' problem.
As I mentioned, the TronXY doesn't seem to use the auto leveling at print time. The Prusa does and I can see the small rotations (less than 5 degrees of the Z axis as a line is drawn across the bed. In the Prusa, they use a bi-parabolic curve fit to the data points so when the head is actually outside the probed area, there is a fairly accurate prediction of where the plate is supposedly. It is assuming that the plate may have an arc, but unlikely an S-curve, so this predictor should be pretty good.
then uses extrapolation and interpolation
If you are looking at the code, can you tell if it is linear or parabolic? Even if it is only linear, I'd say that still better than what I'm dealing with the TronXY... which is nothing! I also want to say that the new Creality K1 and Bambu Lab X1 are using almost continuous scanning. I want to say one of them quoted 25000 points are measured. Obviously, they're scanning as it passes over versus having to "feel" at each point.
3 lines of code = InqPortal = Complete IoT, App, Web Server w/ GUI Admin Client, WiFi Manager, Drag & Drop File Manager, OTA, Performance Metrics, Web Socket Comms, Easy App API, All running on ESP8266...
Even usable on ESP-01S - Quickest Start Guide
Hmmm, their technical support has been better than I'd expect. The second response pointed me to their repository of the Marlin, but did say...
https://github.com/tronxy3d&source=gmail&ust=1693021441631000&usg=AOvVaw1VuCu-lG4m3xYG1C0pANy E"> https://github.com/tronxy3d
3 lines of code = InqPortal = Complete IoT, App, Web Server w/ GUI Admin Client, WiFi Manager, Drag & Drop File Manager, OTA, Performance Metrics, Web Socket Comms, Easy App API, All running on ESP8266...
Even usable on ESP-01S - Quickest Start Guide
@inq @will @davee Thanks, guys; now I know what I will do. There is NO way in Hades I will buy one of these. That is way too much for my ADD brain to deal with. Now I can also give up on trying to learn a CAD-type program or any PCB software since it has been impossible for me to learn so far. I understand you may not want to hear that but some things I am very good at and others I am hopeless. Now I can stop beating myself up, thanks.
First computer 1959. Retired from my own computer company 2004.
Hardware - Expert in 1401, and 360, fairly knowledge in PC plus numerous MPU's and MCU's
Major Languages - Machine language, 360 Macro Assembler, Intel Assembler, PL/I and PL1, Pascal, Basic, C plus numerous job control and scripting languages.
My personal scorecard is now 1 PC hardware fix (circa 1982), 1 open source fix (at age 82), and 2 zero day bugs in a major OS.
Spoilsport !
Anything seems possible when you don't know what you're talking about.
Hi @inq,
Sorry if I have stirred up a hornet's nest of issues, with only a small, broken fly swat to deal with them.
Obviously, I understand if, at any time, you wish to back off from something that is confusing, and could get messy, complicated, and in worst case even break something ... but for now I'll try to continue.
My overall view is something like:
All of these printers are built from roughly the same types of bits .. of course there are lots of tweaky bits, like different heatbreaks, extruders and height sensors that work a little better or worse than someone elses, but providing it has a solid rigid frame, with bearings, etc to allow the moving bits to move in the way they should, etc., then hopefully you should be able to get your $300 investment to perform, pretty much as good as any other, built to similar standards. Of course, this might be a naive view, and I am not excluding the possibility of trading in any parts that prove to be below par, but I think if I had spent $300, I might be willing to give it a go.
Unfortunately, that does run the risk of breaking something on the way, but if it is as disappointing as you suggest, this doesn't seem to be much of a loss.
Does that make sense?
Of course, I also understand you have other projects ....
And sorry, but all I have to offer in hands-on experience is from my little Ender, which seems to be keeping pretty close to 'standard' Marlin, etc. ... so when TronXY have diverged in some way, it is likely to catch me out.
---------------------------------
Regarding your comments on z levelling.
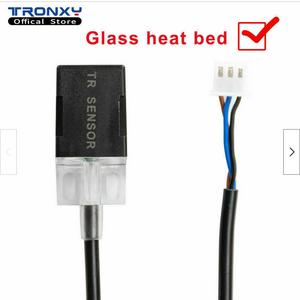
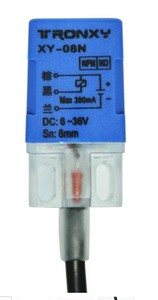
Sorry, I now see there are two types of sensor .. and from what you say, you have the one looking for an 'opaque' surface ... well I presume this is some kind of optical reflection trick, though the most opaque part of it maybe the description of how it works. Regardless of this, my guess is that all the magic is inside the the little box, and so far as the motherboard is concerned, it might as well be a microswitch, as I guess it will be plugged into a simple microswith style port on the motherboard.
The left hand picture is resumably similar to what you have, showing a 3-wire interface. The right hand picture is the older type, which includes a 'circuit diagram' with two of the wires being 6V-36V power and ground return, the third being a switched version of incoming power .. say 0V when it far from the bed, and same as input when it can sense the bed. (or maybe be vice versa). My guess is that the newer sensor will have the same interface for compatibility .. A microswitch would be exactly the same from an electrical and wiring viewpoint.
ie instead of being a better mousetrap, it is trying to be a better microswitch.
Note most, if not all, of these sensors aim to get a map of the bed before starting a print .. once a print starts, they are redundant .. the printer software relies on 'dead reckoning' of printer (micro)steps to keep the nozzle in the right place ... if this fails ... e.g. the motor is depowered for a period, during which the motor position is changed by gravity, etc., then there is nothing to stop the nozzle being driven into the bed or top gantry after power is restored.
My guess is, this is true for many 3D printers .. perhaps you would consider adding microswitches as a 'last resort' limit switches, bearing in mind the power of the motors is probably a lot more than with a small Ender (say).
--------------------------------------------------------------------------------------
I was going to continue, but I think I'll end this mini-sermon here, and start a new one, looking at firmware options, etc.
Best wishes, Dave
There is NO way in Hades I will buy one of these.
Ron, I'm sorry to hear that. Things go pretty easy these days on the learning curve. Speed bumps are minor and you have lot's of peanut-gallery support. Don't let my dealings with the TronXY sway you... the Prusa has been solid. Did you view this video? He is well spoken, but non-technical. At one point he confesses not understanding how extruder motor placement helps - Anyone that can grasp that it's easier to pull a string than push a string understands this concept. The fact that he is wanting to use TPU material... it is hands down the most difficult material to work with. You'll be using PLA and its tons easier.
The printer @davee found at $200US is newer and has every feature (to make it easy) you could hope to start with. I have it bookmarked to buy at the drop of a hat if my Prusa even looks at me funny.
https://www.creality.com/products/creality-ender-3-v3-se
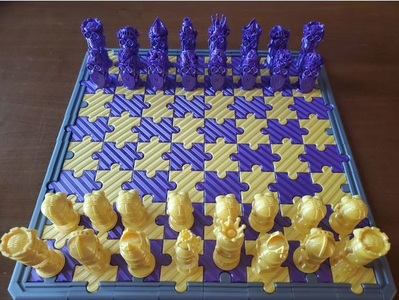
To start with, you have a free library of almost anything you could possibly want to print. Just do a simple search for anything you have in mind. They have from Minion character chess sets to Greek sculpture Winged Victory.
For instance, I needed a 18650 battery box and didn't want to CAD my own...
https://www.thingiverse.com/search?q=18650+battery+box&page=1&type=things&sort=relevant
3 lines of code = InqPortal = Complete IoT, App, Web Server w/ GUI Admin Client, WiFi Manager, Drag & Drop File Manager, OTA, Performance Metrics, Web Socket Comms, Easy App API, All running on ESP8266...
Even usable on ESP-01S - Quickest Start Guide
then hopefully you should be able to get your $300 investment to perform, pretty much as good as any other, built to similar standards.
I totally agree. When I looked at the spec sheet, I saw it has every part (like you said... or equiv) that my Prusa has. I TOTALLY think what is holding back this printer is software. I know I can fix even that, but I don't know if I find it is worth my effort. The secondary reason I got this printer, is I wanted to build and totally Grok a CoreXY design. To make a 1x1x1 meter or even bigger, just substitute longer pieces of the cube (and yes make it as rigid) and longer belts. It could even use the same mechanicals off this printer. NOTHING else need change except bumping up the size of software dimensions!
Unfortunately, that does run the risk of breaking something on the way, but if it is as disappointing as you suggest, this doesn't seem to be much of a loss.
Does that make sense?
Oh hail! It has already fulfilled its secondary role... it becomes part of Inqster the 5th.
My guess is, this is true for many 3D printers .. perhaps you would consider adding microswitches as a 'last resort' limit switches, bearing in mind the power of the motors is probably a lot more than with a small Ender (say).
Actually, my old Prusa (they used to be the point of the spear) charted the way forward with TMC stepper drivers. They sense the current going up when the head hits something and fulfil that duty. My Prusa has no stop switches. It does have the magnetic distance sensor, but only for software bed leveling interp/extrap.
3 lines of code = InqPortal = Complete IoT, App, Web Server w/ GUI Admin Client, WiFi Manager, Drag & Drop File Manager, OTA, Performance Metrics, Web Socket Comms, Easy App API, All running on ESP8266...
Even usable on ESP-01S - Quickest Start Guide
@inq I am in a more optimistic mood today. SO
I will need some 18650 battery boxes (and other stuff), and $200 USD is no big deal. HOWEVER, is all the chatter I have seen around alignment, calibration, and just getting the piece off the ?plate? stuff from the past, or is that still a concern with the $200 printer? The place I am thinking of placing the printer is a little bit shaky, it's one of those resin 5 high shelf units sold everywhere. Do you think that may be a problem? I could weigh the shelf down with a couple of bags of rice (10lb?) or similar.
The CAD issue appears solved with the thingaverse for printing, but it does nada to help with the PCB stuff. I may make that a separate issue now that I can eliminate CAD as a prerequisite for 3D printing. Is there a tool to go from a schematic to a Gerber file?
Mind you, I still have an organizational issue, but I may have a solution. Regarding fumes and smell, all I need is one of those apartment vertical window AC vent adapters, a sheet of acrylic, solvent glue, a sharp knife, a dryer vent hose and clamps, and a computer fan.
Not right away, but soon I may be able to join the 3D printer club after all. Damn you, Dennis! 😀
First computer 1959. Retired from my own computer company 2004.
Hardware - Expert in 1401, and 360, fairly knowledge in PC plus numerous MPU's and MCU's
Major Languages - Machine language, 360 Macro Assembler, Intel Assembler, PL/I and PL1, Pascal, Basic, C plus numerous job control and scripting languages.
My personal scorecard is now 1 PC hardware fix (circa 1982), 1 open source fix (at age 82), and 2 zero day bugs in a major OS.
@inq Are the 'things' on Thingaverse editable? I am considering taking something very close to what I need and modifying it a bit to suit me. Are some, any, or all of them parametric?
Regarding the more difficult materials and /or super smelly, is it possible to build one here in PLA and then ship the 'files' to China for them to print using the 'other' feedstock?
I suspect there are small but important differences in the data to create the object that I do not know now. In other words, if I get a successful print using PLA and want to get them to print in ABS or some other material, do I need to change the data somehow?
First computer 1959. Retired from my own computer company 2004.
Hardware - Expert in 1401, and 360, fairly knowledge in PC plus numerous MPU's and MCU's
Major Languages - Machine language, 360 Macro Assembler, Intel Assembler, PL/I and PL1, Pascal, Basic, C plus numerous job control and scripting languages.
My personal scorecard is now 1 PC hardware fix (circa 1982), 1 open source fix (at age 82), and 2 zero day bugs in a major OS.

