wow... that is a really cool story... I can hear OSHA cringing now... lol
thank you for sharing!
Are we having fun yet?
Yes I confirm having fun :
19:47:37.702 -> Lets' simulate young @codecage...
19:47:37.735 -> WAIT_FOR_START + buttonState changed
19:47:42.675 -> WAIT_FOR_START + buttonState changed
19:47:42.743 -> WAIT_FOR_START + button has been pressed
19:47:42.777 -> =>setPins entered
19:47:42.777 -> setterDown
19:47:42.811 -> sweeperDown
19:47:48.755 -> releasePins
19:47:52.758 -> setterUp
19:47:52.758 -> sweeperUp
19:47:58.763 -> <=setPins exited
19:47:58.763 -> going to state : WAIT_FOR_BALL1
19:48:13.177 -> WAIT_FOR_BALL1 + IRBeam has been triggered
19:48:13.245 -> =>cyclePins entered
19:48:13.245 -> sweeperDown
19:48:18.193 -> setterDown
19:48:24.191 -> grabPins
19:48:28.196 -> setterUp
19:48:34.189 -> sweeperBack
19:48:41.208 -> sweeperFront
19:48:48.211 -> setterDown
19:48:54.212 -> releasePins
19:48:58.212 -> setterUp
19:49:04.219 -> sweeperUp
19:49:10.211 -> <=cyclePins exited
19:49:10.211 -> going to state : WAIT_FOR_BALL2
19:49:13.696 -> WAIT_FOR_BALL2 + IRBeam has been triggered
19:49:13.730 -> =>sweepPins entered
19:49:13.764 -> sweeperDown
19:49:18.708 -> sweeperBack
19:49:25.704 -> sweeperFront
19:49:32.694 -> sweeperUp
19:49:36.694 -> grabPins
19:49:36.728 -> <=sweepPins exited
19:49:36.728 -> going to state : WAIT_FOR_START
19:49:36.762 -> WAIT_FOR_START + buttonState changed
19:49:44.182 -> WAIT_FOR_START + buttonState changed
19:49:44.216 -> WAIT_FOR_START + button has been pressed
19:49:44.284 -> =>setPins entered
19:49:44.284 -> setterDown
19:49:44.318 -> sweeperDown
19:49:50.249 -> releasePins
19:49:54.250 -> setterUp
19:49:54.250 -> sweeperUp
19:50:00.241 -> <=setPins exited
19:50:00.275 -> going to state : WAIT_FOR_BALL1
19:50:24.699 -> Simulation cooldown...let's give young @codecage some time to rest...
19:50:34.694 -> Simulation cooldown...let's give young @codecage some time to rest...
19:50:44.703 -> Simulation cooldown...let's give young @codecage some time to rest...
So I took the FSM script from @dundervetter 's post here and added a #define'd symbol to activate "young @codecage simulation mode", replacing every "physical" input/output with simulated values/printed lines on the Serial Monitor.
This is what it looks like (attached script). I guess we'll definitely have to work on timings in the future...
Eric
@dundervetter by the way I had to comment out the delay() in checkIRBeam() because otherwise there was no chance to catch the IR beam detection, even with an unrealisitically long duration of 0.5s
I have to go away now, see you all later...
Eric
I will take a look at this then tonight thank you for your time!
So I took the FSM script from @dundervetter 's post here and added a #define'd symbol to activate "young @codecage simulation mode", replacing every "physical" input/output with simulated values/printed lines on the Serial Monitor.
This is what it looks like (attached script). I guess we'll definitely have to work on timings in the future...
Ok... so @zeferby I got a chance to run the code I posted before you you did the serial test. So it runs, however... it appears that some of the microseconds might differ from the hj controllers to arduino/PCA9685
living and learning... falling on my sword and all of that good stuff...
what is weird though, is when I try to update the microsecond values and resent the code to the arduino, I almost see not change in the servo position at all. at the moment it seems to be particularly pertaining to Servo A with is the sweeper up and sweeper down motion...
I am going to try make a sketch that I will send microseconds to the servo an see where it ends up one by one.
Let ask something while I go and try this... there isn't a way to say set the servo to a particular position via the HJ controller then unplug it from the HJ...and then have some code running on the arduino also using the PCA9685 to be able to read and tell me what it is reading the set position as. I have tried this afternoon to google that and have not come up with a way to do it... that would be too easy!!!
so I that's why I figure at the moment I would just sent microseconds to one by one to find out where the microseconds value should be.
but I just wanted to give an update and say I am trying things... lol
I know this is pretty late here on the east coast... I don't expect any one to respond tonight...
I just want to update things... I know I am slow at this but I think I am getting there...
so I was able to figure out all of my values so they work with the PCA9685... seems that the microseconds may be of 100ish microseconds some less some more... I know that in the Adafruit Library they do reference that this method of microseconds is not exactly accurate... in hindsight using those sensors just might have been the better way to go but I am still thinking that this will be good enough.
I will do some more work with this tomorrow and report back to update how things are progressing.
I am thinking that I might like try to put in another button to reset things if there would be "god forbid" an issue. Correct me if I am wrong I would create some sort or "reset state" as a case in the code and then create the void reset action. If this is correct I will try to go ahead and write and set that up on the breadboard.
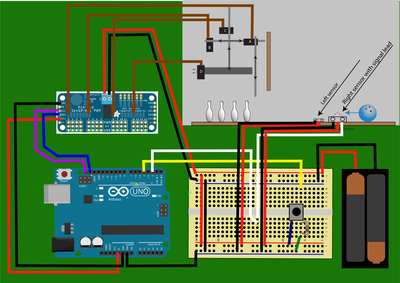
Lastly for now I am going to attach the image I created in adobe illustrator to illustrate how I have things wired as of right now. I know it is not a perfect drawing but I think it will do for now.
I don't have anything to offer, other than to say that it's a pretty nice drawing you made. It's nice to see someone putting so much detail into their project. ?
DroneBot Workshop Robotics Engineer
James
Thank you.. I am a High school tech ed teacher and I teach digital design... the drawing and building that is much more natural to me! Hey... I am enjoying this learning process!
You have done so much for me putting me in touch with all of these wonderful minds! They might be as happy as I am... LOL
I can never thank you enough!
thank you!
talk soon!
Looks like you will have it all working pretty soon 🙂
A pin loader would have completed the job. I thought about it but can't think of a simple way of doing it.
It is possible to use the internal pull up resistor when using a button.
int button = 8;
// set the internal pull up resistor, unpressed button is HIGH
pinMode(button, INPUT_PULLUP);
Hello @dundervetter,
I've been reading your posts above, including this nice picture, and first I'm wondering about the power supply aspect (I suppose the Arduino has either the USB connector or barrel jack supplying its power) :
- I see a common GND between the logic side (Arduino, I2C bus) and the servos power supply, which is OK
- I see the IR beam sensor and the push button using the servos power supply and feeding their "output" into Arduino pins, which I think is not OK ? : if you give 6V DC power to your servos, you could end up sending too high levels to some Arduino pins, so feeding power to those Arduino-connected thingies from the logic/Arduino side may be better
- If you run into current draw issues, you may want to add a capacitor on the servos power
Here is the Adafruit PDF for the PCA9685 where the "Hooking it up" chapter is worth reading :
About the PCA9685 Adafruit library, microseconds accuracy, etc :
- I would stay with a PWM frequency of 50Hz (instead of 60Hz) for analog servos (from some servo discussions I read on the Net), which gives the standard 20ms period
- The PCA manages PWM cycles on a 4096 steps basis (12 bit) and always ends up using void setPWM(uint8_t num, uint16_t on, uint16_t off) behind the scenes. The void writeMicroseconds(uint8_t num, uint16_t Microseconds) function is documented as "not precise" (it relies on a calculation to find the pulse width to feed into setPWM in [0-4095] steps)
Eric
Very nice drawing!
But I have to agree with @zeferby about the power. The power for the servo motor should be separated from the power that runs the Arduino. And also the frequency for the servos should be 50Hz instead of 60Hz as @zeferby stated.
You might also want to look into a tool called 'Fritzing' that can be used to make diagrams/schematics of Arduino projects. This tool used to be free, but I just noticed that they want you to pay about $9.00 US in order to download the latest version. It appears you can still download older versions for free.
SteveG
You have done so much for me putting me in touch with all of these wonderful minds!
Professor Billy DroneBot @dronebot-workshop is the person to thank for that.

Without him we would have no way of knowing that each other exists other than via the YouTube comments under his videos. But that's nowhere near as nice as having this forum.
So yes, BIG THANKS to Professor Billy DroneBot
He's the one who constructed this wonderful playground for us. ? ? ❤️ ? ? ?
DroneBot Workshop Robotics Engineer
James
By the way, you too can become a DroneBot Workshop Robotics Engineer if you aren't one already. Just click on the link and contribute to the playground. ?
DroneBot Workshop Robotics Engineer
James
So yes, BIG THANKS to Professor Billy DroneBot
He's the one who constructed this wonderful playground for us. ? ? ❤️ ? ? ?
VERY TRUE as well!
But I have to agree with @zeferby about the power.
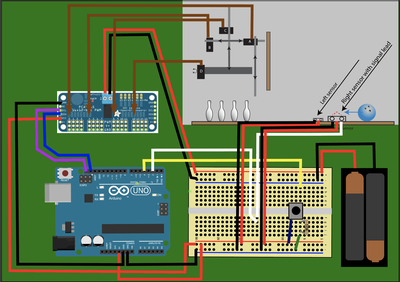
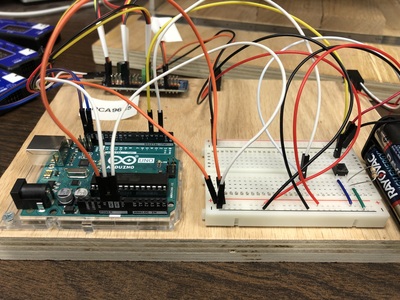
ok so I change the wiring... but now I get a complete shutdown of the arduino when I press the button...
what have I done... I don think this is that difficult so I feel really stupid...
new drawing:
Error:
Physical image:
sorry for all of the images!


