Hello,
Hoping there is someone out there who would be able to help me with some Arduino coding, I want to build an elevator that will go up and down similar to a lift in a building that will stop at different positions as it goes up and down. The critical part is stopping at different floors as it were because I am modelling in n scale so positioning needs to be adjustable and very precise. I am planning on using a stepper motor and some linear guides to build the unit, and I have watched Paul McWhorter's guide on using stepper motors so I think I know how to control the speed and direction but I dont know how to code the stepper motor if I wanted to stop it at different heights as it goes up and down. My initial idea is to build a 4 lane elevator over 8 or 9 levels that will be able to be called up to go from whatever floor I choose to whatever floor is chosen at random, I would eventually like to incorporate it into the train control software I am using so I can control it from there. I hope what I have written makes sense, if there is anyone out there who can spare me some time I would really appreciate it. I am quite sure what I want to build is achievable and I'm fine with the mechanical side of it its the electronics I need help with.
Best Regards
Phil
I presume you are talking about a model train elevator?
https://www.trains.com/mrr/news-reviews/news/video-watch-the-train-elevator-in-action/
@robotbuilder yes that is a similar idea to what I have in my mind, except I will be using mine as a storage area for all my locos and carriages so I can call them up from one level to another, and utilise the area inbetween the upper and lower level to have additional storage.
Cheers Phil
I have watched Paul McWhorter's guide on using stepper motors so I think I know how to control the speed and direction but I dont know how to code the stepper motor if I wanted to stop it at different heights as it goes up and down.
It sounds like your pretty much there. Here is our forum's best guide. Bill shows multiple ways of controlling them. My preferred way is using an A4988 (small and cheap). Here is Bill's video at the part describing the A4988 -
There are many libraries, or you can simply drive it directly by just setting the pin digitalWrite function. By telling it to go "n" number of steps should do exactly what you need. Bill's video shows how to do this latter version. IMO, it would be easiest to avoid the libraries and do it directly like Bill. You'll have to determine the number of steps at each "floor", but once done it should be the same from then-on.
If you already have the electronic parts, it'd be a good idea to assemble them and the software and start playing with moving the stepper motor before building the elevator. If you run into issues, post a picture of your setup, part descriptions and software and we can help you out.
VBR,
Inq
3 lines of code = InqPortal = Complete IoT, App, Web Server w/ GUI Admin Client, WiFi Manager, Drag & Drop File Manager, OTA, Performance Metrics, Web Socket Comms, Easy App API, All running on ESP8266...
Even usable on ESP-01S - Quickest Start Guide
@inq thank you for the link, I had already seen Bill's videos on stepper motors and controllers and they were what started this project with me. What I am unsure about is the actual coding for the stopping positions for each level going up and down, for example if you wanted level five and it was at say level nine or level two and so on. This is the part I am unsure about?
Cheers Phil
@thephilnewman, The C++ logic is quite simple and when you get to the point of having the stepper motor running with Bill's code, I'd be glad to help out and many others can also just as easily. Just post your setup and code and I'll chime back in.
However, I'm wondering if you're going to be able to do it simply with a stepper motor position. If I recall correctly, N scale is really small and thus alignment of the tracks will be exceptionally critical. We can easily position the elevator with a stepper motor that critically. A back of the napkin calculation using say 1/8" threaded rod...
https://www.lowes.com/pd/Hillman-Steel-Threaded-Rod/50015972
...
1/ (32 threads/inch) / (200 steps/rev) / (16 micro steps/step) = 0.00001"
BUT... you're elevator fabrication would have to be extremely stiff. If you cantilever your elevator, just the weight of the locomotive being off/on the elevator might deflect it enough to jump the track. At least that is what I can visualize.
3 lines of code = InqPortal = Complete IoT, App, Web Server w/ GUI Admin Client, WiFi Manager, Drag & Drop File Manager, OTA, Performance Metrics, Web Socket Comms, Easy App API, All running on ESP8266...
Even usable on ESP-01S - Quickest Start Guide
Hi @thephilnewman,
You have already received some great advice from real experts above, so this is just a supplementary comment.
Stepper motors are great for being repeatable .. providing they are not mechanically overloaded or stepped quicker than they physically manage, they do what you tell them, and as @Inq says with appropriate threads etc. can be very precise.
The small Achilles heel can be determining where the motor/thread is when the system is first switched on. e.g. if it was 4 level lift, which floor is at?
A common trick is to fit a limit switch at one end of the motion of the lift .. e.g. a switch which closes when it reaches level '0'. Then, at power up, if the switch is open, gradually step move it downwards until the switch closes. Microswitches are cheap and readily available, but the same function can also be achieved by breaking a light beam, triggering a Hall effect sensor, etc. if you prefer. Obviously the accuracy of your system's positioning will depend upon the accuracy and repeatability of the switch/sensor system.
Having a read about how the commonly available 3D filament printers work could be informative, as they are essentially solving the same problems.
Best wishes and good luck with your project, Dave.
A stepper motor has to be physically zeroed by a sensor at some point before counting up or down. Should it jam you are in big trouble as the pulses will not be moving the motor and it will not know where it is.
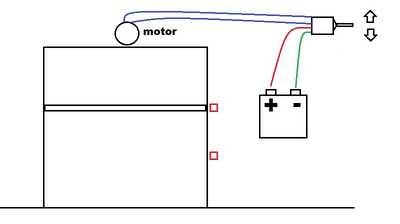
Personally I would have gone with ordinary motors which are easy to control and appear to be used by most other model train elevators I see on the internet. I would rely on reed switches or some other electronic sensor to stop the elevator at each level. You can control it manually with a double pole double throw self centering rocker switch to reverse the motor direction until you get it working properly.
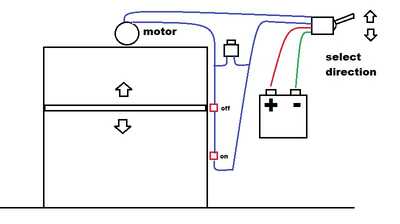
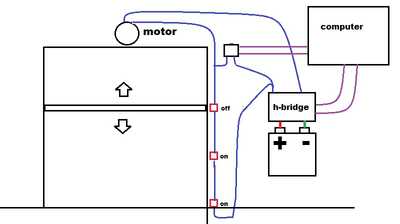
To enlarge an image right click image and select Open link in new window.
A possible solution might be for the elevator platform to turn the reed switch OFF and have all the reed switches connected in series. This means when the platform reaches a level (a reed switch) the motor will stop. The reed switches can be bypassed by a push button which can get the motor going again. In this case the toggle switch is not self centering it simply is set to determine the direction the motor is to turn.
Once you get it working properly you can think about replacing the push button and toggle switch with software control. I would imagine the whole train set activity would be controlled by a computer program.
Not sure if I have wired this properly as it is all imagined not something I have tested.
Generally ...
- to address Inq's point about accuracy and bending, if you do use threaded rod (of some kind) you'll get the benefit of a very accurate system. The downside is that you may need to spend more time refining the locations.
- note that threaded rods will be slower than a belt or gear-driven system
- if you do decide to use threaded rods, maybe lock a GT2 pulley on the bottom end of each and drive them from a common GT2 belt (allowing a single stepper to operate the lift and allowing both ends to be slightly different heights to allow for uneven tracks.
To address your request for help on the Arduino code ...
You'll find it easier to write a small sketch to operate the lift in 'test' mode. You'll only need 2 buttons (one for up and one for down where each moves the lift continuously while pressed). You'll also need to display the current stepper step count on the screen or somewhere.
When you start the test sketch, first home the lift (i.e. move it to the bottom until your stepper/sensor indicates that it's as far down as it can get. Set that position to zero.
Then, press the up and down buttons until the track is positioned so that the tracks on the elevator and container level match as smoothly as possible. Write down the level number and the step count showing.
Continue the previous step for all storage levels.
Once you have that list of level numbers and corresponding step counts, you're finished with the test script (until you add more storage levels or move them around 🙂
Now you can update your code in the main sketch to access the lift. You'll need to add an array of long values and populate it with the list of step counts that you got from the test sketch. You'll need to add code to home the stepper when you start up (as mentioned above). You may need to add a variable and some code to maintain the current stepper step count (unless you use a library like AccelStepper which will do that for you).
When you want to move the lift to a specified level, you just need to get the step count for that level (from the array you created). Then subtract the current step count from the desired step count and move that many steps (negative steps means move DOWN, positive steps means move UP).
Anything seems possible when you don't know what you're talking about.
- note that threaded rods will be slower than a belt or gear-driven system
That will depend on the pitch of the thread. In motorized chair of desk lifters they can be fast and the thread is designed for constant use.
That will depend on the pitch of the thread. In motorized chair of desk lifters they can be fast and the thread is designed for constant use.
Yes, but I was following up Inq's posting. Personally I'd just head down to the hardware store and buy a couple of 1 metre threaded rods and a few washers and nuts to lock on the pulleys at the bottom. For just a few bucks (or probably euros 🙂 you get enough height to store lots of goodies.
But you pay for it in time spent watching the the lift move at glacial speeds. Get the coarsest threaded rod you can find !
Anything seems possible when you don't know what you're talking about.
@thephilnewman I once designed an elevator computer for commercial use for a friend of mine who had an elevator maintenance business and wanted to branch out to build them. For human use, 80% or more of the circuitry and code is to do with safety. Yours will need a bit of that but very little. Regarding stopping precisely at a floor, the normal mechanism is a common micro switch but of industrial quality, i.e. sealed from moisture and other contaminants. Sometimes light interruption circuits are employed but always backed up with a switch. Typically 3 sets of switches control a floor. The first causes the drive motor to slow to 1/2 speed, the second to 1/4 speed, and the last applies the brakes and stops the motor.
Using a threaded rod, use a brass bushing to ride the rod, and fasten the carriage to the brass bushings using a small lever. This is to allow for very small differences in the rod's threads.
Good luck, love N scale!
First computer 1959. Retired from my own computer company 2004.
Hardware - Expert in 1401, and 360, fairly knowledge in PC plus numerous MPU's and MCU's
Major Languages - Machine language, 360 Macro Assembler, Intel Assembler, PL/I and PL1, Pascal, Basic, C plus numerous job control and scripting languages.
Sure you can learn to be a programmer, it will take the same amount of time for me to learn to be a Doctor.
That will depend on the pitch of the thread. In motorized chair of desk lifters they can be fast and the thread is designed for constant use.
Yes, but I was following up Inq's posting. Personally I'd just head down to the hardware store and buy a couple of 1 metre threaded rods and a few washers and nuts to lock on the pulleys at the bottom. For just a few bucks (or probably euros 🙂 you get enough height to store lots of goodies.
But you pay for it in time spent watching the the lift move at glacial speeds. Get the coarsest threaded rod you can find !
Hmmm... I didn't calculate speed. I was being a cheap-skate. I wouldn't want to buy the fancy 3D Printer threaded rod. Just got a number off the Internet... NEMA 17 can do about 3000 rpm.
(3000 rpm) / (60 sec/min) / (32 threads/inch) = 1.6 inches / sec (4 cm/sec) How fast you want to go?
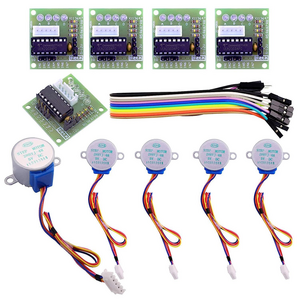
Then again... I'd be a cheap-skate and use something like these things for $14 bucks for 5 sets with drivers.
... but they are geared and as slow as mud. You'd probably want to go to using the belt idea instead of the threaded rod.
@robotbuilder, I like the idea of it being self calibrating. I hadn't quite considered how much dinking around it'd take to find the number of steps for 36 stops. But, as far as using regular motors, there'd be the issue of
- getting geared ones to be able to lift the elevator and train car(s)
- getting drivers (LM-298 ???)
- @thephilnewman said 4 elevators with 9 floors... getting, wiring and programming of monitoring 36 reed switches would likely be far more coding and require an Arduino Mega.
- Also, if any significant speed is desired, you can't just stop the motor the moment it hits the reed-switch. It'd probably throw the car off.
- Then will the motor hold still under load after stopping. The stepper will do that without any coding.
3 lines of code = InqPortal = Complete IoT, App, Web Server w/ GUI Admin Client, WiFi Manager, Drag & Drop File Manager, OTA, Performance Metrics, Web Socket Comms, Easy App API, All running on ESP8266...
Even usable on ESP-01S - Quickest Start Guide
Hi @will @thephilnewman ,
I have never built a train lift, so this whole message may have some really bad ideas and comments, but I note the 3D printer market means there are lots of threaded rods and matching nuts on the AliExpress, etc. sites ... and it looks like you can get a range of pitches, which in principle are cut to be used for a positioning system, not to act as a fixing nut & bolt.
As an example try looking at:
Please note I am not recommending any product or supplier ... just suggesting something might be worth a look and leaving you to decide.
Of course, completely different suggestions, like a toothed belt system are also worth considering.
Bear in mind, that coarse threaded rods are reversible machines that can often be rotated by pushing down on the nut part, so there will be a limit to amount of weight that the lift can support when unpowered, if it is above the lowest level when the power is removed.
....
@robotbuilder is quite correct in saying that a mechanism may jam, but analysis of the consequences is a little more tricky. Whilst @robotbuilder has much more experience in relevant areas, I politely offer a few comments, which I hope will not cause any offence, but rather provide a a base for discussion.
---
Conventional brushed DC motors are the simplest and usually cheapest, but in the event of a stall, their current consumption usually greatly increases, with the result of magic smoke if the power is not removed in a very short time. Of course such protection circuits can be devised, but that implies a more complex system. Plus a stalled motor cannot usually fix the problem of the lift floor being in the wrong place.
------
Stepper motors controllers are normally set up to ensure the current is limited to a safe (for the motor) value, regardless of whether the rotor can move or not. Hence a stalled/jammed motor will not be able to move, but is much less likely to overheat. Furthermore, the controller can be designed to give a short 'high voltage/current' pulse when a new step is initiated, to start the rotor moving, and overcome some amount of natural 'stiction', without risking the motor overheating with a continued excessive current.
Personally, I think stepper motors are usually much better suited to tasks that do not involve continuous rotation. 'Traditionally', they do tend to 'cog' from one step to the next, which can be a disadvantage, but the better controllers can smooth out much of this effect by 'microstepping', and optionally tuning the acceleration and deceleration.
Although stepper motors are often used in 'open loop' fashion, in which the motion is 'assumed' to match the step commands, there is nothing (excepting cash, time, effort, etc.) to stop you adding sensing mechanisms to look for and possibly correct for any deficiencies.
Obviously, some controllers are much smarter than others, and not all of the above suggestions are available in all controllers, nor are they all required for all situations. I only mention them as suggestions to consider, not requirements or recommendations.
-----
I have concerns as to how practical @robotbuilder's reed switch suggestion is. Reed switches typically need a 'relatively' strong magnetic field to operate, but will stay in that 'operated' state until the magnetic field is reduced to a much lower value than needed to 'operate'.
Furthermore, in the case of the lift at an intermediate floor, the range of magnetic field is likely to extend to both above and below the floor level. Hence there could be two positions for each floor, depending on whether it was coming from the floor above or below.
I could (once again 🤨 🤨 ) be imagining a non existent problem, but I suspect these concerns will combine to make difficult to get a precise alignment position. I would recommend some simple experiments before committing to such mechanism, to show it is viable.
Best wishes, Dave


