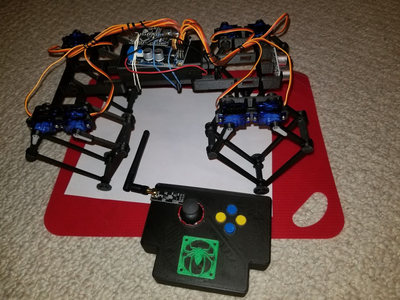
This looked like a simple enough project. The instructions were pretty simple, the stl's printed fine, it contained all the arduino code that I thought I needed, but, of course, it doesn't work for me
Here's what I built...
And here's the instructables page I followed...
https://www.instructables.com/id/GorillaBot-the-3D-Printed-Arduino-Autonomous-Sprin/
Admittedly, I didn't have the magnetometer in stock, so I didn't include it in the build, but, I figured that if I was just gonna use it for remote control, that I wouldn't need it
I guess it's possible that the script is written in such a way that if that part isn't found, that it just won't work, and my skills at programming aren't up to speed enough to notice if the thing is actually required
I know I should ratchet my programming skills up a couple of notches, but, this old dog just isn't up to learning that many new tricks
Here's a link to an Amazon arduino type magnotometer: https://www.amazon.com/gp/product/B01I1J0Z7Y/ref=ox_sc_saved_title_1?smid=A30QSGOJR8LMXA&psc=1
Maybe someone here can describe how this hooks up to a nano. (Why does nothing come with instructions anymore?)
This message was approved by Recycled.Roadkill. May it find you in good health and humor.
I ordered it. Maybe it will help
Then again, maybe I'm missing the actual code that goes into the bot, and I have TWO different scripts for the controller
Some magnetometers showed up today. They're not the ones you posted, and they're not EXACTLY the same as called for in the instructable. (instructable called for QMC5883L, what I got was HMC5883L, closest I could find that was in stock)
May have some time this weekend to play with it, or not. My new 3D printer showed up today, so I'll have to find some place to retire one of mine to so I can set up the new one, and I already opened the box, and it looks like it's gonna be a PROJECT putting it together
This one has instructions... in English... they're not very helpful, but, at least it has them
I'd almost forgotten how much fun this can be. Maybe in the mean time I'll poke around to see if there are any useful upgrades for it before I set about to building it
So the new printer was a fun project
I got the upgraded Anet A8 Plus for the extra size, and thought I was getting a deal for only $190USD
What I didn't realize was that what YOU guys paid the extra few bux for was to have it mostly assembled before they shipped it to you
Mine... wasn't
And the instruction manual wasn't that big a help, and this time the youtube video wasn't a big help either, but I finally got it put together, and not working, or rather, working backwards
It seems that the x and y motors weren't configured properly in the firmware, and they ran backwards, so the thing couldn't zero out, because the endstop switches were at the other end of the printer
Luckily, I had seen a video that Maker's Muse put out about the very same printer, and it seems that he had the exact same problem. His solution was to just whip out the soldering iron and reverse the wires rather than reprogramming the firmware, so that's what I ended up doing
It's working now, and printing the final bits of the Kauda arm (And printing quite nicely I might add... after a few minor tweaks that nobody thought to post online anyplace)
https://www.instructables.com/KAUDA-Robotic-Arm
(which I won't be able to finish cuz I can't find any 40mm OD pipe. All I can find is inches. I may go with sanding down some wooden dowels)
So while I was at work today, I was listening to Bill's video on the nerf (nrf24L01) radio thingy (which is what's inside the GorillaBot) and I thought, why not just go back to my basic rules of establishing basic functionality, and then adding complexity one step at a time ?
Now, of course, even if it DOES work, it won't, cuz the Gorilla is using servos instead of wheels, and walking has to be programmed, but, I should at least be able to check for basic communication using the steps that Bill laid out in his video
Shouldn't I ?
Does this make any sense ?
Cool bot I also had to brush up on my programming skills check out core electronics they have a decent Arduino tutorial 😁👍 it helped me learn some about maths and for loops and variables and such.
Yea, this is gonna require some combination of sequences for each of 8 servos for each step the bot takes
Would that be loops ? Possibly. I tried staring intently at the code, but the words failed to rearrange themselves into plain English, so I stopped before my eyes started bleeding
A new hobby might be in order
Quantum physics sounds pretty easy. All I need to do is cut a couple slots in a piece of paper and count a few photons, and maybe rename my cat


