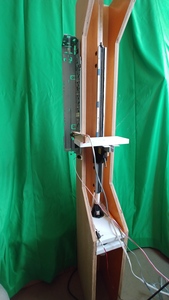
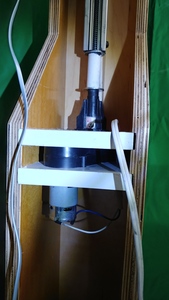
I am building a mechanism with control electronics to operate an elevator for the staging yards of my under-construction model railroad layout. This is a cobbled-together linear actuator made up of a section of acme screw driven garage door opener track. This is capable of about 22 inches of travel, but I only need 10 inches.
It is powered by a 12 volt DC motor and reduction gearbox scavenged from a child's Power Wheels car. Have you ever gone dumpster-diving in your neighbor's trash for your project parts? That's how I got the motor. 😉
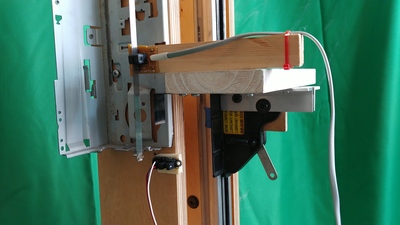
Precision positioning is done via a linear encoder riding along a 600 pulse/inch codestrip. I scavenged these parts from an obsolete computer printer. Yeah, I bet you've torn into some old printers too! BTW, you may also notice here a photo interrupter (endstop module) that is used for 'homing' the actuator at startup.
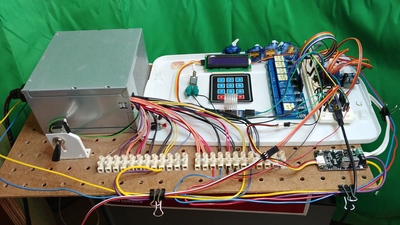
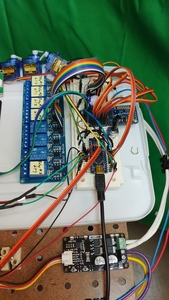
Here are the electronic goodies that operate the elevator mechanism. Yes, that's a computer power supply from an obsolete computer that supplies 12 volts for the actuator motor, 12 volts for the Arduino Nano, 5 volts to power the servos, and 5 volts for the various peripherals (I2C 16-channel servo driver, keypad and LCD display; shift register supplying an 8-relay module; a center detent potentiometer; and a RGB LED with resistors). Oh - and at the bottom right of the photo you see a Cytron MD13S motor driver that handles the elevator motor.
Here's a closeup of the crowded breadboard.
In my next post, I will detail the problems I am having with this monster. Now how do I post my sketch code? Let's see what this icon does...
Now that's an awesome project, and a great reuse of old materials!
Now how do I post my sketch code?
The "<>" ICON flips the editor between CODE and TEXT mode, you'll see the current mode indicated on the bottom left of the editor window ("P" for text, "PRE" for code).
You can also attach the ino files, but it's easier to talk about your sketch if we can see it in your post.
😎
Bill
"Never trust a computer you can’t throw out a window." — Steve Wozniak
Thanks, Bill. I was wondering why that 'P' was in the corner. 😀
With my project I am having trouble getting the the actuator to stop precisely at the target position. I have watched numerous tutorials on using encoders, and the mysterious world if 'interrupts' still has me confused. But I'm a big fan of the Arduino libraries because they help simplify complex processes for the simple-minded like me. In this case, the <Encoder.h> library has come to my rescue. This library has enabled me to successfully utilize my linear encoder with minimal code in my sketch:
// A Sketch to test the hardware (HEDS-9700 quadrature optical encoder riding on 600 pulse per inch codestrip) and the software (<Encoder.h> library)
// Works OK
#include <Encoder.h> // Loads the encoder library
// Best Performance: both pins have interrupt capability
// Good Performance: only the first pin has interrupt capability
// Low Performance: neither pin has interrupt capability
Encoder myEnc(2, 3); // Makes an Encoder library object named 'myEnc' connected to Arduino digital pins 2 and 3 which both have interrupt capability
int encoderPosition = 0; // Makes a variable to hold the encoder count; Initialized to 0
void setup()
{
Serial.begin(9600); // Turns on the serial monitor communications at a BAUD rate of 9600
Serial.println("Linear Encoder Test:");
}
void loop()
{
encoderPosition = myEnc.read(); // An Encoder library function that continually reads and updates the encoder count
Serial.print("Encoder = ");
Serial.println(encoderPosition);
}
I can manually move the actuator (the garage door opener mechanism has a latch that disengages the carriage from the acme screw) and the encoder accurately tracks the movement. So I know the encoder hardware and software are working correctly.
I'm also driving the actuator motor with a Cytron motor driver board. (Thanks, Bill for the tutorial on driving a large gearmotor) Although Bill's code in this tutorial is simple and easy for me to understand, there is a library for the Cytron motor driver! The library saves a few lines of code, and it has worked well to drive my actuator.
My problem comes when I put the actuator and encoder together. Although it worked well at first, now the actuator consistently stops short of the target position, even while still displaying "Up Approach" and then the system becomes unresponsive. I have struggled for months to figure out what is wrong! Here is the code involved:
// This subset of the Staging Elevator sketch isolates the code for moving the elevator
// Stops well short of destination; Not using approach speed; Won't respond to second move command
// Works OK after re-booting the computer! but only for one move
// Replaced IBT-2 motor driver with Cytron MD13S; Modified code for PWM/DIR control
// Stopped 3 short of destination; No improvement
// Included Cytron library; modified code for library functions; No improvement
// Switch motor connections to Arduino 11 and 10 (Uses Timer 2); No improvement - put back to 5 and 6
// Add #define encoder optimize; No improvement
// Switched to Arduino 101 instead of Uno; Working properly now! But the Curie-based 101 is not compatible with several libraries that are needed for the complete system
// Switched to NANO BLE; Back to stopping short of destination; Started getting 'out of sync' errors with Chinese NANO
// Theory: AVR-based Arduinos have problem reading encoder at same time as PWMing the motor? But why did it work previously with UNO?
// OR Theory; Use of serial monitor to real-time track the encoder count causes lag/interrupt conflict?
// Test: Rebooted computer, removed Serial Monitor encoder print - No improvement
// Switched to LAFVIN brand NANO; Still stops slightly short and stops responding
// Changed to <EncoderStepCounter.h> library; Much lower resolution; Failed to go to approach speed (stalled at 26 to go)
// Changed to half step mode of library; No improvement; Switched back to <Encoder.h> which is easier to use
// Powered all peripherals off separate 5v supply, not Arduino 5v pin; Still stopping short, displaying "Up Approach" but not moving
// Flip-flopped the max and approach 'ifs'; No difference
// Added 'if' conditional to 'else'; No difference
// Added 'volatile' qualifier to 'encoderPosition' datatype; No difference
// Changed BAUD rate to 115200; No difference -- AAAAARRRGH!
#include <CytronMotorDriver.h> // Loads the library for the Cytron MD13S motor driver board; Found in Library Manager
CytronMD elMotor(PWM_DIR, 5, 6); // Makes a Cytron library object named 'elMotor' (elevator motor) with MD13S PWM connected to Arduino pin 5 and DIR connected to 6
int maxSpeed = 100; // Variable for maximum speed of the elevator motor; Change value here (up to 255}to suit your motor/gear ratio
int approachSpeed = 10; // Variable for a slower speed for approaching the destination without overshooting the destination
#define ENCODER_OPTIMIZE_INTERRUPTS // This optional setting causes Encoder to use more optimized code; It must be defined before the library 'include'
#include <Encoder.h> // Loads the Encoder library found in the Library Manager
Encoder linEnc(2, 3); // Makes an Encoder library object named 'linEnc' (linear encoder) with the encoder's quadrature lines connected to Arduino interrupt-capable pins 2 and 3
// If the encoder counts up when it should count down, or vice versa, then just reverse the pin 2 and 3 connections
volatile int encoderPosition; // Variable to hold the current encoder count
int goToPosition; // variable to hold the encoder count of a target or destination position
void setup ()
{
Serial.begin(9600); // Initializes serial communications at a BAUD rate of 9600; This enables the use of the serial monitor for input and debugging/troubleshooting
delay(30); // Wait for Serial to initialize
}
void loop()
{
encoderPosition = linEnc.read(); // An Encoder Library function that continually reads the linear encoder and places its value into the 'encoderPosition' variable
Serial.print(F("Encoder Position is ")); // Confirm real time position of elevator
Serial.println(encoderPosition);
if (Serial.available() > 0) // If anything is entered into the serial monitor; This is temporarily used for user input
{
goToPosition = (Serial.parseInt()); // Place the entered value into the 'goToPosition' variable; 'parseInt' command is needed to retrieve the entered number ('Serial.read' will return the ASCII code for that key)
Serial.print(F(" GoToPosition is ")); // To confirm the serial monitor entry
Serial.println(goToPosition);
}
if (goToPosition > encoderPosition) // Will need to move elevator up
{
if ((goToPosition - encoderPosition) > 25) // If the elevator is far from its destination
{
elMotor.setSpeed(maxSpeed); // Cytron library function that will run the elevator motor up at the maximum speed
Serial.println(F("Up Max")); // To confirm that the above command is being executed
}
else if((goToPosition - encoderPosition) < 25) // If the elevator is near the destination position
{
elMotor.setSpeed(approachSpeed); // Cytron library function that will run the elevator motor up at the approach speed
Serial.println(F("Up Approach")); // To confirm
}
}
if (goToPosition < encoderPosition) // Will need to move the elevator down
{
if ((abs(goToPosition - encoderPosition)) < 25) // If elevator is within 25 of the target position; 'abs' yields an absolute value (turns negative values into positive)
{
elMotor.setSpeed(-approachSpeed); // In the Cytron library, a negative speed value will make the motor run in the down direction
Serial.println(F("Down Approach"));
}
else
{
elMotor.setSpeed(-maxSpeed);
Serial.println(F("Down Max"));
}
}
if (goToPosition == encoderPosition) // Stops elevator when it reaches the destination
{
elMotor.setSpeed(0);
Serial.println(F("Position Aligned")); // Confirms that the move is complete and successful
}
} // End of void loop
When I started this project, I had problems with overshoot and oscillations around the target point. I thought a PID controller was the solution. I discovered that PID theory is another topic that goes way over my head, but yes, there are a few libraries for PID control. Alas, I spent a month goofing with three different PID libraries, and I still could not get the results I needed. I tried using 'for' loops to ramp down the PWM as the elevator neared the target. I don't think 'for' loops and encoders play well together. But if I jump to a slow speed right before I reach the destination, that should work - and it did at first. But now I am at a total loss to understand what is going wrong. You see in my notes in the above code several things I have tried - to no avail. I have double and triple and ten-time checked my wiring. I followed Bill's troubleshooting strategies. NO JOY! Any suggestions?
Wow! That code looks so much better! Thanks, robotBuilder. Copy as HTML, use source code icon, paste into window- Got it!
Hi MSimmons!
I'm also building a model train elevator - I'm calling it a 'train lift'. My approach has been suspension and counterbalancing by a cable that is driven by a spindle driven by a stepper motor. I'm plan to do the homing with IR 'speed' sensors and then navigate by counting motor steps.
I'll be sure to follow your progress. Good luck!
Tom
Tom
Good to hear from you, Tom. The carriage on my actuator will be attached to the staging yard track boards via 4 cables with turnbuckles, and a pulley system with counterweights. I considered using a stepper motor as well - easier to deal with the drive electronics. (I have a home-designed and home-built CNC router powered by NEMA 23 steppers, so I have some experience in that regard) But I opted for the DC motor/linear encoder combo because I was concerned about the position precision of the cable/pulley system along with any thermal expansion/contraction of the wood framework of the whole elevator mechanism. The threshold of the stationary tracks with the moveable elevator tracks must be precise to avoid derailments. I'll be mounting the linear encoder right at that threshold, so any backlash in the system will be negated.
I'll be interested to follow your project as well. Good luck!
My problem comes when I put the actuator and encoder together. Although it worked well at first, now the actuator consistently stops short of the target position, even while still displaying "Up Approach" and then the system becomes unresponsive. I have struggled for months to figure out what is wrong! Here is the code involved:
In a situation like this, I would just take the code back to a very basic level to help narrow down the problem.
For example:
void loop()
 {
  encoderPosition = linEnc.read();

  if(encoderPosition > 0 && encoderPosition < 20) {
    elMotor.setSpeed(maxSpeed);
   } else {
    elMotor.setSpeed(approachSpeed);
   }

  if(encoderPosition == 25) {
    elMotor.setSpeed(0);
    Serial.println(F("Position Aligned"));
   }
 }
...a small test like this can be used to determine if the final condition is properly entered, or overshooting occurring due to timing issues, which may then require the use of ">=" instead of "==".
From here you can start to narrow down the problem.
It's also be possible that approachSpeed may be too low, causing the motor to just stall and hum without enough power.
Anyway... gotta start somewhere 🙂
Cheers.
I can see your requirement to align the final rail position very accurately (+/- ?microns)
With your cnc experience you will know that stepper motors can achieve such accuracy (by counting pulses) so going over to a stepper instead of a crude dc motor ?
A hybrid way maybe only to use the encoder strip for the last 1/4" or so of travel and then you set the motor to creep . As you say when you turn down the wick so you lose torque and stiction may be a limit here. At crawling speed the stepper still maintains reasonable torque. Maybe a crude PWM on the equally crude motor to crawl plus a hard mechanical end stop and a timer to stop the motor so it doesnt overheat when banging against the endstop (or monitor motor current instead to detect stall, the acme thread shouldn't jam?). A timer to detect motor stall/overload current/alarm probably a good idea
but i suppose you want to get the code right first
Always look on the bright side of life
Responding to @Robint, I don't know what accuracy MSimmons is aiming for but for my train lift the goal will be +/- 0.25 mm. I'm using a stepper motor winding the cable that suspends the lift and the counterweight.
Spindle diameter = 9 mm
Therefore spindle circumference = π x 9 mm = about 28.3 mm
Stepper motor steps = 1.8°
Therefore stepper motor cable advance = about 0.14 mm per step (ignoring the thickness of the cable and hoping for total adhesion)
So if I can stop my stepper motor at the correct step, the lift will be within my accuracy goal, without having to think about microstepping.
Responding to @MSimmons, I totally get your concerns about expansion and so on. I hope I can sidestep it with the following plan:
I'll be arranging a few cm of screen to interrupt an IR sensor at each end of the range of motion. At the beginning of a session if neither sensor is interrupted the mechanism will move in an arbitrary direction until one is interrupted. Then it will creep in the sensible direction until establishing a reference step number at the edge of the interruption. Then it will move a programmed number of steps to the upper (or lower) train lift elevation. (I'll have a routine for establishing any needed correction to these numbers when things shift or my cable stretches.)
MSimmons - can we know your given name?
Tom
Glad you've made progress 🙂
BTW - In my research, I came across this code in another forum. It is gibberish to me. Can anyone explain it?
 /* Code for ramp-up that doesn't use 'for' loop or 'delay()'

 time_now = time(); //take a reading of current time. or millies()
  if (time_now < TIME_RAMPUP) { //still need to ramp it up
    if (time_now > time_prev) { //need to increment motor speed
      time_prev+=TIME_INC;
      motor_dc+=PWM_STEP;  // you may wish to bound the dc here
      analogWrite(MOTOR_PIN, motor_dc); //increase dc
    }
  }*/
As the comment states, it is code used to ramp up (accelerate) the motor. TIME_RAMPUP appears to be the desired (set) amount of time that the ramp up speed should occur within. For example, keep "accumulating" PWM speed via "motor_dc += PWM_STEP" until TIME_RAMPUP seconds/microseconds (i.e:- UNITS of time) have been reached.
So if I want my robot to move forward for 10 seconds, but I want to soft start the first 2 seconds of it's 10 second movement, then accumulate the speed until TIME_RAMPUP seconds, at which by that point you should be at your set speed.
It's not shown in a loop, but it's probably be called from a function, callback function in a loop or an interrupt etc... - It can't accumulate it's speed otherwise 🙂
Cheers.

