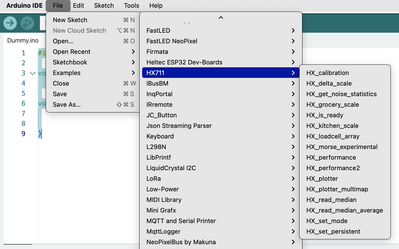
@zander To get the load cell to work on its own is easy. copy only the load cell code and you should be fine.
@the-apprentice The code will be one of the examples modified if needed to do whatever it is I need it to do.
What I am looking for is some first hand advice re the load cell hardware.
First computer 1959. Retired from my own computer company 2004.
Hardware - Expert in 1401, and 360, fairly knowledge in PC plus numerous MPU's and MCU's
Major Languages - Machine language, 360 Macro Assembler, Intel Assembler, PL/I and PL1, Pascal, Basic, C plus numerous job control and scripting languages.
Sure you can learn to be a programmer, it will take the same amount of time for me to learn to be a Doctor.
@zander I need the stepper to read the load cell reading and then adjust the speed accordingly.
I now have the stepper running with the load cell reading on he serial monitor. 😊 Now I need the stepper speed to be set by the load cell value. I have no idea how to do this and can not find any tutorial on how to convert the serial monitor data to set the speed of the stepper. I have the A0 pin as the potentiometer input. This now wont work. If anyone have a suggestion please help.
/*
 Sketch to run a stepper motor usig a load cell to adjust the speed.
 Arduino pin 2 -> HX711 CLK
 Arduino pin 3 -> HX711 DOUT
 Arduino pin 5V -> HX711 VCC
 Arduino pin GND -> HX711 GND
*/
#include <AccelStepper.h>
#include <MultiStepper.h>
#include "HX711.h"
// Motor
HX711 scale(2, 3); // Load cell pins
int reverseSwitch = 4;  // Hall swich for reverse
int driverPUL = 5;    // PUL- pin
int driverDIR = 6;    // DIR- pin
int spd = A0;     // Potentiometer
int pd = 30;       // Pulse Delay period
boolean setdir = LOW; // Set Direction
void revmotor (){setdir = !setdir;}
// Load cell
float calibration_factor = -1; // this calibration factor is adjusted according to my load cell
float units;
float Nm;
int temp = A0;


void setup() {
  // Load cell
  Serial.begin(9600);
  Serial.println("HX711 calibration sketch");
  Serial.println("Remove all weight from scale");
  Serial.println("After readings begin, place known weight on scale");
  Serial.println("Press + or a to increase calibration factor");
  Serial.println("Press - or z to decrease calibration factor");
  scale.set_scale();
  scale.tare();  //Reset the scale to 0
  long zero_factor = scale.read_average(); //Get a baseline reading
  Serial.print("Zero factor: "); //This can be used to remove the need to tare the scale. Useful in permanent scale projects.
  Serial.println(zero_factor);
  // Motor
  pinMode (driverPUL, OUTPUT);
  pinMode (driverDIR, OUTPUT);
  attachInterrupt(digitalPinToInterrupt(reverseSwitch), revmotor, FALLING);

}


void loop() {
  // Motor
  {
  for (int i = spd ; i<25000 ; i++) {
  digitalWrite(driverPUL,HIGH);
  delayMicroseconds(spd);
  digitalWrite(driverPUL,LOW);
  delayMicroseconds(spd);}
  digitalWrite(driverDIR,setdir);
}
  // Load cell

  scale.set_scale(calibration_factor); //Adjust to this calibration factor
  Serial.print("Reading: ");
  units = scale.get_units(), 0;
  if (units < 0)
  {units = 0.00;}
  Nm = units * 0.0;
  Serial.print(units);
  Serial.print(" Nm ");
  Serial.println();
  if(Serial.available())
  char temp = Serial.read();
    if(temp == '+' || temp == 'a')
      calibration_factor += 1;
    else if(temp == '-' || temp == 'z')
      calibration_factor -= 1;
}
@the-apprentice Just use the variable in the print statement to make the motor speed whatever makes sense. I don't have anywhere close to enough information to tell you more.
I will comment though that your motor code looks strange, it seems to be in it's own loop doing ?????. Conceptully what I think you have been asking for is to detect the load and adjust the motor speed. Your code can do that albeit with some re-arranging.
Conceptually your code should be something similar to (in the loop) read the load cell, compare to the previous value, if + go slower, if - go faster. That is a VERY high level description.
Not sure what role the pot will serve if you are controlling the speed with the load cell.
If you want to override the load cell feedback, then in the motor control code, read the pot and use that value to adjust the motor speed.
First computer 1959. Retired from my own computer company 2004.
Hardware - Expert in 1401, and 360, fairly knowledge in PC plus numerous MPU's and MCU's
Major Languages - Machine language, 360 Macro Assembler, Intel Assembler, PL/I and PL1, Pascal, Basic, C plus numerous job control and scripting languages.
Sure you can learn to be a programmer, it will take the same amount of time for me to learn to be a Doctor.
I will keep at it. The load cell data I don't know how to get to it n the code. The motor is now running full speed al the time. Not what I want. I will try and try till it work. Thanks for helping.
@the-apprentice The motor isn't running with that code, it fails to complete. The load cell constructor is incorrect, look it up.
As far as where you get the load cell data, it's where it prints the data, just use the part that says 'get' but first fix that statement, it has extraneous characters.
As far as the motor, you will need to read the documentation for the library you are using to learn the API so you can decide on what members to use to set/control the speed.
Like I said a long time ago, make a module out of the motor control code so you can get the load cell data and then call the motor function with the new speed as calculated from the load cell times some algorithm.
You also mentioned a pot, is that used to set a starting speed? If so, then add that 2, 3, 4 lines of code in the motor module.
First computer 1959. Retired from my own computer company 2004.
Hardware - Expert in 1401, and 360, fairly knowledge in PC plus numerous MPU's and MCU's
Major Languages - Machine language, 360 Macro Assembler, Intel Assembler, PL/I and PL1, Pascal, Basic, C plus numerous job control and scripting languages.
Sure you can learn to be a programmer, it will take the same amount of time for me to learn to be a Doctor.
I will keep at it. The load cell data I don't know how to get to it n the code. The motor is now running full speed al the time. Not what I want. I will try and try till it work. Thanks for helping.
Please post your (current) sketch and the readings from the load cell for the maximum and minimum tensions you measured.
Anything seems possible when you don't know what you're talking about.
The pod is for the max speed that must not be exceeded.
@the-apprentice USE THE REPLY LINK. That is what I did and it inserts @the-apprentice into the msg and you get an email that someone has replied.
Read your replies before sending them. I have no idea of context, or what a pod is.
I will guess you are replying (use quote instead of reply if reply isn't obvious) to an old post of mine and you are talking about a Potentiometer or POT or Pot or even pot. We electro-heads will understand what you mean if you just say pot.
If all that is correct, then obviously place a pot read in the main motor control loop to set a maximum. You might think that should be I the setup and it can be, but it should ALSO be in the main loop in case you change your mind.
First computer 1959. Retired from my own computer company 2004.
Hardware - Expert in 1401, and 360, fairly knowledge in PC plus numerous MPU's and MCU's
Major Languages - Machine language, 360 Macro Assembler, Intel Assembler, PL/I and PL1, Pascal, Basic, C plus numerous job control and scripting languages.
Sure you can learn to be a programmer, it will take the same amount of time for me to learn to be a Doctor.
@will Min tension will be 0 Stepper must run at the st max speed, Max is 5Kg the higher the load the slower the stepper must run/even stop if it gets too high.
/*
 Sketch to run a stepper motor usig a load cell to adjust the speed.
 Arduino pin 2 -> HX711 CLK
 Arduino pin 3 -> HX711 DOUT
 Arduino pin 5V -> HX711 VCC
 Arduino pin GND -> HX711 GND
*/
#include "HX711.h"


HX711 scale(2, 3); // Load cell pins
// Motor
int reverseSwitch = 4;  // Hall swich for reverse
int driverPUL = 5;    // PUL- pin
int driverDIR = 6;    // DIR- pin
int spd = A0;     // Potentiometer
int pd = 30;       // Pulse Delay period
boolean setdir = LOW; // Set Direction
void revmotor (){setdir = !setdir;}
// Load cell
float calibration_factor = -1; // this calibration factor is adjusted according to my load cell
float units;
float Nm;
int temp = A0;


void setup() {
  // Load cell
  Serial.begin(9600);
  Serial.println("HX711 calibration sketch");
  Serial.println("Remove all weight from scale");
  Serial.println("After readings begin, place known weight on scale");
  Serial.println("Press + or a to increase calibration factor");
  Serial.println("Press - or z to decrease calibration factor");
  scale.set_scale();
  scale.tare();  //Reset the scale to 0
  long zero_factor = scale.read_average(); //Get a baseline reading
  Serial.print("Zero factor: "); //This can be used to remove the need to tare the scale. Useful in permanent scale projects.
  Serial.println(zero_factor);
  // Motor
  pinMode (driverPUL, OUTPUT);
  pinMode (driverDIR, OUTPUT);
  attachInterrupt(digitalPinToInterrupt(reverseSwitch), revmotor, FALLING);

}


void loop() {
  // Motor
  {
  digitalWrite(driverPUL,HIGH);
  delayMicroseconds(pd);
  digitalWrite(driverPUL,LOW);
  delayMicroseconds(pd);
  digitalWrite(driverDIR,setdir);
}
  // Load cell
 {
  scale.set_scale(calibration_factor); //Adjust to this calibration factor
  Serial.print("Reading: ");
  units = scale.get_units(), 0;
  if (units < 0)
  {units = 0.00;}
  Nm = units * 0.0;
  Serial.print(units);
  Serial.print(" Nm ");
  Serial.println();
  if(Serial.available())
  char temp = Serial.read();
    if(temp == '+' || temp == 'a')
      calibration_factor += 1;
    else if(temp == '-' || temp == 'z')
      calibration_factor -= 1;
 }
}
Here is a version which approximates what I think you want to do. I can't compile and test it because I don't have the library you use for the load cell, so read the comments and adjust as required ...
Anything seems possible when you don't know what you're talking about.
@will Thanks for helping. It seems the loadcell reading only runs once. The stepper motor runs very slow.(Barely) I will keep trying.
@the-apprentice Have a look at the examples and pick the one that is the closest match to what you are trying to do. I am attaching a screen print of what you have for a choice.
As far as the motor goes, simply adjust the speed.
First computer 1959. Retired from my own computer company 2004.
Hardware - Expert in 1401, and 360, fairly knowledge in PC plus numerous MPU's and MCU's
Major Languages - Machine language, 360 Macro Assembler, Intel Assembler, PL/I and PL1, Pascal, Basic, C plus numerous job control and scripting languages.
Sure you can learn to be a programmer, it will take the same amount of time for me to learn to be a Doctor.
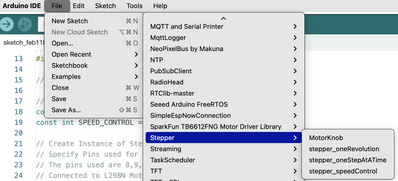
@the-apprentice As far as the motor goes, again, look at the examples and start with the closest. I am enclosing a screen grab of your choices.
First computer 1959. Retired from my own computer company 2004.
Hardware - Expert in 1401, and 360, fairly knowledge in PC plus numerous MPU's and MCU's
Major Languages - Machine language, 360 Macro Assembler, Intel Assembler, PL/I and PL1, Pascal, Basic, C plus numerous job control and scripting languages.
Sure you can learn to be a programmer, it will take the same amount of time for me to learn to be a Doctor.


