@pakabol, @triform, @etinkerer, byron
OK, now printing the first test print file again using the new roll of filament. Have some glue stick on the bed and all seems to be going OK. I did have issues this morning loading the filament! It some how rolled around the guide roller and out the back side of the extruder assembly instead of feeding through the extruder nozzle. It did that twice and both times I had to remove the roller/guide assembly to get the mis-fed filament removed!
And I've now gotten OctoPi controlling my printer. Just have to learn how to make it do it's tricks. Don't see how it integrates with CURA, but supposedly you can slice right on the RasPi and then go to printing the gcode without have to do the slicing on the PC and then moving the gcode to the printer. So much to learn and only 24 hours in a day.
SteveG
Hope it goes well!
Sounds like you have a trick extruder 😉
I change my print options for most prints, so I just slice outside of OctoPi. It is configured, but I like to change settings based on what I'm printing. I'm also a Simplfied3D user now as well. Said I would never buy it, but did about two years ago. :/
Scott
i got my filament today and got a print going so far its smooth sailing
Depending on which version of octo... um. Are you using octo-pi or octo-print ?
Octo-pi is a program that you install into a working operating system, and octo-print is a fully integrated OS based on the latest raspbian with octo-pi already installed
So, anyway, depending on which version of octo you have, Cura may or may not work. If you go for one of the older versions, Cura still works, but you have to remember to import your settings from an older version of Cura in order to get the 2 programs to work together. In the newest version of Octo, I think the Cura button is still there, but, I'm pretty sure it doesn't work
I haven't upgraded my own Octo in months, so mine is pretty far behind, and the Cura still works. There's no reason to use a Pi4 on Octo, it doesn't need that kind of horsepower. My recommendation is a Pi3B, cuz the B is easier to set up the wifi on than the B+
i got my filament today and got a print going so far its smooth sailing
Yay !
Have you started printing the atomic bomb, or are you going with the spaghetti ?
Have you started printing the atomic bomb, or are you going with the spaghetti ?
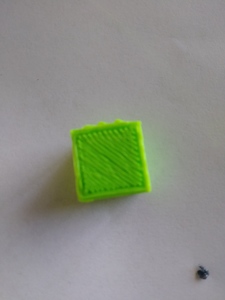
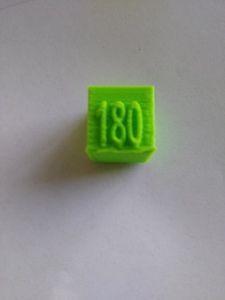
im redoing to test print that i ran out of filament on just because i need to see what it is and also when i tried to do the 180 block i forgot to add the gcode to preheat the extruder LOL what can i say im a noob
the bomb is about 5th in my queue
spaghetti ?
thats sounds good for dinner.. hrmm? hopefully not PLA-ghetti thou
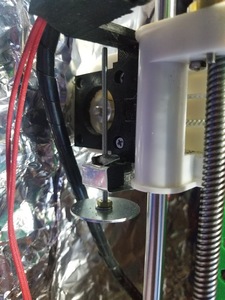
Not sure how well you can see this, but I modified the Z limit switch in a way that I found to be absolutely un-live-without-able
You can adjust this screw with the washer on it until it hits the z limit switch for extreme fine tuning
I had to modify the motor mount for it, and I figured, since I was at it, I also added a camera mount, so the cam goes up and down with the z-height
I don't really like the cam mount tho. I'm still trying to figure out the perfect one. I think a better idea would be to mount it on one of the corners of the bed
I found that the best way is to heat the bed first, cuz the bed takes longer to heat, and don't start heating the extruder until the bed is at temp. This way you reduce the possibility of roasting any filament in the extruder while it's waiting for the bed to heat up
Not sure how well you can see this, but I modified the Z limit switch in a way that I found to be absolutely un-live-without-able
You can adjust this screw with the washer on it until it hits the z limit switch for extreme fine tuning
Maybe I missed something in an earlier response but why do you need a way to make adjustments to the limit switch? Shouldn't it only need to be adjusted once and done? I thought the reason for a limit switch is a precaution to keep the hot end from hitting the bed. Doesn't the software set distance for the bed to hot end clearance?
Pat
The most exciting phrase to hear in science, the one that heralds new discoveries, is not “Eureka!” (I found it!) but “That's funny …”
Author: Isaac Asimov
Doesn't the software set distance for the bed to hot end clearance?
In theory, yes
In practice, not so much
See, the limit switch is what sends the signal to the software, and the limit switch doesn't always seem to trigger at the exact same point. Part of the printers startup process is to re-home to set the limits for the software. So even tho all 4 points of the bed are perfect, the z might be off by 2 or 3 hairs after the homing process, and turning that screw is a lot more of an elegant adjustment than either moving the limit switch or readjusting all 4 screws on the bed
I've also replaced the thumb screws on my bed with wingnuts, then I put an alligator clip to stop the wingnut from spinning.
Don't forget, these things tend to vibrate
Well guys the re-print of the first test file worked fine, but boy was it hard to get off the glass bed. Me thinks maybe I applied the glue stick maybe a little too thick. Anyway then moved on to print the RasPi base that I made spaghetti out of day before yesterday. This time it printed just fine. Here's a photo:
It was a little easier to get off the glass. Then scrapped the old glue a bit to make it a bit smoother and started to print the top of the RasPi case. So far so good. Will stop for the day after this finishes and then get me some isopropyl alcohol to clean the glass with. Might try soap and water first.
Having a barrel of fun.
SteveG
It is actually octo-print! Downloaded the image and imaged a microSD card. It is the latest on the OctoPrint website. And the RasPi I put it on arrived in a care package of 2 RasPi 3B+ that arrived yesterday. A friend that had recently moved to FL sent them to me because he didn't think he would ever use them and he figured I could put them to good use. Boy did I ever hit the jackpot. I've already let him know that one of them has begun a new life!
And I think I have figured out that CURA is not "built-in." I'll just use me PC and transfer using OctoPrint.
SteveG


