Bill, I have been following your excellent tutorials for some time now and I want to congratulate you on the really professional way that you are giving us all of this valuable information.
I have been using arduinos for a number of years and recently purhased a raspberry p13B and also a pi zero ( mainly i think because of your tutorial on using the 40 pin io header.
You explain ( not sure where ) the fairly obvious conclusion that inserting small modules which use rectangular pins into the standard arduino style breadboard which presumaby is made primarily to accept the tiny circular male pins fitted to the dupont style of connecting wire eventually ruins the breadboard resulting in intermittent contacts.
So before i start to follow the code for the individual LED examples in your video I have spent a little time to create a "reliable" breadboarding system which works admirably.
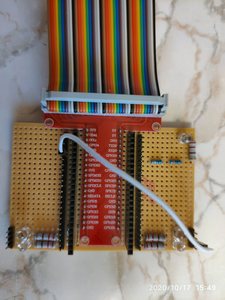
I use the T shaped extension board which identifies the pin numbers on my protopype, this is soldered direcly onto a piece of vero-board. I fit two female and two male headers to the board to allow the use of female or male connecting wires. I have added a number of LEDS ( 4 off ) which are pre-connected to the 220 ohm series resistors , which connect to ground. by this means I simply need to add one wire to the io pin in which i am interested to observe its on or off state.
I will TRY to add a picture of my efforts to this post but I am not at this time to clear abot how to do that.
anyway I am certain this board will allow for a much more enjoyable experience as I plug into the io pin of interest
Finally I hope that you have now recovered from your recent illness that you told us about.
Regards and stay safe during Covid. !!
Think i failed on the picture !!!!
Glad you have enjoyed the tutorials. I essentially "sacrificed" a solderless breadboard to use with my Pi T-Cobbler, but I'd really like to see what you came up with (the LED arrangement sounds intriguing).
I will TRY to add a picture of my efforts to this post but I am not at this time to clear abot how to do that.
Sorry, I really do need to create some "help" pages and videos for this forum. Try just dragging your image onto the post your making.
And thanks for asking about my health, I'll be the first to admit it's not 100% but this last week has been a real improvement, I feel the best I have all year and can now utter entire sentences without running out of breath. Pretty soon I'll be producing so much content you folks will be sick of me LOL (hopefully not).
😎
Bill
"Never trust a computer you can’t throw out a window." — Steve Wozniak
Ah Thats better.!! the led at the top right is just to tell me that the pi has power. i use three series resistors to reduce its brightness. ( the wire goes to pin 17 in this picture )
at the bottom there are 4 leds whose cathodes go to 0v , their anodes are individually connected to 220 ohm series resistors and the other end of the resistor goes to a header pin. so a single wire between the pin of the pin of interest interest ( GPIOpin17 ) to any one of those headers tells me when the pin is high. ideally i would of liked to add leds for all of the "working pins" for sketches addressing more than one LED.
I was pleased to see that your forum is a fast mover !! i like that !!
just one further point. the pi zero W only has one usb port so swapping between a mouse and a keyboard was a real pain.
I did a bit of reading and discovered the way to communicate with the pi. from my pc.. The zero was ohh so slow and while it will run the code ( as you say ) it wastn't much fun following your video as i coded )
Cheers Eric, ( glad you are feeling better )

