Hi its videogame95 from uk Romford Essex into rasp pi zero w pi 3 pi 4 esp32 and pi pico w
i need help with my eps32 and Tb6612fng can't get the write libraries to install to get my car motors moving ?
I add install zip file ESP32 ROBOT TB6612FNG FILE but still no motors running setup pin are 17,18, motor ani1 ani2 pwm on pin 26 control pins over motor on pins 13,bin2 14,bin 1 pwm on 25 motor are on output pins Ain1 Ain2 and Bin1 Bin2 second motor .stby on pin 35.
droneworkshop youtube video are any on this with esp32 or pi pico with TB6612fng motor control board
thank for any help
@videogame95 It would be easier if you post your code. See help above right to learn how to post code.
First computer 1959. Retired from my own computer company 2004.
Hardware - Expert in 1401, and 360, fairly knowledge in PC plus numerous MPU's and MCU's
Major Languages - Machine language, 360 Macro Assembler, Intel Assembler, PL/I and PL1, Pascal, Basic, C plus numerous job control and scripting languages.
Sure you can learn to be a programmer, it will take the same amount of time for me to learn to be a Doctor.
Hi thank for you help this the code i am using I just add adafruit Library but just waits hard resetting via RTS pin
#include <Wire.h>
#include <Adafruit_MotorShield.h>

// Create the motor shield object with the default I2C address
Adafruit_MotorShield AFMS = Adafruit_MotorShield();

// Connect motor(s) to M1 and M2
Adafruit_DCMotor *motor1 = AFMS.getMotor(1);
Adafruit_DCMotor *motor2 = AFMS.getMotor(2);

void setup() {
Serial.begin(9600); // set up Serial library at 9600 bps
Serial.println("Adafruit Motorshield v2 - Motor test!");

AFMS.begin(); // create with the default frequency 1.6KHz

Serial.println("Motor test!");

motor1->setSpeed(255);
motor2->setSpeed(255);
}

void loop() {
Serial.println("Forward");
motor1->run(FORWARD);
motor2->run(FORWARD);
delay(2000);

Serial.println("Backward");
motor1->run(BACKWARD);
motor2->run(BACKWARD);
delay(2000);

Serial.println("Release");
motor1->run(RELEASE);
motor2->run(RELEASE);
delay(1000);
}
hi so#include <Wire.h>
#include <Adafruit_MotorShield.h>

// Create the motor shield object with the default I2C address
Adafruit_MotorShield AFMS = Adafruit_MotorShield();

// Connect motor(s) to M1 and M2
Adafruit_DCMotor *motor1 = AFMS.getMotor(1);
Adafruit_DCMotor *motor2 = AFMS.getMotor(2);

void setup() {
Serial.begin(9600); // set up Serial library at 9600 bps
Serial.println("Adafruit Motorshield v2 - Motor test!");

AFMS.begin(); // create with the default frequency 1.6KHz

Serial.println("Motor test!");

motor1->setSpeed(255);
motor2->setSpeed(255);
}

void loop() {
Serial.println("Forward");
motor1->run(FORWARD);
motor2->run(FORWARD);
delay(2000);

Serial.println("Backward");
motor1->run(BACKWARD);
motor2->run(BACKWARD);
delay(2000);

Serial.println("Release");
motor1->run(RELEASE);
motor2->run(RELEASE);
delay(1000);
}
@videogame95 I can't compile it since Adafruit_Motorshield does not appear in my library list.
First computer 1959. Retired from my own computer company 2004.
Hardware - Expert in 1401, and 360, fairly knowledge in PC plus numerous MPU's and MCU's
Major Languages - Machine language, 360 Macro Assembler, Intel Assembler, PL/I and PL1, Pascal, Basic, C plus numerous job control and scripting languages.
Sure you can learn to be a programmer, it will take the same amount of time for me to learn to be a Doctor.
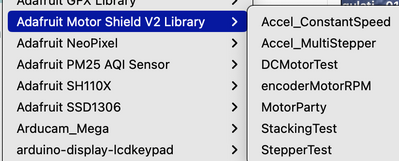
@videogame95 Ok, found the V2 library. It appears you have modified the sample sketch. Try the manufacturers sample UNCHANGED first. Once that works then VERY SLOWLY make changes to do what you want.
/*
This is a test sketch for the Adafruit assembled Motor Shield for Arduino v2
It won't work with v1.x motor shields! Only for the v2's with built in PWM
control

For use with the Adafruit Motor Shield v2
---->	 http://www.adafruit.com/products/1438
*/

#include <Adafruit_MotorShield.h>

// Create the motor shield object with the default I2C address
Adafruit_MotorShield AFMS = Adafruit_MotorShield();
// Or, create it with a different I2C address (say for stacking)
// Adafruit_MotorShield AFMS = Adafruit_MotorShield(0x61);

// Select which 'port' M1, M2, M3 or M4. In this case, M1
Adafruit_DCMotor *myMotor = AFMS.getMotor(1);
// You can also make another motor on port M2
//Adafruit_DCMotor *myOtherMotor = AFMS.getMotor(2);

void setup() {
  Serial.begin(9600);           // set up Serial library at 9600 bps
  Serial.println("Adafruit Motorshield v2 - DC Motor test!");

  if (!AFMS.begin()) {         // create with the default frequency 1.6KHz
  // if (!AFMS.begin(1000)) {  // OR with a different frequency, say 1KHz
    Serial.println("Could not find Motor Shield. Check wiring.");
    while (1);
  }
  Serial.println("Motor Shield found.");

  // Set the speed to start, from 0 (off) to 255 (max speed)
  myMotor->setSpeed(150);
  myMotor->run(FORWARD);
  // turn on motor
  myMotor->run(RELEASE);
}

void loop() {
  uint8_t i;

  Serial.print("tick");

  myMotor->run(FORWARD);
  for (i=0; i<255; i++) {
    myMotor->setSpeed(i);
    delay(10);
  }
  for (i=255; i!=0; i--) {
    myMotor->setSpeed(i);
    delay(10);
  }

  Serial.print("tock");

  myMotor->run(BACKWARD);
  for (i=0; i<255; i++) {
    myMotor->setSpeed(i);
    delay(10);
  }
  for (i=255; i!=0; i--) {
    myMotor->setSpeed(i);
    delay(10);
  }

  Serial.print("tech");
  myMotor->run(RELEASE);
  delay(1000);
}
First computer 1959. Retired from my own computer company 2004.
Hardware - Expert in 1401, and 360, fairly knowledge in PC plus numerous MPU's and MCU's
Major Languages - Machine language, 360 Macro Assembler, Intel Assembler, PL/I and PL1, Pascal, Basic, C plus numerous job control and scripting languages.
Sure you can learn to be a programmer, it will take the same amount of time for me to learn to be a Doctor.
@videogame95 One part you left out is important, it will tell you if you connected all the wires correctly, this is the missing code in setup, I think you can figure out where it goes.
  if (!AFMS.begin()) {         // create with the default frequency 1.6KHz
  // if (!AFMS.begin(1000)) {  // OR with a different frequency, say 1KHz
    Serial.println("Could not find Motor Shield. Check wiring.");
    while (1);
  }
  Serial.println("Motor Shield found.");
First computer 1959. Retired from my own computer company 2004.
Hardware - Expert in 1401, and 360, fairly knowledge in PC plus numerous MPU's and MCU's
Major Languages - Machine language, 360 Macro Assembler, Intel Assembler, PL/I and PL1, Pascal, Basic, C plus numerous job control and scripting languages.
Sure you can learn to be a programmer, it will take the same amount of time for me to learn to be a Doctor.
@videogame95 Sorry, I am not an expert in these motors, but what might be tripping you up is the sample code that you built off is 'object oriented' code, NOT procedural. You appear to be thinking procedurally (like I do) and that won't work.
Just start with the sample and slowly use archive and modify, if it breaks go back one archive and try again.
Good luck.
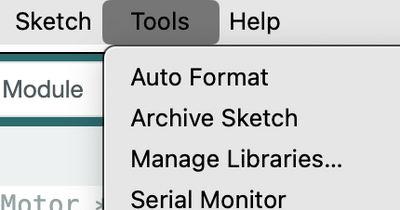
p.s. Archive is in the Tools menu, see pic.
First computer 1959. Retired from my own computer company 2004.
Hardware - Expert in 1401, and 360, fairly knowledge in PC plus numerous MPU's and MCU's
Major Languages - Machine language, 360 Macro Assembler, Intel Assembler, PL/I and PL1, Pascal, Basic, C plus numerous job control and scripting languages.
Sure you can learn to be a programmer, it will take the same amount of time for me to learn to be a Doctor.
@videogame95 You might also want to start with the sketch that Bill used in his video. Here is the code he published.
NOTE these comments
TB6612FNG Arduino Sketch
Since this replaces the L298N, we can use the same sketch to drive the module.
You can also use one of the many libraries available for the L298N, as any L298N code will work on this module.
The L298N Library by Andrea Lombardo is a well-documented library that you can install directly from your Arduino IDE. It has several functions to make working with the L298N easier, and can also be used with the TB6612FNG.
/*
Author  : Andrea Lombardo
Site    :  https://www.lombardoandrea.com
Source  :  https://github.com/AndreaLombardo/L298N/

Here you can see how to work in a common configuration.

L298NX2 is not a new version of module or IC,
but it stands for a double implementation of L298N library.

With L298NX2 is possible to initialize two motors at once.

Speed range go from 0 to 255, default is 100.
Use setSpeed(speed) to change speed for both motors,
setSpeedA(speed) or setSpeedB(speed) for individual changes.

Sometimes at lower speed motors seems not running.
It's normal, may depends by motor and power supply.

Wiring schema in file "L298NX2 - Schema_with_EN_pin.png"
*/

// Include the (new) library
#include <L298NX2.h>

// Pin definition
const unsigned int EN_A = 10;
const unsigned int IN1_A = 9;
const unsigned int IN2_A = 8;

const unsigned int IN1_B = 7;
const unsigned int IN2_B = 6;
const unsigned int EN_B = 5;

// Initialize both motors
L298NX2 motors(EN_A, IN1_A, IN2_A, EN_B, IN1_B, IN2_B);

// Wait for Serial Monitor to be opened
while (!Serial) {
  //do nothing
}

// Set initial speed for both motors
motors.setSpeed(80);
}

void loop() {
  // Tell both motors to go forward (may depend by your wiring)
  motors.forward();

  // Alternative method:
  // motors.run(L298N::FORWARD);

  //print the motor status in the serial monitor
  printSomeInfo();digitalWrite(IN1, HIGH);

  motors.stop();

  // Alternative method:
  // motors.run(L298N::STOP);

  printSomeInfo();

  delay(3000);

  // Change individual speeds
  motors.setSpeedA(255);
  motors.setSpeedB(90);

  // Tell motor A to go back (may depend by your wiring)
  motors.backwardA();

  // Alternative method:
  // motors.runA(L298N::BACKWARD);

  // Tell motor B to go forward (may depend by your wiring)
  motors.backwardB();

  // Alternative method:
  // motors.runB(L298N::FORWARD);

  printSomeInfo();

  delay(3000);

  // Stop
  motors.stop();

  printSomeInfo();

  // Change individual speeds
  motors.setSpeedA(90);
  motors.setSpeedB(255);

  delay(3000);
}

/*
Print some informations in Serial Monitor
*/
void printSomeInfo() {
  Serial.print("Motor A is moving = ");
  Serial.print(motors.isMovingA() ? "YES" : "NO");
  Serial.print(" at speed = ");
  Serial.println(motors.getSpeedA());
  Serial.print("Motor B is moving = ");
  Serial.print(motors.isMovingB() ? "YES" : "NO");
  Serial.print(" at speed = ");
  Serial.println(motors.getSpeedB());
}
First computer 1959. Retired from my own computer company 2004.
Hardware - Expert in 1401, and 360, fairly knowledge in PC plus numerous MPU's and MCU's
Major Languages - Machine language, 360 Macro Assembler, Intel Assembler, PL/I and PL1, Pascal, Basic, C plus numerous job control and scripting languages.
Sure you can learn to be a programmer, it will take the same amount of time for me to learn to be a Doctor.
@zander hi I'm not coder but understand most of the code so I use gptchat to right my code for me
Look up.
@videogame95 Use the samples provided by the Library authors, they are correct and a lot smarter than ChatGPT as you have already discovered.
First computer 1959. Retired from my own computer company 2004.
Hardware - Expert in 1401, and 360, fairly knowledge in PC plus numerous MPU's and MCU's
Major Languages - Machine language, 360 Macro Assembler, Intel Assembler, PL/I and PL1, Pascal, Basic, C plus numerous job control and scripting languages.
Sure you can learn to be a programmer, it will take the same amount of time for me to learn to be a Doctor.


