I would like to see a video on making a headless raspberry pi. There are some video out there but they are all old, out of date, and have errors. Please use window remote desktop connection.
@sj_h1 I just googled that question and here is the instructions. It is waaaaay easier now with the new imager.
https://www.tomshardware.com/reviews/raspberry-pi-headless-setup-how-to,6028.html
First computer 1959. Retired from my own computer company 2004.
Hardware - Expert in 1401, and 360, fairly knowledge in PC plus numerous MPU's and MCU's
Major Languages - Machine language, 360 Macro Assembler, Intel Assembler, PL/I and PL1, Pascal, Basic, C plus numerous job control and scripting languages.
Sure you can learn to be a programmer, it will take the same amount of time for me to learn to be a Doctor.
@sj_h1 I just noticed you want to use RDP, here is a link https://pimylifeup.com/raspberry-pi-remote-desktop/
First computer 1959. Retired from my own computer company 2004.
Hardware - Expert in 1401, and 360, fairly knowledge in PC plus numerous MPU's and MCU's
Major Languages - Machine language, 360 Macro Assembler, Intel Assembler, PL/I and PL1, Pascal, Basic, C plus numerous job control and scripting languages.
Sure you can learn to be a programmer, it will take the same amount of time for me to learn to be a Doctor.
I would like to see a video on making a headless raspberry pi. There are some video out there but they are all old, out of date, and have errors. Please use window remote desktop connection.
I can't do a nice video like @dronebot-workshop, but here is what I'm doing...
I've just run through doing this about a dozen times in the last couple of weeks. If you're hard set about using Windows Remote Desktop, you'll have to use one of the tutorials where you have to install xrdp on the Pi. In the OS Bullseye (one back from current) they have built-in support using VNC Server (nothing to load) expecting us to use the free version of VNC Viewer on our Windows boxes. It works about the same as Windows Remote Desktop. I've had no complaints.
Also, the process seems to now be in a state of flux since the RasPi5 is such a different hardware beast that it has broken a lot of things. The newest OS Bookworm no longer supports VNC Server and has gone to something more obscure and less mature. https://forums.raspberrypi.com/viewtopic.php?t=357582
As my primary target is a Raspberry Pi Zero-W and Bookworm will not run on it, I've backed up to using Bullseye anyway. Setting up headless on it is pretty simple, even for the case where you have to use headless during the install phase and don't have ethernet (Pi Zero W).
- I'll assume you've done some installs before and don't need a "press this button with pictures" for every step.
- Use the Raspberry Pi Imager. I have v 1.8.3
- Select your Raspberry Pi Device
- Choose OS: Pick Bullseye Desktop or Full
- Choose Storage: pick your SD - If you want something fancy... like SSD, Dongle or boot over ethernet... I can't help you.
- Hit Next
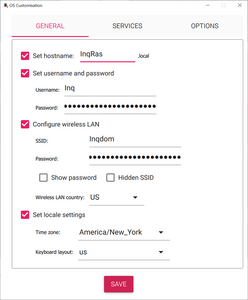
- At the Use OS customisation? (sic) dialog, select Edit Settings
- Fill out all sections. I like not having to use Pi, raspberry.
- On services tab, Enable SSH and Use password authentication
- Save... and back at sic, press YES to Would you like to apply OS customisation settings?
- Fill out all sections. I like not having to use Pi, raspberry.
- Install loaded SD into RasPi - It'll take a while before it lets you in depending on your RasPi's speed and SD size. At least 3 minutes for my Pi-Zero and RasPi4.
- Connect using some kind of SSH terminal. I typically use PuTTY, but I understand Windows Power Shell will work also: SSH <computer name> -l <user name>
- Once in run: sudo raspi-config
- Change the following items:
- Display / VNC Resolution : to your desired screen resolution.
- Interface Options : I3 VNC : Enable
- Finish
- Probably should do:
- sudo apt-get update
- sudo apt-get upgrade
- Reboot if it tells you.
- Install and run VNC Viewer - https://www.realvnc.com/en/connect/download/viewer/
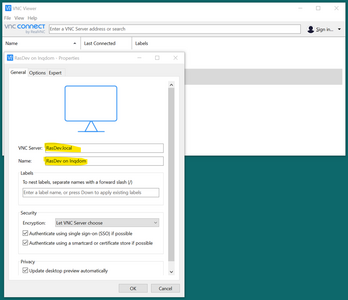
- To setup a connection, File / New connection...
- Fill out VNC Server:
- Name (friendly name)
- All the rest of the defaults will work fine.
- Double click your new entry
- It'll prompt you for saving a certification (just to confirm you're talking to the computer you think you are) your username, password
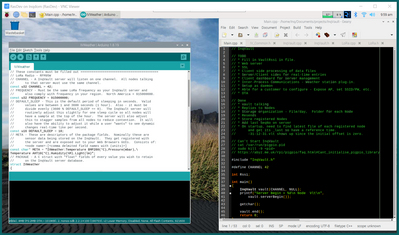
- Should get your desktop.
3 lines of code = InqPortal = Complete IoT, App, Web Server w/ GUI Admin Client, WiFi Manager, Drag & Drop File Manager, OTA, Performance Metrics, Web Socket Comms, Easy App API, All running on ESP8266...
Even usable on ESP-01S - Quickest Start Guide
@inq Excellent tutorial Dennis. I have bookmarked it as you have a few twists in there I was not using. As far as step 5, I use an SSD connected to my USB port and it is no different from an SD card. Of course the big advantage is they last a lot longer than a normal SD, don't know about the endurance line of SD's which is advisable. If you are insistent on an SD, check out how to minimize wear, The Swiss Guy has a video HERE
First computer 1959. Retired from my own computer company 2004.
Hardware - Expert in 1401, and 360, fairly knowledge in PC plus numerous MPU's and MCU's
Major Languages - Machine language, 360 Macro Assembler, Intel Assembler, PL/I and PL1, Pascal, Basic, C plus numerous job control and scripting languages.
Sure you can learn to be a programmer, it will take the same amount of time for me to learn to be a Doctor.


