Hello Everyone,
I am Deep from Delhi, India. I am into this hobby of making electronics projects since 1980. I am HAM radio operator also and my call sign is VU2AK. You can find me on QRZ.COM page. Also, I am secretary of DARTS (Delhi Amateur Radio Technical Society) and our website is www.darts.ord.in
I am now into making IOT project. I am now building IOT project to measure energy and display it on 16x2 display using nodeMCU ESP32S.
I need support if anyone can help me out in this
Warm regards
Pradeep Kumar
Mob-7303-375-375
WhatsApp-7880-375-375
You are very welcome I am sure Deep,
In my case I am just starting out myself but I will do my best where I am able.
Kindest Regards
Mark
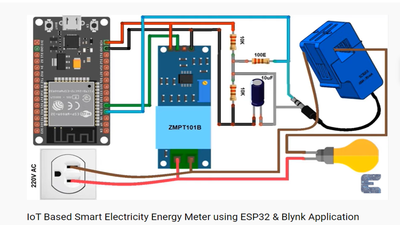
I am trying to replicate the following project as per the link below:
They are using Blynk app and the display simultaneously. I could not configure Blynk app and reading is also not displayed on 16x2 dispaly.
I have used the following code:
#include <LiquidCrystal.h>
LiquidCrystal lcd(13, 12, 14, 27, 26, 25);
#define BLYNK_PRINT Serial
#include "EmonLib.h"
#include <WiFi.h>
#include <WiFiClient.h>

EnergyMonitor emon;

#define vCalibration 83.3
#define currCalibration 0.50

char ssid[] = "Delhi Police jio";
char pass[] = "delhat@51";

float kWh = 0;
unsigned long lastmillis = millis();

void myTimerEvent()
{
emon.calcVI(20, 2000);
kWh = kWh + emon.apparentPower * (millis() - lastmillis) /3600000000.0;
yield();
Serial.print("Vrms: ");
Serial.print(emon.Vrms, 2);
Serial.print("V");

Serial.print("\tIrms: ");
Serial.print(emon.Irms, 4);
Serial.print("A");

Serial.print("\Power: ");
Serial.print(emon.apparentPower, 4);
Serial.print("W");

Serial.print("\tkWh: ");
Serial.print(kWh, 4);
Serial.print("kWh");

lcd.clear();
lcd.setCursor(0, 0);
lcd.print("Vrms:");
lcd.print(emon.Vrms, 2);
lcd.print("V");
lcd.setCursor(0, 1);
lcd.print("Irms:");
lcd.print(emon.Irms, 4);
lcd.print("A");
delay(2500);

lcd.clear();
lcd.setCursor(0, 0);
lcd.print("Power:");
lcd.print(emon.apparentPower, 4);
lcd.print("W");
lcd.setCursor(0, 1);
lcd.print("kWh:");
lcd.print(kWh, 4);
lcd.print("W");
delay(2500);

lastmillis = millis();

Blynk.virtualWrite(V0, emon.Vrms);
Blynk.virtualWrite(V1, emon.Irms);
Blynk.virtualWrite(V2, emon.apparentPower);
Blynk.virtualWrite(V3, kWh);
}

void setup()
{
Serial.begin(9600);
lcd.begin(16, 2);

emon.voltage(35, vCalibration, 1.7); // Voltage:input pin, calibration, phase_shift
emon.current(34, currCalibration); // Current: input pin, calibration.

timer.setInterval(5000L, myTimerEvent);
lcd.setCursor(3, 0);
lcd.print("IoT Energy");
lcd.setCursor(5, 1);
lcd.print("Meter");
delay(3000);
lcd.clear();
}

void loop()
{
timer.run();
}
I look forward for any support to complete this
Warm regards
Pradeep Kumar
Mob-7303-375-375
WhatsApp-7880-375-375
Welcome to the forum.
Can you please give us more details about what kind of energy are you measuring: Electrical, solar, gravitational ?
Also, what sensor(s) are you planning to use ?
Anything seems possible when you don't know what you're talking about.
Thanks Will for coming to my post.
Well if you see the link above in my post it talk about measuring the electrical current and voltage simultaneously.
I can hookup this SCT013 current sensor to any electrical devise (example fan, light, motor etc. etc.). I am using the following circuit diagram:
Hope I am able to share I am trying to do. I really got stuck up in writing the code as nothing is displayed on 16x2 display.
Warm regards
Pradeep Kumar
Mob-7303-375-375
WhatsApp-7880-375-375
Will in my above reply you will not find the 16x2 display but in the link below you will find the same:-
I too have used the same so that it displays on 16x2 display and at the same time on Blynk app.
Warm regards
Pradeep Kumar
Mob-7303-375-375
WhatsApp-7880-375-375
Looks good so far.
I'm sorry but I can't find any link in your post above.
I don't use ESP's yet (still having too much fun with Arduino's), but if you're using C++ I may be able to help you with the code.
Anything seems possible when you don't know what you're talking about.
Copy past this into google search,
IoT Based Smart Electricity Energy Meter using ESP32 & Blynk Application
This project which includes code seems to be,
https://how2electronics.com/iot-based-electricity-energy-meter-using-esp32-blynk/
And learning to use the Arudino IoT Cloud
https://dronebotworkshop.com/arduino-iot-cloud/
Thanks a lot. I have used the same code and the same project.
I got stuck at
char auth[] = "......";
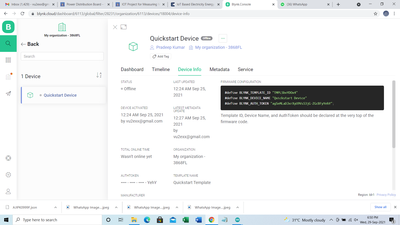
This is authentication code does not match nor the Blynk app works. Also I could not properly configure the Blynk app as a result of which the project is not working.
I will like to use the same project without using Blynk app - I only want that the readings of the current sensor displays the reading on the 16x2 display.
C++ code need to be modified. Kindly support in that.
Warm regards
Pradeep Kumar
Mob-7303-375-375
WhatsApp-7880-375-375
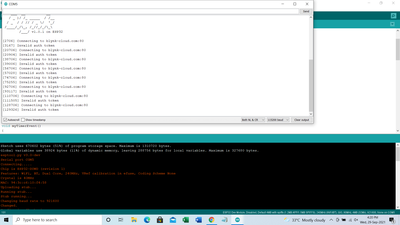
I have used the second code wherein it should display on LCD but following were displayed on "Serial Monitor"
Now how to get confirmed that the Voltage sensor ZMPT101B and current sensor SCT013 and working properly.
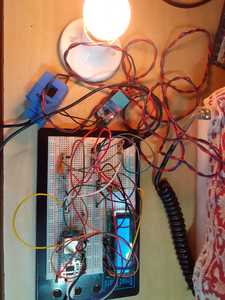
Either I should go step by step - first check voltage sensor and then in second step add current sensor to it. Three pics are as below:
Warm regards
Pradeep Kumar
Mob-7303-375-375
WhatsApp-7880-375-375
Thanks a lot for the suggestion. I am building the same but got stuck half the way. If by any chance you have made this project or have some idea I will definitely like to hear from you.
Thanks a lot
Warm regards
Pradeep Kumar
Mob-7303-375-375
WhatsApp-7880-375-375
Warm regards
Pradeep Kumar
Mob-7303-375-375
WhatsApp-7880-375-375
I will like to use the same project without using Blynk app - I only want that the readings of the current sensor displays the reading on the 16x2 display.
C++ code need to be modified. Kindly support in that.
OK, let's try to eliminate the Blynk part, step by step ...
1) make a copy of the sketch and work ONLY on the copy.
2) put // at the beginning of any command that references Blynk like the #defines at the top, the Blynktimer and all calls to those objects.
3) try recompiling to see if there are any orphaned Blynk related commands
4) comment out the entire loop() routine at the bottom.
5) rename the "void myTimerEvent" to "loop"
6) test compile that and try running it if it compiles.
Please let me know how that turns out.
Anything seems possible when you don't know what you're talking about.
Thanks a lot.
I tried some other program the voltage sensor is working but now it appears that the current sensor is not.
I have tried this sketch to measure current:
// EmonLibrary examples openenergymonitor.org, Licence GNU GPL V3

#include "EmonLib.h" // Include Emon Library
EnergyMonitor emon1; // Create an instance

void setup()
{
Serial.begin(115200);

emon1.current(34, 52); // Current: input pin, calibration.
}

void loop()
{
double Irms = emon1.calcIrms(1480); // Calculate Irms only

Serial.print(Irms*230.0); // Apparent power
Serial.print(" ");
Serial.println(Irms); // Irms
delay(500);
}
On increasing or on decreasing the load it is showing the following reading on serial monitor.
72.34 0.31
68.27 0.30
66.84 0.29
70.61 0.31
70.06 0.30
63.40 0.28
82.75 0.36
66.64 0.29
74.58 0.32
72.26 0.31
62.60 0.27
61.34 0.27
Looks like the current sensor is not working.
Warm regards
Pradeep Kumar
Mob-7303-375-375
WhatsApp-7880-375-375
Sorry but I haven't used that component so I can't help you with that.
Anything seems possible when you don't know what you're talking about.


