Notifications
Clear all

Can it be done? Combining MEMS technology sketch's with "if" and else" for a better result.

18 Posts
4 Users
2 Reactions
3,046 Views
(@quince)
Member
Joined: 3 years ago
Posts: 40
Topic starter  


Hello All, In my flying career I saw analog instruments  phased out and digital instruments replace them. I wanted to try and understand how MEMS technology worked, not just how to use it. I purchased the Adafriut 9 axis sensor used in an instruction  video series and cut and pasted my way to the end, lesson 24.

I was surprised and disappointed in the complexity of calibrating the compass by waving it around and how quickly in fell out of the set parameters it captured during the calibration stage. Within minutes in had wandered several degrees. The breakout board claims to be tilt compensating, but the more I tilted it the faster the heading wandered. I found the same to be true with the 6 DOF MPU 6050


I did build a diy-arduino-gimbal-self-stabilizing-platform/#Arduino_Code   I never did get the visual for the computer up and running but the code running on a MPU 6050 did run the servos with the same problem as before, wandering heading. The instructor in the video said that this breakout board was not as accurate as it could be.  During this period of time I was reading and came across shields for Arduino. I saw an Arduino 9 axis motion shield and so I bought one to see how it preformed. It was night and day. No messing around, plug it in and move it a fraction of an inch and it is reading, accurately, no deviation in heading after 12 hours.


It was very interesting, both claim to use the BNO 005 and yet the Arduino shield is much better. More like what I saw in the cockpit.  Fast and reliable.

I think a truly superior system would be taking instructions from the Arduino 9 axis motion shield and using them to run the code in; DIY Gimbal - MPU6050 Arduino

 Code based on the MPU6050_DMP6 example from the i2cdevlib library by Jeff Rowberg

I watched a video on combining sketch's , but this looks like it would take time and is much more complicated than the video example. I have no idea if it is possible with a variety of "if" or conflicts ect.

If you have a minute please read through both sets of code and tell me if it is worth the effort or if something jumps out that you think makes it impossible. Thanks, Quince


#include <Wire.h>
#include "NAxisMoton.h"
//Object that for the sensor
NAxisMotion mySensor;

//Flag to indicate if an interrupt was detected
bool intDetected = false;

//At a Range of 4g, the threshold
//is set at 39.05mg or 0.3830m/s2.
//This Range is the default for NDOF Mode
int threshold = 5;

//At a filter Bandwidth of 62.5Hz,
//the duration is 8ms.
//This Bandwidth is the default for NDOF Mode
int duration = 1;

//To know which interrupt was triggered
bool anyMotion = true;

//This code is executed once
void setup() {
  //Peripheral Initialization

  //Initialize the Serial Port to view information on the Serial Monitor
  Serial.begin(115200);

  //Initialize I2C communication to the let the library communicate with the sensor.
  I2C.begin();

  //Sensor Initialization
  Serial.println("Please wait. Initialization in process.");

  //The I2C Address can be changed here inside this function in the library
  mySensor.initSensor();
  mySensor.setOperationMode(OPERATION_MODE_NDOF);

  //Can be configured to other operation modes as desired
  mySensor.setUpdateMode(MANUAL);
  //The default is AUTO. Changing to manual requires
  //calling the relevant update functions prior to calling the read functions

  //Setting to MANUAL  requires lesser reads to the sensor

  //Attach the interrupt to the Interrupt Service Routine
  //for a Rising Edge. Change the interrupt pin depending on the board
  attachInterrupt(INT_PIN, motionISR, RISING);

  //Setup the initial interrupt to trigger at No Motion
  mySensor.resetInterrupt();
  mySensor.enableSlowNoMotion(threshold, duration, NO_MOTION);
  anyMotion = false;

  //Accelerometer interrupts can be triggered from all 3 axes
  mySensor.accelInterrupts(ENABLE, ENABLE, ENABLE);

  Serial.println("This is a game to test how steady you can move an object with one hand. \n
                 Keep the device on a table and mark 2 points.");

  Serial.println("Move the Device from one place to another
                 without triggering the Any Motion Interrupt.\n\n");

  delay(1000); //Delay for the player(s) to read
  Serial.println("Move the device around and then place it at one position.\n
                 Change the threshold and duration to increase the difficulty level.");

  Serial.println("Have fun!\n\n");
}

void loop() //This code is looped forever
{
  if (intDetected)
  {
    if (anyMotion)
    {
      Serial.println("You moved!! Try again. Keep the Device at one place.\n");
      intDetected = false;

      //Reset the interrupt line
      mySensor.resetInterrupt();

      //Disable the Any motion interrupt
      mySensor.disableAnyMotion();

      //Enable the No motion interrupt
      //(can also use the Slow motion instead)
      mySensor.enableSlowNoMotion(threshold, duration, NO_MOTION);
      anyMotion = false;
    }
    else
    {
      Serial.println("Device is not moving. You may start again.\n\n\n");
      intDetected = false;

      //Reset the interrupt line
      mySensor.resetInterrupt();

      //Disable the Slow or No motion interrupt
      mySensor.disableSlowNoMotion();

      //Enable the Any motion interrupt
      mySensor.enableAnyMotion(threshold, duration);
      anyMotion = true;
    }
  }
}

//Interrupt Service Routine
//when the sensor triggers an Interrupt
void motionISR() {
  intDetected = true;
}
*/
// I2Cdev and MPU6050 must be installed as libraries, or else the .cpp/.h files
// for both classes must be in the include path of your project
#include "I2Cdev.h"

#include "MPU6050_6Axis_MotionApps20.h"
//#include "MPU6050.h" // not necessary if using MotionApps include file

// Arduino Wire library is required if I2Cdev I2CDEV_ARDUINO_WIRE implementation
// is used in I2Cdev.h
#if I2CDEV_IMPLEMENTATION == I2CDEV_ARDUINO_WIRE
#include "Wire.h"
#endif
#include <Servo.h>
// class default I2C address is 0x68
// specific I2C addresses may be passed as a parameter here
// AD0 low = 0x68 (default for SparkFun breakout and InvenSense evaluation board)
// AD0 high = 0x69
MPU6050 mpu;
//MPU6050 mpu(0x69); // <-- use for AD0 high

// Define the 3 servo motors
Servo servo0;
Servo servo1;
Servo servo2;
float correct;
int j = 0;

#define OUTPUT_READABLE_YAWPITCHROLL

#define INTERRUPT_PIN 2  // use pin 2 on Arduino Uno & most boards

bool blinkState = false;

// MPU control/status vars
bool dmpReady = false;  // set true if DMP init was successful
uint8_t mpuIntStatus;   // holds actual interrupt status byte from MPU
uint8_t devStatus;      // return status after each device operation (0 = success, !0 = error)
uint16_t packetSize;    // expected DMP packet size (default is 42 bytes)
uint16_t fifoCount;     // count of all bytes currently in FIFO
uint8_t fifoBuffer[64]; // FIFO storage buffer

// orientation/motion vars
Quaternion q;           // [w, x, y, z]         quaternion container
VectorInt16 aa;         // [x, y, z]            accel sensor measurements
VectorInt16 aaReal;     // [x, y, z]            gravity-free accel sensor measurements
VectorInt16 aaWorld;    // [x, y, z]            world-frame accel sensor measurements
VectorFloat gravity;    // [x, y, z]            gravity vector
float euler[3];         // [psi, theta, phi]    Euler angle container
float ypr[3];           // [yaw, pitch, roll]   yaw/pitch/roll container and gravity vector

// packet structure for InvenSense teapot demo
uint8_t teapotPacket[14] = { '$', 0x02, 0, 0, 0, 0, 0, 0, 0, 0, 0x00, 0x00, '\r', '\n' };


// ================================================================
// ===               INTERRUPT DETECTION ROUTINE                ===
// ================================================================

volatile bool mpuInterrupt = false;     // indicates whether MPU interrupt pin has gone high
void dmpDataReady() {
  mpuInterrupt = true;
}

// ================================================================
// ===                      INITIAL SETUP                       ===
// ================================================================

void setup() {
  // join I2C bus (I2Cdev library doesn't do this automatically)
#if I2CDEV_IMPLEMENTATION == I2CDEV_ARDUINO_WIRE
  Wire.begin();
  Wire.setClock(400000); // 400kHz I2C clock. Comment this line if having compilation difficulties
#elif I2CDEV_IMPLEMENTATION == I2CDEV_BUILTIN_FASTWIRE
  Fastwire::setup(400, true);
#endif

  // initialize serial communication
  // (115200 chosen because it is required for Teapot Demo output, but it's
  // really up to you depending on your project)
  Serial.begin(38400);
  while (!Serial); // wait for Leonardo enumeration, others continue immediately

  // initialize device
  //Serial.println(F("Initializing I2C devices..."));
  mpu.initialize();
  pinMode(INTERRUPT_PIN, INPUT);
  devStatus = mpu.dmpInitialize();
  // supply your own gyro offsets here, scaled for min sensitivity
  mpu.setXGyroOffset(17);
  mpu.setYGyroOffset(-69);
  mpu.setZGyroOffset(27);
  mpu.setZAccelOffset(1551); // 1688 factory default for my test chip

  // make sure it worked (returns 0 if so)
  if (devStatus == 0) {
    // turn on the DMP, now that it's ready
    // Serial.println(F("Enabling DMP..."));
    mpu.setDMPEnabled(true);

    attachInterrupt(digitalPinToInterrupt(INTERRUPT_PIN), dmpDataReady, RISING);
    mpuIntStatus = mpu.getIntStatus();

    // set our DMP Ready flag so the main loop() function knows it's okay to use it
    //Serial.println(F("DMP ready! Waiting for first interrupt..."));
    dmpReady = true;

    // get expected DMP packet size for later comparison
    packetSize = mpu.dmpGetFIFOPacketSize();
  } else {
    // ERROR!
    // 1 = initial memory load failed
    // 2 = DMP configuration updates failed
    // (if it's going to break, usually the code will be 1)
    // Serial.print(F("DMP Initialization failed (code "));
    //Serial.print(devStatus);
    //Serial.println(F(")"));
  }

  // Define the pins to which the 3 servo motors are connected
  servo0.attach(10);
  servo1.attach(9);
  servo2.attach(8);
}
// ================================================================
// ===                    MAIN PROGRAM LOOP                     ===
// ================================================================

void loop() {
  // if programming failed, don't try to do anything
  if (!dmpReady) return;

  // wait for MPU interrupt or extra packet(s) available
  while (!mpuInterrupt && fifoCount < packetSize) {
    if (mpuInterrupt && fifoCount < packetSize) {
      // try to get out of the infinite loop
      fifoCount = mpu.getFIFOCount();
    }
  }

  // reset interrupt flag and get INT_STATUS byte
  mpuInterrupt = false;
  mpuIntStatus = mpu.getIntStatus();

  // get current FIFO count
  fifoCount = mpu.getFIFOCount();

  // check for overflow (this should never happen unless our code is too inefficient)
  if ((mpuIntStatus & _BV(MPU6050_INTERRUPT_FIFO_OFLOW_BIT)) || fifoCount >= 1024) {
    // reset so we can continue cleanly
    mpu.resetFIFO();
    fifoCount = mpu.getFIFOCount();
    Serial.println(F("FIFO overflow!"));

    // otherwise, check for DMP data ready interrupt (this should happen frequently)
  } else if (mpuIntStatus & _BV(MPU6050_INTERRUPT_DMP_INT_BIT)) {
    // wait for correct available data length, should be a VERY short wait
    while (fifoCount < packetSize) fifoCount = mpu.getFIFOCount();

    // read a packet from FIFO
    mpu.getFIFOBytes(fifoBuffer, packetSize);

    // track FIFO count here in case there is > 1 packet available
    // (this lets us immediately read more without waiting for an interrupt)
    fifoCount -= packetSize;

    // Get Yaw, Pitch and Roll values
#ifdef OUTPUT_READABLE_YAWPITCHROLL
    mpu.dmpGetQuaternion(&q, fifoBuffer);
    mpu.dmpGetGravity(&gravity, &q);
    mpu.dmpGetYawPitchRoll(ypr, &q, &gravity);

    // Yaw, Pitch, Roll values - Radians to degrees
    ypr[0] = ypr[0] * 180 / M_PI;
    ypr[1] = ypr[1] * 180 / M_PI;
    ypr[2] = ypr[2] * 180 / M_PI;
    
    // Skip 300 readings (self-calibration process)
    if (j <= 300) {
      correct = ypr[0]; // Yaw starts at random value, so we capture last value after 300 readings
      j++;
    }
    // After 300 readings
    else {
      ypr[0] = ypr[0] - correct; // Set the Yaw to 0 deg - subtract  the last random Yaw value from the currrent value to make the Yaw 0 degrees
      // Map the values of the MPU6050 sensor from -90 to 90 to values suatable for the servo control from 0 to 180
      int servo0Value = map(ypr[0], -90, 90, 0, 180);
      int servo1Value = map(ypr[1], -90, 90, 0, 180);
      int servo2Value = map(ypr[2], -90, 90, 180, 0);
      
      // Control the servos according to the MPU6050 orientation
      servo0.write(servo0Value);
      servo1.write(servo1Value);
      servo2.write(servo2Value);
    }
#endif
  }
}

   
Quote
frogandtoad
(@frogandtoad)
Member
Joined: 6 years ago
Posts: 1458
 

@quince

Posted by: @quince

If you have a minute please read through both sets of code and tell me if it is worth the effort or if something jumps out that you think makes it impossible. Thanks, Quince

I have no real experience or knowledge of what you're trying to achieve, but I feel confidant that you can achieve what you like, BASED on the device your using has enough memory, speed and data storage etc...

I and others here can help you to implement any code, but you'll have to provide the logic you require 🙂

Have a go at implementing it yourself, ask questions, show your code attempt, and I'm sure I or someone else here with experience can chime in to help you to progress your problem to completion.

Cheers.


ReplyQuote
(@quince)
Member
Joined: 3 years ago
Posts: 40
Topic starter  

 Hello all , I just sent this note to another user that was kind enough to tell why the lack of response.


WOW I never thought that it would be looked at like I was trying to have someone else do the work. I started doing code the end of December. I needed help  from  a kind forum user for the code below, I tried for a week before I asked for help. He did it in ten minutes.When I look at trying to combine the two codes for the project I have in mind I got weak in the knees.

The question I was asking is if it could be done. I don't know enough to understand that it was a special area of expertise. I thought that like most of my other problems the forum could  solve it in 30 minutes, and I get to learn where I went wrong, or the steps to start.  I had every attention of trying to combine the two by using the Arduino shield as the data input for the DIY gimble.The gimble program runs very well, but the heading wanders. I have tried other MEMS units  prior to the shield and they were very bad.I knew I had trouble when I could not get the shield code to compile, without any modification ,direct from Arduino.What I found odd is that the code will not compile but the system works fine when I plug it in and pull up the examples. Preloaded?

I have loaded all library's and the program tells me I am still missing one but it shows in the library and is loaded  so I need to figure that out.   What I had intended  was to try and change the code concerning the input from the MPU 6050 to that of the shield and see if they would play together but when the program would not compile I went looking for answers and I found the raw code for the shield and got nervous, as  you say it is long and complicated.

I have found that there is no substitute for being able to ask a question from someone who knows. I am new to this so  if I have stepped out of line somehow I can assure you all it was unintentional and I apologize. Thanks  to the user for explaining the lack of response. Quince 


ReplyQuote
Ron
 Ron
(@zander)
Father of a miniature Wookie
Joined: 4 years ago
Posts: 7914
 

@quince Let's start with the library issues. Exactly what is the error msg, take a screen print. Now don't get upset, but have you messed in the directories instead of using the library manager? Fow some reason a lot of new people with no experience do that and mess themselves up. Just use the arduino tools and it will work.

First computer 1959. Retired from my own computer company 2004.
Hardware - Expert in 1401, and 360, fairly knowledge in PC plus numerous MPU's and MCU's
Major Languages - Machine language, 360 Macro Assembler, Intel Assembler, PL/I and PL1, Pascal, Basic, C plus numerous job control and scripting languages.
My personal scorecard is now 1 PC hardware fix (circa 1982), 1 open source fix (at age 82), and 2 zero day bugs in a major OS.


ReplyQuote
(@quince)
Member
Joined: 3 years ago
Posts: 40
Topic starter  

Ron, I downloaded the library in a zip, opened included library. add library,it took it. I think that  there may be more than one for the shield, or it has been modified in some manner.  I need to run that down.  I am having some of the same issues with the code for the BNO 005, there are several different "BNO 055" library's. I try to be very careful when I install them, I found that out early.

What is stumping me is that the code for the shield will not compile but the shield runs Great! but no way to try and modify the code If I can't get the sketch to compile.  Quince


adrino_9_axis_shield_code:3:10: fatal error: NAxisMoton.h: No such file or directory
#include "NAxisMoton.h"
^~~~~~~~~~~~~~
compilation terminated.
exit status 1
NAxisMoton.h: No such file or directory

https://docs.arduino.cc/hardware/9-axis-motion-shield


ReplyQuote
Ron
 Ron
(@zander)
Father of a miniature Wookie
Joined: 4 years ago
Posts: 7914
 

@quince This is not correct procedure.

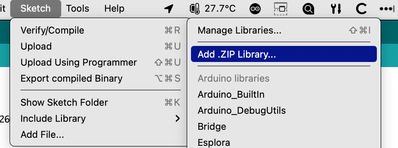
opened included library. add library

Once the zip is downloaded you use the IDE to do the install. If you have done otherwise, you may need to delete the entire arduino environment and start over.

I find it odd that they would spell arduino wrong.

I am including a screen print of what you do after the zip is downloaded.

You can verify what libs you have by looking at your sketchbook location libraries directory. If NAxisMoton is there then check the contents of the dir to see what .h files are there. If they can't spell arduino, maybe they also misspelled the name of the include file.

Screen Shot 2022 04 21 at 15.25.55


ccc


First computer 1959. Retired from my own computer company 2004.
Hardware - Expert in 1401, and 360, fairly knowledge in PC plus numerous MPU's and MCU's
Major Languages - Machine language, 360 Macro Assembler, Intel Assembler, PL/I and PL1, Pascal, Basic, C plus numerous job control and scripting languages.
My personal scorecard is now 1 PC hardware fix (circa 1982), 1 open source fix (at age 82), and 2 zero day bugs in a major OS.


ReplyQuote
(@quince)
Member
Joined: 3 years ago
Posts: 40
Topic starter  

Ron, I found the library issue the code download from Arduino looks like this;

# include NineAxesMotion.h"

When I opened the Eular example that is running it looks like this;

#include "Arduino_NineAxesMotion.h"

And the system came right up it compiled  further  down the sketch and I end here;


Arduino: 1.8.16 (Windows 7), Board: "Arduino Uno"


In file included from C:\Users\James\Documents\Arduino\adrino_9_axis_shield_code\adrino_9_axis_shield_code.ino:3:0:

C:\Users\James\Documents\Arduino\libraries\Arduino_NineAxesMotion-master\src/Arduino_NineAxesMotion.h:766:8: warning: extra tokens at end of #endif directive [-Wendif-labels]

#endif __NAXISMOTION_H__


Multiple libraries were found for "Arduino_NineAxesMotion.h"

Used: C:\Users\James\Documents\Arduino\libraries\Arduino_NineAxesMotion-master

Not used: C:\Users\James\Documents\Arduino\libraries\Arduino_NineAxesMotion-1.1.1

exit status 1


ReplyQuote
Will
 Will
(@will)
Member
Joined: 4 years ago
Posts: 2592
 
Posted by: @quince

adrino_9_axis_shield_code:3:10: fatal error: NAxisMoton.h: No such file or directory
#include "NAxisMoton.h"
^~~~~~~~~~~~~~
compilation terminated.
exit status 1
NAxisMoton.h: No such file or directory

https://docs.arduino.cc/hardware/9-axis-motion-shield

Adrino ?

NAxisMoton ?

These mis-spelled terms look like they've been typed in and not copied.

By the way, if you follow the link to the 9-axis-motion-shield and click Resources to get to the library download, the GitHub repository clearly states 

Note: this library is deprecated and no longer maintained.

So it may be that you need another library as this one seems to be outdated.

Anything seems possible when you don't know what you're talking about.


Ron reacted
ReplyQuote
Ron
 Ron
(@zander)
Father of a miniature Wookie
Joined: 4 years ago
Posts: 7914
 

@quince Ok, last error first. It appears you have 2 versions of the library, decide which is correct and delete the other directory/library.

Not sure re the #endif, I don't use that statement hardly ever so don't remember the syntax but my guess is it is not terminal, fix the 2 versions of the library first.

First computer 1959. Retired from my own computer company 2004.
Hardware - Expert in 1401, and 360, fairly knowledge in PC plus numerous MPU's and MCU's
Major Languages - Machine language, 360 Macro Assembler, Intel Assembler, PL/I and PL1, Pascal, Basic, C plus numerous job control and scripting languages.
My personal scorecard is now 1 PC hardware fix (circa 1982), 1 open source fix (at age 82), and 2 zero day bugs in a major OS.


ReplyQuote
Ron
 Ron
(@zander)
Father of a miniature Wookie
Joined: 4 years ago
Posts: 7914
 

@will Good man Will. That makes some sense.

First computer 1959. Retired from my own computer company 2004.
Hardware - Expert in 1401, and 360, fairly knowledge in PC plus numerous MPU's and MCU's
Major Languages - Machine language, 360 Macro Assembler, Intel Assembler, PL/I and PL1, Pascal, Basic, C plus numerous job control and scripting languages.
My personal scorecard is now 1 PC hardware fix (circa 1982), 1 open source fix (at age 82), and 2 zero day bugs in a major OS.


ReplyQuote
(@quince)
Member
Joined: 3 years ago
Posts: 40
Topic starter  
/****************************************************************************
* Copyright (C) 2011 - 2014 Bosch Sensortec GmbH
*
* Euler.ino
* Date: 2014/09/09
* Revision: 3.0 $
*
* Usage:        Example code to stream Euler data
*
****************************************************************************
/***************************************************************************
* License:
*
* Redistribution and use in source and binary forms, with or without
* modification, are permitted provided that the following conditions are met:
*
*   Redistributions of source code must retain the above copyright
*   notice, this list of conditions and the following disclaimer.
*
*   Redistributions in binary form must reproduce the above copyright
*   notice, this list of conditions and the following disclaimer in the
*   documentation and/or other materials provided with the distribution.
*
*   Neither the name of the copyright holder nor the names of the
*   contributors may be used to endorse or promote products derived from
*   this software without specific prior written permission.
*
* THIS SOFTWARE IS PROVIDED BY THE COPYRIGHT HOLDERS AND CONTRIBUTORS "AS IS" AND
* ANY EXPRESS OR IMPLIED WARRANTIES, INCLUDING, BUT NOT LIMITED TO, THE IMPLIED
* WARRANTIES OF MERCHANTABILITY AND FITNESS FOR A PARTICULAR PURPOSE ARE
* DISCLAIMED. IN NO EVENT SHALL COPYRIGHT HOLDER OR CONTRIBUTORS BE LIABLE FOR ANY
* DIRECT, INDIRECT, INCIDENTAL, SPECIAL, EXEMPLARY, OR CONSEQUENTIAL DAMAGES
* (INCLUDING, BUT NOT LIMITED TO, PROCUREMENT OF SUBSTITUTE GOODS OR SERVICES;
* LOSS OF USE, DATA, OR PROFITS; OR BUSINESS INTERRUPTION) HOWEVER CAUSED AND
* ON ANY THEORY OF LIABILITY, WHETHER IN CONTRACT, STRICT LIABILITY, OR TORT
* (INCLUDING NEGLIGENCE OR OTHERWISE) ARISING IN ANY WAY OUT OF THE USE OF THIS
* SOFTWARE, EVEN IF ADVISED OF THE POSSIBILITY OF SUCH DAMAGE
*
* The information provided is believed to be accurate and reliable.
* The copyright holder assumes no responsibility for the consequences of use
* of such information nor for any infringement of patents or
* other rights of third parties which may result from its use.
* No license is granted by implication or otherwise under any patent or
* patent rights of the copyright holder.
*/

#include "Arduino_NineAxesMotion.h"        //Contains the bridge code between the API and the Arduino Environment
#include <Wire.h>

NineAxesMotion mySensor;         //Object that for the sensor 
unsigned long lastStreamTime = 0;     //To store the last streamed time stamp
const int streamPeriod = 20;          //To stream at 50Hz without using additional timers (time period(ms) =1000/frequency(Hz))

void setup() //This code is executed once
{
  //Peripheral Initialization
  Serial.begin(9600);           //Initialize the Serial Port to view information on the Serial Monitor
  Wire.begin();                    //Initialize I2C communication to the let the library communicate with the sensor.
  //Sensor Initialization
  mySensor.initSensor();          //The I2C Address can be changed here inside this function in the library
  mySensor.setOperationMode(OPERATION_MODE_NDOF);   //Can be configured to other operation modes as desired
  mySensor.setUpdateMode(MANUAL); //The default is AUTO. Changing to MANUAL requires calling the relevant update functions prior to calling the read functions
  //Setting to MANUAL requires fewer reads to the sensor
}

void loop() //This code is looped forever
{
  if ((millis() - lastStreamTime) >= streamPeriod)
  {
    lastStreamTime = millis();
    mySensor.updateEuler();        //Update the Euler data into the structure of the object
    mySensor.updateCalibStatus();  //Update the Calibration Status

    Serial.print("Time: ");
    Serial.print(lastStreamTime);
    Serial.print("ms ");

    Serial.print(" H: ");
    Serial.print(mySensor.readEulerHeading()); //Heading data
    Serial.print("deg ");

    Serial.print(" R: ");
    Serial.print(mySensor.readEulerRoll()); //Roll data
    Serial.print("deg");

    Serial.print(" P: ");
    Serial.print(mySensor.readEulerPitch()); //Pitch data
    Serial.print("deg ");

    Serial.print(" A: ");
    Serial.print(mySensor.readAccelCalibStatus());  //Accelerometer Calibration Status (0 - 3)

    Serial.print(" M: ");
    Serial.print(mySensor.readMagCalibStatus());    //Magnetometer Calibration Status (0 - 3)

    Serial.print(" G: ");
    Serial.print(mySensor.readGyroCalibStatus());   //Gyroscope Calibration Status (0 - 3)

    Serial.print(" S: ");
    Serial.print(mySensor.readSystemCalibStatus());   //System Calibration Status (0 - 3)

    Serial.println();
  }  }


Ron, This compiles ,but look at the error message block as it compiles. It displays a warning message. Thanks, Quince


ReplyQuote
Ron
 Ron
(@zander)
Father of a miniature Wookie
Joined: 4 years ago
Posts: 7914
 

@quince Can you show me? Please screen print only.

First computer 1959. Retired from my own computer company 2004.
Hardware - Expert in 1401, and 360, fairly knowledge in PC plus numerous MPU's and MCU's
Major Languages - Machine language, 360 Macro Assembler, Intel Assembler, PL/I and PL1, Pascal, Basic, C plus numerous job control and scripting languages.
My personal scorecard is now 1 PC hardware fix (circa 1982), 1 open source fix (at age 82), and 2 zero day bugs in a major OS.


ReplyQuote
Will
 Will
(@will)
Member
Joined: 4 years ago
Posts: 2592
 

@quince 

I just compiled it with no errors at all.

edit: previous version was from wrong sketch. correct version is here now

Sketch uses 8632 bytes (28%) of program storage space. Maximum is 30720 bytes.
Global variables use 579 bytes (28%) of dynamic memory, leaving 1469 bytes for local variables. Maximum is 2048 bytes.

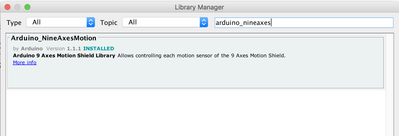
This was the library I used ...

Screen Shot 2022 04 21 at 3.52.12 PM

Anything seems possible when you don't know what you're talking about.


Ron reacted
ReplyQuote
Ron
 Ron
(@zander)
Father of a miniature Wookie
Joined: 4 years ago
Posts: 7914
 

@will @quince you have to give Will a cookie when he does good work, otherwise he gets cranky.

I think you know what is happening here, Will gets it to work first time, sooooooooo??????

First computer 1959. Retired from my own computer company 2004.
Hardware - Expert in 1401, and 360, fairly knowledge in PC plus numerous MPU's and MCU's
Major Languages - Machine language, 360 Macro Assembler, Intel Assembler, PL/I and PL1, Pascal, Basic, C plus numerous job control and scripting languages.
My personal scorecard is now 1 PC hardware fix (circa 1982), 1 open source fix (at age 82), and 2 zero day bugs in a major OS.


ReplyQuote
Will
 Will
(@will)
Member
Joined: 4 years ago
Posts: 2592
 
Posted by: @zander FYI @quince

@will @quince you have to give Will a cookie when he does good work, otherwise he gets cranky.

Nah, won't help, I'm always cranky 🙂

I specified the library I used in the hopes that the one Quince is using might be the problem and switching to the same one I used may result in a clean compile.

Anything seems possible when you don't know what you're talking about.


ReplyQuote
Page 1 / 2