Build a Raspberry Pi Solar Camera and get a close-up look at the 2024 Solar Eclipse! Learn to use any telescope to stream video with a Raspberry Pi HQ Camera.
Today, we will integrate a Celestron EclipSmart Solar Telescope (or any telescope) with a Raspberry Pi HQ Camera. The result is an instrument that can stream images to web browsers and video players or interact with popular astronomy applications.
I’ll show you two applications that you can use to stream the data. One of them, RPI Cam ASCOM Alpaca, is used with professional astronomy software. The second, Picamera2 Web UI Lite, is a more general-purpose app. I’m using it in my implementation.
I’ll also show you Astroberry Server, a complete Raspberry Pi suite of astronomy applications.
I’m preparing for the April 2024 eclipse and am thrilled to report that the DroneBot Workshop is in the path of totality! As long as we have a clear day on April 8th, I’ll be able to watch and photograph the event of a lifetime from the comfort of my spare bedroom!
The solar telescope is one of the instruments I will be using, and it is a fascinating device, even without an eclipse. It lets you view sunspots and watch them evolve, a real treat if you are into astronomy (as I am).
I’ll also show you how to apply solar filters to a regular camera to obtain some great pictures of the Sun.
And, naturally, I’ll show off some of my photos.
Here is the Table of Contents for today's video:
00:00 - Introduction
01:35 - Raspberry Pi Astronomy
07:18 - Celestron Solar Telescope
10:02 - Raspberry Pi HQ Camera
11:43 - Other Bits & Pieces
14:50 - Telescope Assembly
15:58 - Pi and Case Assembly
18:17 - Image Software Introduction
19:24 - Astroberry Server
21:40 - RPI Cam ASCOM Alpaca
24:02 - Picamera2 Web UI Lite Installation
30:35 - Preparing for the Eclipse
35:42 - My "Observatory" & Sun Filters
37:30- DSLR Setup & Pictures
39:03 - Pi Camera Setup & Pictures
40:46 - Conclusion
I hope you enjoy the project and have time to assemble it before the eclipse. If I get some photos and/or videos on April 8th, I’ll share them on the forum!
Happy sungazing!
"Never trust a computer you can’t throw out a window." — Steve Wozniak
Thanks Bill. I used to be fairly involved in astronomy (10" Newtonian fully computer controlled and 70/480 ED refractor by Televue)
I would love to get back into it in a small way so this project sounds perfect.
Now everything else has to go on the back burner.
First computer 1959. Retired from my own computer company 2004.
Hardware - Expert in 1401, and 360, fairly knowledge in PC plus numerous MPU's and MCU's
Major Languages - Machine language, 360 Macro Assembler, Intel Assembler, PL/I and PL1, Pascal, Basic, C plus numerous job control and scripting languages.
Sure you can learn to be a programmer, it will take the same amount of time for me to learn to be a Doctor.
@zander, I envy you; the best I did was an 8-inch reflector scope from Edmund Scientific when I was a teenager. It was still enough to keep me out on many cold winter nights.
I'd love to get back into it. I'm at least going to use my "observatory" to shoot a few Moon pictures with that telephoto lens.
😎
Bill
"Never trust a computer you can’t throw out a window." — Steve Wozniak
@dronebot-workshop That will work great. Currently, I have a Canon 100 to 400 plus a 2X and 3X? I also have a spotter scope with a right angle eye piece so now I am thinking of getting that Pi HiQ camera and a 1.25 to C adapter (used to have a few, all gone now) Since I have a WiFi controlled alt az head, I am thinking of setting up on the balcony and streaming to the 55" 4K HDR screen. I am more interested in deep sky then solar, I won't have time to put that together and a quick check told me they are out of stock. I also looked at long range weather and it doesn't;t look good. Ever since they 'greened' the mine tailings, we now get many cloudy nights. I used to belong to the astronomy club here for a few years and we could notice the difference. Makes it tougher, but If I can leave the rig set up on the balcony with an all sky (another project) camera to check conditions it will be less painful than carrying al the gear out to the site only to be dissapointed.
I hope you get to see the eclipse inh all it's gloey, we had our chance a few years ago and observed from our fire tower using a piece of cardboard with a pinhole projecting against a presentation tripod and while paper. Worked great and we had our backs to the sun so very safe.
Good luck.
First computer 1959. Retired from my own computer company 2004.
Hardware - Expert in 1401, and 360, fairly knowledge in PC plus numerous MPU's and MCU's
Major Languages - Machine language, 360 Macro Assembler, Intel Assembler, PL/I and PL1, Pascal, Basic, C plus numerous job control and scripting languages.
Sure you can learn to be a programmer, it will take the same amount of time for me to learn to be a Doctor.
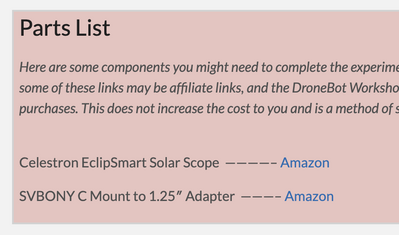
The only C-mount adapters I've found on Amazon are 1.25" not 1.50". Does the one required for the Celestron EclipSmart Solar Telescope have to be 1.50"?
I may be in Austin, TX on the 8th, but even not, or the weather is bad, this setup will be handy in the future.
CodeCage
SteveG
@codecage C mount is 1" and 32mm thread, but a telescope C mount is also a 1.25" D adaptor.
I think this is the type you want (I used to have a few) LINK
First computer 1959. Retired from my own computer company 2004.
Hardware - Expert in 1401, and 360, fairly knowledge in PC plus numerous MPU's and MCU's
Major Languages - Machine language, 360 Macro Assembler, Intel Assembler, PL/I and PL1, Pascal, Basic, C plus numerous job control and scripting languages.
Sure you can learn to be a programmer, it will take the same amount of time for me to learn to be a Doctor.
Just went thru the video and accompanying article again and see that somehow I translated the C-Mount to 1.25" adapter to a 1.5"adapter. Couldn't be considered a fat finger but maybe a brain far..... 🤣 🤣
And I've got to quit watching these videos! I want to build everything!!! Well, I can't take it with me anyway so might as well spend my money on the things that me happy in the years I have left. But after that I'm afraid it will just sit on a shelf and gather dust.
SteveG
@codecage I know what you mean. My problem is I keep running into roadblocks, most of a mechanical nature. I have very limited space and tools so have to use hand tools and sometimes my muscles don't want to listen to my brain.
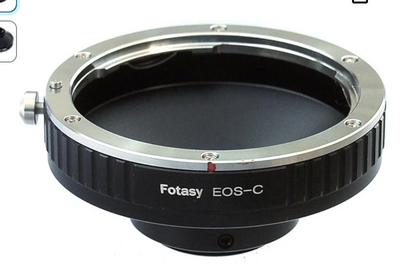
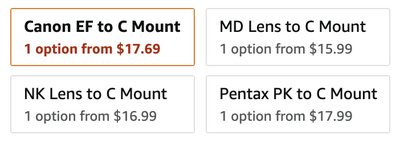
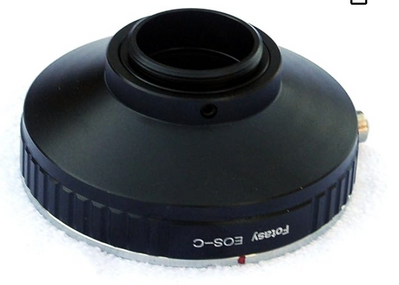
I think there is a reason for the confusion, looking at the article I see the following. I am also including the definition of 'C mount' in the 3rd pic. So a 'telescope to camera adaptor has a 1.25" OD cylinder on one end that fits in the standard 1.25" ID telescope and a 1" OD 32TPI connection on the other end that screws into the camera adaptor. There is also a C mount adaptor for each different camera. I use Canon so the 4th pic shows that adaptor to complete the entire setup. The rest of the pics show the availability of different camera adaptors and the backside 1" side of the adaptor. Hopefully that clears up any confusion.
First computer 1959. Retired from my own computer company 2004.
Hardware - Expert in 1401, and 360, fairly knowledge in PC plus numerous MPU's and MCU's
Major Languages - Machine language, 360 Macro Assembler, Intel Assembler, PL/I and PL1, Pascal, Basic, C plus numerous job control and scripting languages.
Sure you can learn to be a programmer, it will take the same amount of time for me to learn to be a Doctor.
I'm not sure of the etiquette here - if I have something to ask/discuss about the solar scope project, do I ask it here in this thread? Or is there a separate place for project discussion?
I'll ask my question, and you guys can redirect me if it should go somewhere else.
I have a Pi 4, HQ camera, and Picamera2 web set up and working. But the image embedded in the default page is much smaller and lower in resolution than the camera specs suggest. As I understand it, the HQ camera should be able to produce an image that is roughly 4K, but the image in the page appears to be not much larger than 480p widescreen. If you use the "Capture Image" button, the resulting capture appears to be larger - about 720p - but still nowhere near the size suggested by the camera specs.
Is there a way to access and stream the full resolution of the camera?
Maybe there is some key detail that I'm missing. If so, please educate me. 🙂
Thanks.
Jim G.
Is there a way to access and stream the full resolution of the camera?
Maybe there is some key detail that I'm missing. If so, please educate me.
Using the URL youripaddress:8080/video_stream will give you a full-screen stream; you can also use this URL with VLC and other streaming software.
Toms Hardware has an excellent article on adjusting your camera settings using Picamera2 - https://www.tomshardware.com/raspberry-pi/how-to-control-your-raspberry-pi-camera-using-a-web-ui.
Hope that helps! I'll be setting mine up on Saturday or Sunday for a "test run" before the big day, if I discover any "Magic settings" I will post them.
😎
Bill
"Never trust a computer you can’t throw out a window." — Steve Wozniak
@jimgilliland I have not used that setup but I have used another streaming camera setup and it has resolution settings in the UI. I have not yet tried Picamera2 so I can't tell you how to do it, but I would think it is obvious. Do NOT make the mistake of trying to adjust the resolution on the display end, that will result in a very poor image.
NOTE: If you have a 4K TV it may have a facility to act as a browser, but if not depending on make/model you should have either Chromecast (all) or AirPlay(Apple). I have both on my new 55" Sony. If you do NOT have anything built in, a chromecast dongle costs less than $50 IIRC and can be picked up in any store that sells electronic gear usually. That dongle will need a USB receptacle on the TV.
First computer 1959. Retired from my own computer company 2004.
Hardware - Expert in 1401, and 360, fairly knowledge in PC plus numerous MPU's and MCU's
Major Languages - Machine language, 360 Macro Assembler, Intel Assembler, PL/I and PL1, Pascal, Basic, C plus numerous job control and scripting languages.
Sure you can learn to be a programmer, it will take the same amount of time for me to learn to be a Doctor.
If you haven't already discovered this, be sure to the leave the period off the end of the link to the article on Tom's Hardware
SteveG
youripaddress:8080/video_stream
Thank you, that pointed me in the right direction. On my system, it seems to be "video_feed", not "video_stream". When I copy the image URL from the browser and opened it directly, I do get a full 4K image. And it appears that the capture function is also capturing a full image. So it is the browser and the page html that is limiting the image on the page. I'll try to set up OBS on the pi and see how well it can record a stream. I fear that the pi won't do it well because it doesn't have a GPU. It may make more sense to just capture individual frames.
I started working on this when you first published your video/article. I had been looking forward to the eclipse, but I hadn't made any plans for using technology with it. Once I got started, I googled some online guidance from others and found that most of the experts tell me I should have started planning 9 months ago! So I guess I'm just trying to get caught up. 🙂
I got the camera and 1.25" adapter, and I also got a lens for the camera so I could test it without having to set up the telescope. I'm using a pi 4 because I couldn't find a long camera cable that would fit the smaller connector on the pi 5.
I have a Meade telescope that's about 20-25 years old (ETX-105). I made a solar filter for it that fits perfectly, but when I turned it on I discovered that the display on the Autostar hand controller had failed. A web search suggests that this is a very common problem with these devices. But it still seems to work, and there are ways to control it using an app on Android or Windows. That still leaves a lot of problems to resolve.
For example, how to do a polar alignment during the daytime without guide stars? Will an "auto" setting work to capture images, or do I need to find out how to set exposure times? Obviously, with a telescope I can't change the aperture or focal length. I'm not sure whether exposure time and/or light sensitivity (ISO) even make sense in this context.
I also plan to set up a mirrorless camera on a tripod with an intervalometer.
Lots more things to figure out: Can I use automation to guide the scope or will I have to guide it manually? What about the camera? How often will I need to reposition it as the sun moves across the sky? I'm in the path of totality, so how quickly can I remove the solar filters from the scope and the camera when totality arrives? What settings need to be changed at that point? Obviously the image brightness will vary widely from full sunlight to full eclipse - how do I set up bracketing so I have some insurance against over or under exposure?
Some of the online advice says to just forget all of this and enjoy the eclipse in real time without concerning myself with cameras or telescopes at all. I think that's not a bad idea, but it would be great if I could let the computers drive the image captures so I wouldn't have to worry about it during those 3 minutes.
Maybe those guys are right - I should have started planning this many months ago. 🙂
Or maybe none of this will matter at all. The forecast here was calling for sunshine, but today it has changed to a forecast of clouds and rain for Monday afternoon.
If you have a 4K TV it may have a facility to act as a browser, but if not depending on make/model you should have either Chromecast (all) or AirPlay(Apple). I have both on my new 55" Sony. If you do NOT have anything built in, a chromecast dongle costs less than $50 IIRC and can be picked up in any store that sells electronic gear usually. That dongle will need a USB receptacle on the TV.
I have three TVs in this house, and the newest of them is about 12-15 years old. Two of them haven't been used in years, and even the one in my living room gets used only a couple of times a year.
But I have two 4K monitors on this computer. The better of the two is a 43" screen. At computer monitor range, 43" of 4K image is about as much as my eyes can resolve.
I also have two laptops with 4K displays. 4K is overkill on the smaller (13") one, but it is worthwhile on the 17" screen. I'm still working out how to best use all of this stuff for Monday.
@jimgilliland Be very careful with both camera sensors and human eyes even during totality. As far as tracking, every object (Sun, Moon, planets, other minor objects) has a tracking rate. If your scope has a german equatorial mount with tracking, the setting will be in the software somewhere. If you have a really old clock drive, it will be a mechanical gear setting and it works off grid!
I am both an astronomer and a photographer and I am not planning on taking any pictures, just maybe have a look through some solar glasses I bought. Our latest weather forecast is for some clouds so it will be spotty.
Exposure is not too difficult, use auto with some bias to trick the 18%grey target the camera will give you. I have an intervalometer both in my camera, and a stand alone that could manage the timing etc so all you have left is tracking. Lets try some simple math, the sun is on a 24hr journey, that's 1,440 minutes. The suns apparent size is 1/2 a degree so the sun travels from one edge to the other in 2 mins. (360/720 = 1/2 degree, 1440/720 = 2 minutes)
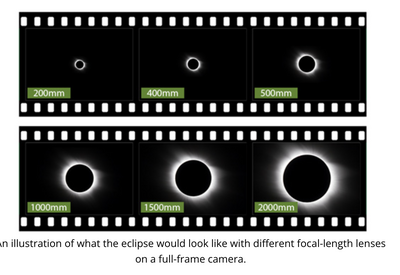
I have attached a picture of what different focal length lenses will produce. I can get to 1200 by using a triple on my 100-400. Since my sensor is APS-C my effective fl would be 1680. Off the top of my head I think 1/2000 of a second at f8 then set the camera motor to High and intervalometer to 1 pic every second using a bracket algorithm of 5 at a 1/2 stop each.
Bottom line is, your friends are right, it's a 6 month plus planning exercise. Off the top of my head based on the type of questions you are asking, I think your tripod/tracking is not up to the job, I doubt you have current software and are up to speed on how to use it. I am further along and still won't attempt to take any pictures, it's just too much effort and YES, the photographer at any kind of event does not get to enjoy it as he is hussling to get it all correct. Easier today with digital and computers, but some parts are the same.
If you have any specific questions that I may be able to help with give me a shout, I am on here almost constanatly.
First computer 1959. Retired from my own computer company 2004.
Hardware - Expert in 1401, and 360, fairly knowledge in PC plus numerous MPU's and MCU's
Major Languages - Machine language, 360 Macro Assembler, Intel Assembler, PL/I and PL1, Pascal, Basic, C plus numerous job control and scripting languages.
Sure you can learn to be a programmer, it will take the same amount of time for me to learn to be a Doctor.


