have changed the sketch a bit, to clear the screen before the next output. However - how do I re-initialize the first screen? I assume with a break-out button like * or #? And yes, the stepper is running, but I will have to zero it.
... stepper is dead ...
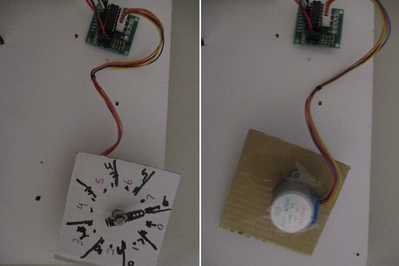
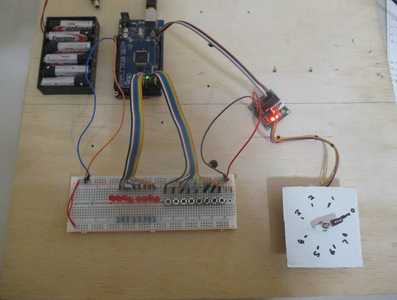
That I would consider a major issue. I would get that working properly first. I would use the Arduino IDE Monitor to input a key value and get the stepper working correctly. In another stepper project I worked on the user would input a number (press a button) 1 to 8 and the stepper would move to the required position. Your problem is similar except you have 24 positions and use a keypad. You move a set number of moves rather than to a particular position. As you can see in the image below I used a square of cardboard so I could texture the desired positions to make sure it worked as required.
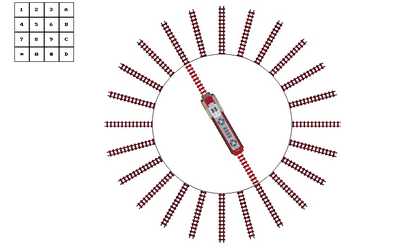
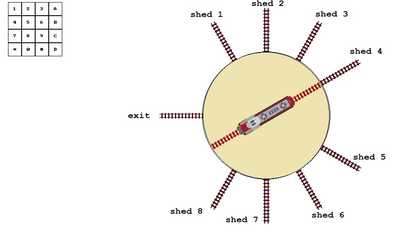
I also started a simulation of your turn table to test the logic of the program. It uses a virtual keypad (click buttons with mouse). As you have a touch screen you could have a virtual keypad?
robotBuilder, that is nice. the stepper is fixed in the meantime, as well as the screen layout - I will share a video, to see the current run. What I will need to do is to center the stepper, and from there have references to where it should go. The output for 180 deg and 0 deg should also be amended, not sure how to include that now, with the new statement, as it is dependent on the selection of either 9 or 0.
What I also fought about is a "break-out" key, (to go back after a selection, without confirmation), and an erase key, to erase the current value. Then perhaps to add the selected number to the display, to see what has been selected, before confirming it with C.
@robotbuilder - I see the option for the sched number is already included. 🙂
displayInfo("Bridge move to",shed+" selected",BLACK);
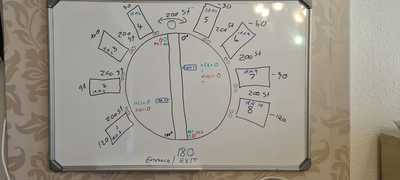
@robotbuilder - due to lack of space, the current position of the locomotive will be on the 0 / 180 degree axle, with 0 degrees facing the loco scheds. (in between the loco scheds currently.) (If the was no track :)) The rest of the scheds 30 degrees apart (if the information I have, it will then be 200 steps to the next sched - so, from 0 - 100 steps, left and -100 right. and then up in increments of 200 steps. So, if we remove the track outer right in front of the loco, the left track and right track, should be 200 steps apart (30 degrees). ( https://openlabpro.com/guide/stepper-motor-basics/) To move it back to 0, from anywhere, it should, as you mentioned know where it is currently pointing. Also, it should be able to move from anywhere to the 180 deg position, depending if the loco should be front or back facing. This mean that the last sched will be 600 steps from the first step, but the most outer scheds will be 1400.
" Your problem is similar except you have 24 positions and use a keypad." - nope, I only have 8 scheds, plus 0 and 180 degrees.
00 steps apart.
have changed the sketch a bit, to clear the screen before the next output.
Yes, you'll probably need to set the text size, clear the screen and reposition the cursor. Not all of those actions were performed each time in the original sketch, so I thought you would add them into the displayInfo or moveToShed as required.
However - how do I re-initialize the first screen? I assume with a break-out button like * or #?
Sorry, I don't know what you mean by 'first screen' ?
And yes, the stepper is running, but I will have to zero it.
Is it supposed to be fed angles or is the angle-to-steps done elsewhere ?
Anything seems possible when you don't know what you're talking about.
Anything seems possible when you don't know what you're talking about.
how do I re-initialize the first screen? I assume with a break-out button like * or #?
I think I know what "first screen" means now. Here is a sub to do the necessary work (I think)
//
//      Reset the screen ready for next loop
//
void showMainScreen() {
    tft.setTextSize(2);
    tft.setCursor(1, 20);
    tft.fillScreen(WHITE);
    displayInfo("To select a Locomotive","Press the loco sched no", BLACK );
}
Remove these commands from the setup() and replace it with the statement
showMainScreen(); // Display starting screen
Add it to the main loop() right after the moveToShed command. That way it will be called after (and only after) you've completed or aborted the module which "dirtied" the screen. That eliminates having to make the user clean up after a move.
So that part of the loop() will now look like
    char key = kpd.getKey();                            // Read keypad
    if ( key!=NO_KEY && ( '0'<=key && key<='9' )) {     // If a valid numeric key
        num = key-'0';                                  // Convert char to shed number
        moveToShed(num,shedSteps[num]);                 // Confirm and xecute move
        showMainScreen();                               // Re-display main screen
    }
I've been passing these out as segments because I'm not sure if there's a totally up-to-date sketch lying around. I've made all these changes to my copy of ModSet0v2. I think both of you have updated versions too, would it be worthwhile to find a new, common version with everybody's changes made so we're all on the same page ?
Remaining questions
- is it "shed" or "shed" ?
- are there any remaining problems or bugs in the existing sketch ?
- what else is left to do ?
Anything seems possible when you don't know what you're talking about.
"I implemented this as a function because 30 degrees isn't 200 steps, so it may need to be changed later." The advantage is that this is planning phase. So the sheds can be placed exactly where the motor stops. I saw in another video that the guy used a control switch, to adjust the stepper to exactly where he wants it - might do that later on, if it does not work. I am not sure what Robotbuilder have, I think we should perhaps wait and hear what he have, before changing anything?
"I implemented this as a function because 30 degrees isn't 200 steps, so it may need to be changed later." The advantage is that this is planning phase. So the sheds can be placed exactly where the motor stops. I saw in another video that the guy used a control switch, to adjust the stepper to exactly where he wants it - might do that later on, if it does not work. I am not sure what Robotbuilder have, I think we should perhaps wait and hear what he have, before changing anything?
Yeah, I'd like to have all three of us looking at the same sketch. Maybe we can separate remaining tasks so that we're all doing something different and not wasting time duplicating each other.
Are the shed orientations correct ? I set them in the positive direction of rotation for 1-4 with 1 being the closest and spreading out from there; negative rotation from 5-8 with 8 being the closest and spreading out from there to 5.
You may find that the Arduino library Stepper.h is a little too "relaxed" for your use. For instance, it doesn't keep track of your current position and doesn't feature acceleration when moving. For an alternative, take a look at the "AccelStepper" library which offers much larger range of control. It may be better for you in the long run but "Stepper" will be adequate for now. It just means that you'll need to move at constant speed and provide code to remember where you are.
The StepMot.step command will eventually need to be expanded to
a) keep track of where the stepper is now
b) compute the shortest #steps to move from where it is to where it wants to be. For example, if you're at shed 1 and you want to move to shed 8, then you DO NOT want to go through 2, 3, 4, 5, 6, and 7, but instead want to go backward from shed 1 trough zero degrees to shed 8.
Also you'll need
1) have some reliable way of orienting the bridge when the system is powered up. Since the bridge has 2 ends (and I assume that it doesn't matter which end is which) you would only have to spin a maximum of 180 degrees to align to a starting position.
2) (maybe) if step count isn't good enough to align the bridge to the sheds after many rotations, you may also need to implement some method if determining when the bridge is aligned with the shed. No need to worry about that yet, but it may be the same tactic as for aligning the bridge to zero, so we need to keep it in mind, nicer to use the same solution for both.
What else is in the pipeline ?
Anything seems possible when you don't know what you're talking about.
... I only have 8 sheds, plus 0 and 180 degrees.
Ok that changes everything. I am not sure of the logic of your shed steps array so I have just ignored it and coded as I would have done it myself. I would number them shed1 to shed8 and pressing their number would rotate the table to that shed. Number 9 to exit or drive on. Number 0 perhaps to rotate 180 degrees. Do you use the turn table to turn 180 degrees and thus drive the train off backwards or forwards? Actually the shed and exit position would be in steps not degrees so the step position of each shed and the exit would be kept as step values in a list. You could just hit the key number of the desired shed and let it turn to that shed automatically.
Anything seems possible when you don't know what you're talking about.
Does your stepper actually have 2048 steps or in fact 4096 steps for a full 360 because it is geared?
My understanding is that a turn table is used to turn a train around such as at the end of a track so as to go in the opposite direction? In your case you want to use it as a compact way to garage the trains rather than just branching the tracks into different sheds?
My suggestion is the method I used in another project would work? Essentially each turn table position is given a step number. So for example if there were 9 positions you just list the step value for each position.
int stepPositions[] = {1365,1536,1707,1877,0,171,341,512,683};
Then you can get the desired position for each key value.
desiredPosition = stepPositions[keyValue];
You also have stored the currentPosition (which started at zero).
So you work out how many steps and which direction is best change the currentPosition to the desiredPosition.
stepCount = currentPosition - desiredPosition;
moveStepper(stepCount);
currentPosition = desiredPosition; // update current position
Here is the setup I used to test the code in the other project. It had eight equally spaced positions but it can easily be modified to handle 9 or more positions not equally spaced around the circle. As you can see it used push buttons rather than a keypad but the logic would be the same.

