A computer ATX power supply can be easily converted into a versatile and powerful power supply for your workbench. In this video, I’ll show you how easy it is to make that conversion.
Full Article at https://dbot.ws/atxpwr
A power supply is an essential piece of equipment for any electronics experimenter. While you can get by with USB adapters and “wall warts” having a capable high-current source of 3.3, 5, and 12 volt DC power will take your experimenting to another level.
Commercial power supplies with these sorts of current capabilities can be very expensive, however, there is a much cheaper alternative. With some simple wiring, you can convert an ATX power supply from a desktop computer into a reliable and capable workbench power supply.
Even if you need to purchase a new ATX power supply this method is still a lot cheaper than buying a commercial workbench power supply. And chances are that you won't need to spend any money at all on the ATX power supply, I salvaged mine from an old Windows XP computer and it works just great.
There are two types of ATX power supplies commonly in use, I will show you the differences between them. Either model can be used in this project.
Here is the Table of Contents for the video:
00:00 - Introduction
04:36 - Parts used in Project
10:06 - ATX Supply pinouts
13:46 - ATX Supply Inside
16:17 - Testing ATX Supply
19:14 - Hookup Diagram
22:48 - Building the Power Supply
30:17 - Testing the Power Supply
31:59 - Adding a Power Meter
One note - there are many ways to do this and I outline a few of them in the video. Several methods (including the one I used) involve opening up the ATX power supply. If you do that BE VERY CAREFUL as some of the components in the supply can retain a high-voltage charge for hours or even days after the supply has been unplugged.
If you are unsure about opening up a power supply (or if you have a new one still under warranty) don’t do it, you can still build this project another way. I go over that at the conclusion of the video.
As always there is an article on the DroneBot Workshop website that accompanies this video, you can read it at https://dbot.ws/atxpwr.
"Never trust a computer you can’t throw out a window." — Steve Wozniak
I'm in the process of building a bench power supply as shown in the video. Just one question: What size fuses are recommended? I have purchased some 3A fuses but wonder if they are high enough. I only plan to power Arduino / Raspberry Pi, etc projects from it.
Any feedback welcome.
: What size fuses are recommended
The fuse ratings really depends upon the rating of the ATX power supply you are using, and every one is different. This is why I didn't specify them in the article.
On most ATX power supplies you'll find the rating on a sticker on the case, but some don't have them. So us the following logic:
- Generally, the 5-volt supply is rated for the highest capacity. Most are rated at 20 - 45 amps
- The 3.3-volt supply is usually rated from 18 - 40 amps
- The 12-volt supply (positive) is usually not very high, about 4 - 18 amps
Keep in mind that these ratings are usually overly generous, and your supply won't be able to provide the maximum current on each output simultaneously.
😎
Bill
"Never trust a computer you can’t throw out a window." — Steve Wozniak
A computer ATX power supply can be easily converted into a versatile and powerful power supply for your workbench. In this video, I’ll show you how easy it is to make that conversion.
Full Article at https://dbot.ws/atxpwr
A power supply is an essential piece of equipment for any electronics experimenter. While you can get by with USB adapters and “wall warts” having a capable high-current source of 3.3, 5, and 12 volt DC power will take your experimenting to another level.
Commercial power supplies with these sorts of current capabilities can be very expensive, however, there is a much cheaper alternative. With some simple wiring, you can convert an ATX power supply from a desktop computer into a reliable and capable workbench power supply.
Even if you need to purchase a new ATX power supply this method is still a lot cheaper than buying a commercial workbench power supply. And chances are that you won't need to spend any money at all on the ATX power supply, I salvaged mine from an old Windows XP computer and it works just great.
There are two types of ATX power supplies commonly in use, I will show you the differences between them. Either model can be used in this project.
Here is the Table of Contents for the video:
00:00 - Introduction
04:36 - Parts used in Project
10:06 - ATX Supply pinouts
13:46 - ATX Supply Inside
16:17 - Testing ATX Supply
19:14 - Hookup Diagram
22:48 - Building the Power Supply
30:17 - Testing the Power Supply
31:59 - Adding a Power MeterOne note - there are many ways to do this and I outline a few of them in the video. Several methods (including the one I used) involve opening up the ATX power supply. If you do that BE VERY CAREFUL as some of the components in the supply can retain a high-voltage charge for hours or even days after the supply has been unplugged.
If you are unsure about opening up a power supply (or if you have a new one still under warranty) don’t do it, you can still build this project another way. I go over that at the conclusion of the video.
As always there is an article on the DroneBot Workshop website that accompanies this video, you can read it at https://dbot.ws/atxpwr.
Hey Bill, Just thought I would share that I've followed your idea and built my own supplementary p/supply. I just had to go one further and split the available 12v lines to create a 9v output with an LM7809, a 100uF capacitor, and a 0.1uF capacitor. Bolted it to the existing heat sink. Now I have a handy 9v cell simulator (for when 5v just won't cut it!) I would love to share some pictures, but I can't seem to do that here.
I would love to share some pictures, but I can't seem to do that here.
Of course you can share them here, just drag them into your post or use the My Media link below the editor.
😎
Bill
"Never trust a computer you can’t throw out a window." — Steve Wozniak
Thanks Bill. I'm still learning a lot.
Okay, as you suggested, the ratings are on the side of the power supply as follows:
- 3.3 V - 25A
- 5 V - 25A
- 12 V - 16 A
I initially put in 3A fuses as I mentioned and think I will upgrade these to 10A fuses. This seems a good compromise if I need to use more than one voltage at a time. What do you think?
Also, another question. I had two old computers at home and checked the power supplies in both. The first one had 3.3 V (or over), 5 V (or over) but 11.8 V (approximately) on the 12 V line. The second one had 3.3 V and 12 V (or over) but only 4.83 V on the 5 V line. So I am currently using the second option. Is being under 5 V critical for running devices rated at 5 V or will 4.83 V be adequate. Of course, I'll keep looking for another power supply but this may have to do for now.
Cheers and thanks for your help.
David 😎
Is being under 5 V critical for running devices rated at 5 V or will 4.83 V be adequate.
Well the specs for TTL logic (the 5-volt logic family of devices) is that the supply voltage should be between 4.75 and 5.25 volts, so your 4.83-volts should be enough.
It's not uncommon for the 12-volt line to be off by a full volt or more. Originally the +12v and -12v were meant for Serial RS232 communications, but as that really isn't used anymore the +12-volts is usually for the motors in hard drives and DVD players, as well as the computer's fans. It isn't as critical as a logic-level voltage.
😎
Bill
"Never trust a computer you can’t throw out a window." — Steve Wozniak
Thanks again Bill. After what you explained, I may have been better off with the <12 V of the other power supply. Still, it's done now and I'll just stick with what I have.
Today I received a JSN-SR04T Waterproof Ultrasonic sensor which I plan to test and, if successful, use as part of my water distillation project. I'll be posting my results on the thread later.
Keep up the great work. I love your channel.
David 😎
A computer ATX power supply can be easily converted into a versatile and powerful power supply for your workbench.
Hey Bill,
Your power supply video was the first one of yours I watched. Your calm demeanor and non-judgmental approach encouraged me to not only build one, but actually share it here. I find this latter task considerably more challenging!
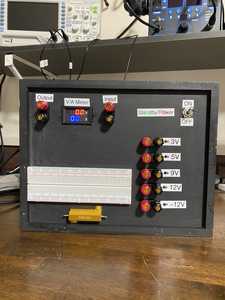
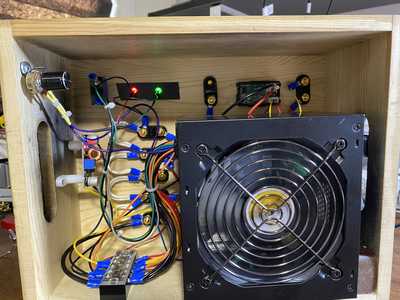
I've added a couple of pictures. I was intrigued about opening up the PS and found that rewarding, ha. I clipped some wires off at the base and bundled the other like voltages together (3 each). I wanted 9V as well, so used a buck converter and reduced a 12V feed to 9V. Works pretty well.
I put it all in an old wood box I was using for junk. It is now fully functional and I keep it on my work desk (rather than the workbench) so I can test out things when I am supposed to be working. This was my first project.
Thanks for the idea!
Enjoy it!
I wish you many hours of fun using your new power supply.
hj
hj
@hstaamThank you! So far, it has been useful, not having to set my main power supply for voltage on different types of needs. The grounds are all attached so only need to move one clip each time.
Wondering what the pot is for?
Thanks! I used what I had for LEDs and they were way too bright. So instead of swapping them out, I added the pot to adjust intensity. Yes, an overkill, but the whole idea was to have fun and trying things out.
Thanks again for noticing.
Don
Actually a great idea! Mine came out to bright as well and I just learned to live with it. But when the room is dimly lit they really look bright. May add one to my supply!!
SteveG
I just learned to live with it.
While my wife rarely comes into my workshop, anything LED and she quotes an article she read about eye damage looking directly into bright LEDs. I had inspiration/motivation/intimidation to modify the intense risk of ocular damage! Phew!
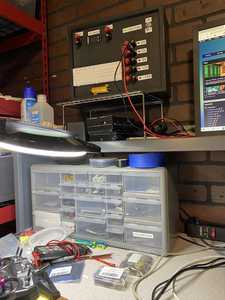
Although I do keep it high up now at the computer station (see pic), so the risk is minimal. Someday I'm going to get really wild and crank that pot all the way up! ...when my wife is not around of course:-)


