Looks good, though I would use a slightly higher voltage to charge the batteries fully, and a charge controller to ensure full charge / prevent overcharge.
Update on the build:
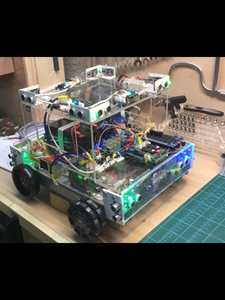
motors and batteries fitted
corner sensors fitted
I2C comms verified to all sensors from Mega
motor test completed
so now for the programming of the 328’s and the mega!
wish me luck👍
So there are 16 sonar sensors? It is certainly bristling with hardware, makes my smaller test bases look very sparse! I see a circuit board at the front which appears to have button switches. Any chance of a complete circuit diagram?
Have you run it on the floor yet when testing the motors? I am assuming there are only two drive wheels so when it turns it has to swing the whole back end of the robot base around the centre point between the two drive wheels?
so now for the programming of the 328’s and the mega!
wish me luck👍
Yes good luck with that. There are some coders here that will probably help if you get stuck on anything. In some ways the mechanical and electronic build is the easy part particularly if you are up to speed with the electronics.
Probably worth having your own thread for the robot?
yes 16 ultrasonics with RGB LED’s signifying green for good, blue for getting close and red for stop.
the circuit board at the rear is the same design as Bill’s, it’s the motor control board, made originally with two Nano’s but now modified to ATMega328’s.
on the floor I have run the motor test sequence, again from Bill, and it works fine. The Omni wheels are excellent in that respect and it swings the rear around very easily. The two batteries provide plenty of ballast to assist with grip.
@Milbul
on the floor I have run the motor test sequence, again from Bill, and it works fine. The Omni wheels are excellent in that respect and it swings the rear around very easily. The two batteries provide plenty of ballast to assist with grip.
Ok. I wondered because when I reversed my lightweight (not much ballast) robot base the single swivel wheel would slowly begin to turn and then jam sideways into the carpet causing the robot base to do a little jump not recorded by the encoders sending it off in the wrong direction. I intend looking for a better "swivel" wheel.
An outside robot would probably need better free running wheels to deal with grass, soft soil and so on with a sharp turn where the wheels you are using would essentially be moving sideways and fully dependent on those little wheels turning and the rest of the wheel not hitting anything.
Pdf from Bills GitHub folder for the motor control board I have built.
😊 😊
This is the current level of the latest iteration of BB1.
Comments on my poor coding will be gratefully received 🙂
Regards to all,
Mel.
I think your coding is quite reasonable.
My biggest complaint would be that the indentation isn't consistent and that makes it hard for us to read (and will make it hard for you to read in a couple of years too 🙂
Since you're obviously not a beginner and since you correctly add code for debugging, I would suggest that you look at the compiler preprocessor directives at
https://www.deviceplus.com/arduino/arduino-preprocessor-directives-tutorial/
These will allow you to #define a value like your current variable MOTOR_DEBUG but will then allow you to add your testing code in such a manner that it will just disappear in the final version. That is, the testing code will not be compiled and not included in the size of the final product.
You would do something like...
#define MOTOR_DEBUG true
and then later ...
#if MOTOR_DEBUG
Serial.println();
Serial.print(leftSpeed);
Serial.print(" original ");
Serial.print(rightSpeed);
Serial.print(" magnitude = ");
Serial.print(magnitude);
Serial.println();
#endif
This will cause the compiler to evaluate the expression MOTOR_DEBUG and if it is found to be true, then it will include all of the commands down to the following #endif.
However, if the value is NOT true (i.e. you changed the definition to #define MOTOR_DEBUG false), then the compiler will not include the code down to the #endif. That code will therefore not be included in the compilation.
This allows you to freely insert test and debugging code and statements without bloating the final product (or causing unnecessary output on the serial monitor).
Furthermore, this will not allocate any space for the value assigned to MOTOR_DEBUG either.
Anything seems possible when you don't know what you're talking about.
Thankyou for the response.
most of the code comes from watching other YouTube sources: DBWorkshop, Brian’s CodingCoach etc.
Copied by myself 😳😔 I only started working with code after I saw Bills DB1 project and decided to make something similar as a workout for the old grey cells!
I will however take your advice and check out the link, let’s hope it has some effect 👍😊
Thankyou for the response.
most of the code comes from watching other YouTube sources: DBWorkshop, Brian’s CodingCoach etc.
Copied by myself 😳😔 I only started working with code after I saw Bills DB1 project and decided to make something similar as a workout for the old grey cells!
That's probably why it's inconsistent, the code was patched together 🙂
I will however take your advice and check out the link, let’s hope it has some effect 👍😊
It will have no real impact on this sketch. It was more of a suggestion for implementing test and debug code with a smaller impact on the final product's size for future use.
Anything seems possible when you don't know what you're talking about.
i have no previous knowledge of programming, therefore it has been a steep learning curve to get to where I am now. I completed a few tutorial series on the Arduino from Paul McWhorter which has given me the basics, all the code in my sketch is typed in by me, not copy and pasted and I am aware of what it all does.
my skill as a programmer is not the best, but I try to make sure I understand what I’m doing therefore appreciate input from experts such as yourself.
Again, thanks for your input 😊
Have just found time to look at your code.
I notice you don't use the encoders although you check them.
You are using five sonar readings to control the motors.
How are the sonar sensors arranged.
I couldn't make them out in the small video image but the robot isn't the same as the one you posted earlier in the thread with 16 sonar sensors?
Although I use different motors I could test your logic on one of my robot bases or a simulation if I had the sensor layout.
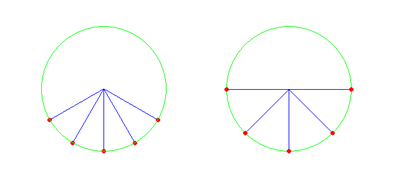
Sonar is at 30,60,90,120 & 150 degrees.
It’s the same chassis but drastically changed to reduce complexity, cytron MDD10a motor controller, arduino mega controller.
encoders currently not used but working on the kinematics solution for proper control of the robot is my current task.
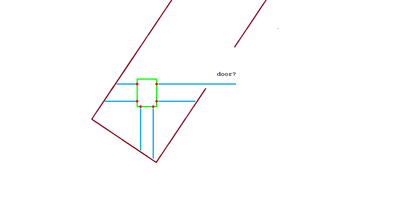
Ok. I arranged my sonar sensors differently. I figured two sensors on the right might be used to keep a robot base centred as it proceeded down a passage.
Another thought was two sonar sensors set apart but pointing in the same direction might be used to determine the orientation of a robot base to a wall.


