
Notifications
Clear all
Topic starter
2019-12-25 10:28 pm
This is another test of the polls. This one is multiple-choice.
"Never trust a computer you can’t throw out a window." — Steve Wozniak

2019-12-26 11:53 am
My first attempt to post on the upgraded forum. ?
Just keeping in harmony with the test topic. I've only been using UNO and MEGA 2560 boards.
Instead of using the Arduino Nano I use Blue or Black Pills, STM32F103 boards. They are cheaper, faster, and have twice the memory. Also every single I/O pin can act as an IRQ pin if desired. They also run a lot faster at 72Mhz.
Here's video comparing the speed between a Nano and a Blue Pill. Quite impressive:
So here's my first test post on Boxing Day!

DroneBot Workshop Robotics Engineer
James
2019-12-26 5:05 pm
Going on holiday tomorrow with 1x Uno + 1x STM32F103 with my laptop...
Eric

2020-01-14 4:34 am
Not included in poll is one I've been experimenting with, the Adafruit Trinket. Great for smaller projects and its small footprint is really nice!
Photo Bud (aka John)
The Old Curmudgeon!

2020-02-04 8:07 pm
Instead of using the Arduino Nano I use Blue or Black Pills, STM32F103 boards. They are cheaper, faster, and have twice the memory. Also every single I/O pin can act as an IRQ pin if desired. They also run a lot faster at 72Mhz.
James, can you get these with the headers installed? I don't want to solder 40 pins unless I have to, and I mostly build stuff on breadboards as experiments. A quick search seems to indicate they all come with headers unattached.
Paul VE1DX
2020-02-04 9:05 pm
James, can you get these with the headers installed? I don't want to solder 40 pins unless I have to, and I mostly build stuff on breadboards as experiments. A quick search seems to indicate they all come with headers unattached.
I don't know. I've always bought them with the headers unattached. I like the option of soldering them on myself since this frees me up to soldering them on the bottom of the board (for plugging into a breadboard) or soldering the pins on the top of the board for use with DuPont wires. Or just soldering wires directly to the board if I so choose. This also allows me to opt for using headers that are angled 90 degrees.
For me the soldering is not a problem. I have a really nice soldering station and I've been soldering boards for decades, so my soldering skills are superb, if I must so so myself. ? They actually go pretty quick.
What I typically do is insert the header pins into a breadboard first. This will insure perfect alignment with the breadboard. Then I set the STM32 board on the pins and solder the four corner pins first making sure the board is sitting flush with the pin headers. Then I just go down each row soldering every other pin. I do this in part to keep from overheating one area too much. I need to go around the board twice then to get all the pins soldered. It doesn't take long if you're skilled at soldering.
The key is to always have a little fresh solder on the tip so that when you touch it to the pin the pin heats up instantly and is ready to take solder. What you don't want to do is place a dry iron against the pin and wait for a long time wondering why it's taking the pin so long to heat up. That actually puts way more heat into the board than necessary. So here's the method I use.
- Clean the soldering iron tip often (every 3 or 4 pins).
- Use a "Chore boy" type tip cleaner rather than a wet sponge. (a wet sponge actually cools the tip down)
- After cleaning the tip, before touching it to the pin first touch it to the fresh solder.
- Just a little bit of fresh solder melted onto the tip will heat the pin up instantly.
- Then just add a little more fresh solder to complete the joint.
That's how I do it and it goes really quick and easy. It might take some time to get it down pat, but once you do it should be smooth sailing.
Use one of these to clean the soldering tip:

Also make sure you have a really skinny tip on the iron. That helps too.
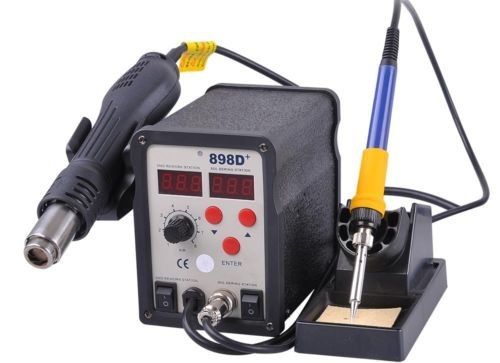
Here's the soldering station I use, but any soldering iron should work just as well.
I set the soldering temperature around 480 degrees. But this is because with a hotter iron I can get on and off the pin in a hurry. You don't want to keep the iron against the pin for a long time at the hot temperature. You'll end up heating up the pin and melting the plastic header that holds the pin. You certainly don't want to that to happen. So if you use the higher temp be sure to solder the pin quickly. You shouldn't need to wait for anything to heat up if you use the method I described above. If you find yourself waiting for a pin to heat up you aren't doing it right. It should heat up instantly. The key is to have a little bit of fresh solder already on the tip. That fresh solder will conduct the heat to the pin instantly and you should be able to instantly add a little more solder as needed. If you're waiting for pins to heat up, you need to reexamine the whole procedure.
You should be able to solder the pins up in no time at all.
If you're really good at it you can just go right down the line without skipping over every other pin. I've done that too. If things are working smoothly it should go really fast. If you get to a pin that doesn't seem to want to heat up. Just clean the tip. Touch some fresh solder onto the tip, and go at it again. I typically clean the tip and touch it with fresh solder every 3 or 4 pins. That seems to work the best for me. The tip will tend to accumulate old solder and you don't want that. So clean the tip often you should be just fine.
And don't forget to solder the four corner pins first. This will insure that the board is flat against the headers and won't move as you go down a row.
DroneBot Workshop Robotics Engineer
James
dkilzer reacted
2020-02-04 9:24 pm
Thanks for all the hints! As you likely recall, I come from a mostly software background, so all of what you have written is useful information. All I remember from my days working with the hardware gurus (who used Weller stations with numbered tips for the temperature like 5, 6, 7, etc.) was one retired professional electronics engineer who stressed: "always use the hottest tip you can." That is precisely what you are saying, only with a digital temperature readout instead of 6 = 600, 7 = 700, etc.
The idea of putting them on the breadboard is excellent as well. Alignment is critical, and that was a worry you removed! I checked the price, and you are spot on about the price and speed advantages of the "blue and black pills." Thanks so much!
Now I need to get the right soldering station. I have a 1970s vintage Weller, and no doubt, the technology has advanced vastly in the ensuing 40-50 years. I'm off to see what I can find for a decent price.
Paul VE1DX
2020-02-04 10:05 pm
I checked the price, and you are spot on about the price and speed advantages of the "blue and black pills."
Just as a heads-up.
The blue pills have no mounting holes. That's fine for breadboard use, but can be a problem when trying to mount them in a project. The blue pills can also be run from a 5 source.
The black pills have mounting holes which is nice for mounting in a project. But they require a 3.3 volt source. They do have some 5 volt tolerant pins though.
In any case, I just thought I'd mention that there are subtle differences between them. I think they also have their built-in LEDs on different pins. So code needs to be written for them separately in many cases. Although many of the other pins are pretty much the same.
Another nice feature of these boards is that just about every I/O pin can also be used as an Interrupt pin. That can be nice if you're working with a project that requires a lot of interrupts.
So yeah, for the price they are hard to beat. More powerful than an UNO, almost equivalent to a Mega but take up far less space, and run faster to boot.
Yep, I'm in love. ?
DroneBot Workshop Robotics Engineer
James

2020-02-05 7:38 am
2020-02-05 4:35 pm
Instead of using the Arduino Nano I use Blue or Black Pills, STM32F103 boards. They are cheaper, faster, and have twice the memory. Also every single I/O pin can act as an IRQ pin if desired. They also run a lot faster at 72Mhz.
This is probably a dumb question, but what software do you use to program them? The Arduino IDE and tell it that it's an Arduino Nano? I did an Internet search, and I find lots of hits promoting the STM32 family of chips. They all agree with the video you posted in terms of far better performance and cost. I can't find anything that says, "these are drop-in replacements for the Arduino Nano."
Does the default boot loader on the "blue and black pills" have to be flashed, or can I hook one up to the Arduino IDE and start programming? My Mac version of the IDE offers three "ports" for the Nano -- ATmega328P, ATmega328P(Old Bootloader) and ATmega168. I use the ATmega328P(Old Bootloader) for my Nano. All this to say, I don't want to figure out how to update bootloaders and use a different IDE.
I don't have a problem with the 3.3 V, and I like the idea that one can use most of the pins for interrupts. I'm comfortable with soldering on the headers. Just concerned about creating another steep software or firmware learning curve.
If I go this route, this is what I'd like to try:
They say it's Arduino compatible, but it has different pin labelling based on the pictures, and one reviewer says there are no English or French instructions. I want to go this route, but I don't want to create a week's work figuring out how to use them. Comments? Better ideas?
Paul VE1DX
2020-02-05 5:09 pm
I don't use a bootloader on the STM32 boards. It takes up 20K of memory and has other disadvantages as well. Instead I use a serial adapter card to program them:
FT232RL 3.3V 5.5V FTDI USB to TTL Serial Adapter Module
I find this to be a far better solution. One reason is that if you go the bootloader route you'll need to burn a bootloader into every board you use. I didn't want to be bothered having to do that. So instead I just use the serial adapter module above. It works just fine.
This is probably a dumb question, but what software do you use to program them?
I use the Arduino IDE. You'll need to go into the Board Manager and install the STM32F103 board. Once you do that you can then just select the board from the list of boards.
There are other things that you need to be aware of. The STM32 is a 32 bit processor. So that needs to be taken into consideration when using integers. For example if you use a 16 bit integer you'll never get a negative number because the STM32 uses 32 bit integers. So you need to tell the STM32 that you are using 16bit integers.
There are a couple little quirks you'll need to learn about. But nothing too serious. I wouldn't call it a steep learning curve. Just a few things you need to know.
It threw me for a loop the first time I ran into the 32 bit integer problem. I was working the 16-channel servo board. I had set it up on an UNO and everything was working perfectly. I moved the code over to the STM32 and it wouldn't run. It too me a week! To figure out what the problem was. ?
I even bought a $20 oscilloscope to look at the signals being sent to the PCA9685 board. And all the signals were just fine, but it still wasn't working!
I finally learned that all I needed to do was replace int with uint16_t in the code. That's all it took to fix the problem. As soon as I did that it worked perfectly. This is because the STM32 sees int as a 32-bit number. So you need to tell it that you are using a 16-bit int.
It's a 32bit processor.
Little things that can drive you crazy if you don't know about them. ?
But at least now I have an oscilloscope. ?
So yeah, there may be little quirky things that you'll need to discover. But overall it's pretty much the same as the Arduino family. Just be aware that some pins and signals may be on different pins. Have a pinout chart handy,


DroneBot Workshop Robotics Engineer
James
2020-02-05 6:02 pm
As @robo-pi said you'll probably have to pay attention to the datatypes used in your sketches and prefer using the portable ones rather the those remapped to so-called "standard" int/bool/float/long, which actually depend on the size of the processor word size.
Apart from that I purchased some no-name chinese ones and had to carefully check the pins vs. the blue/black pill pinouts above, and use the jumpers correctly.
The link you posted seems to indicate these units already have the STM32duino bootloader ready for USB programming, but FTDI is the safest - and as mentionned by robo-pi, the least memory hungry - option.
Remember to include the STM into the Arduino IDE Preferences/Additional Boards Manager URLs :

Eric
2020-02-05 6:13 pm
I just found the Aditional boards manager on the Apple version. I'm guessing I'm making a mountain out of a molehill on this, and it'll go fairly slick. It is a hobby and a learning experience, so if it simply plugged and played, all any of us would gain is the speed enhancement.
Paul VE1DX
2020-02-05 6:13 pm
So yeah, there may be little quirky things that you'll need to discover. But overall it's pretty much the same as the Arduino family. Just be aware that some pins and signals may be on different pins. Have a pinout chart handy,
Thanks so much for all the information, James. I ordered essentially the same soldering station and other parts you recommended. If you heard frustrated screaming and cursing in a week or two, even from a thousand miles or so, it's me! ?
2020-02-07 5:52 pm
The blue pills have no mounting holes. That's fine for breadboard use, but can be a problem when trying to mount them in a project. The blue pills can also be run from a 5 source.
My "blue pills," soldering station, etc., arrived today, so I get to play with the new gear. I ordered them Wednesday, expected delivery was Monday, and they came today (Friday.) That reminds me of something I saw on the Internet that said, "Order a chicken and an egg from Amazon. Then you'll know!"
On the downside, we are sitting on the verge of a severe weather event. Everything is coated with ice 2.5 cm thick, and the temperature is just at freezing. Environment Canada is predicting winds gusting 110-115 kph overnight. That's about 1 inch of ice and 70 mph winds for those who speak in Imperial units. It almost certainly guarantees 12-24 hours without power, so no testing anything until we get beyond that. That's winter in Nova Scotia for you. Oh well. It could be a Force 3-4 hurricane and an earthquake!
I will shut everything down (my weather station, etc.) shortly. I'm not too fond of hard crashes preceded by power spikes and 1-2 seconds of flickering, so it's best to avoid them if you know they are almost inevitable.
Paul VE1DX
Page 1 / 2
Next