Let's start this thread with some reasons and excuses:
- Any plant I have ever been responsible for, is in a better place now!
- I just wanted to play around with the Capacitive Moisture sensors - Thanks @dastardlydoug ... this beer's for you!
- Might convince my wife to use it... as long as she actually places it near the green things.
We were talking in DD's thread https://forum.dronebotworkshop.com/help-wanted/mega-plus-board-with-esp-32/ about all kinds of things... powering, architecture, and devices. Do we use one large MPU... say an Arduino Mega or ESP32 with distributed sensors, pumps and valves... or do we use lots of little, single point MPU's and connect them with WiFi? I think it will all depend on the design of the garden. Are we focusing on potted indoor plants, raised gardens, hydroponic, vertical gardens or a multi-acre garden? I'm of the school... divide and conquer - Sun Tzu. I'm hoping to learn about gardening and how you use electronics and software with a garden. Of course, I'll have to interject my 2-cents worth, but I'm also realistic (actually pessimistic) about my ability to be farmer. As such... take what I say with a grain of salt... see item #1 above.
VBR,
Inq
3 lines of code = InqPortal = Complete IoT, App, Web Server w/ GUI Admin Client, WiFi Manager, Drag & Drop File Manager, OTA, Performance Metrics, Web Socket Comms, Easy App API, All running on ESP8266...
Even usable on ESP-01S - Quickest Start Guide
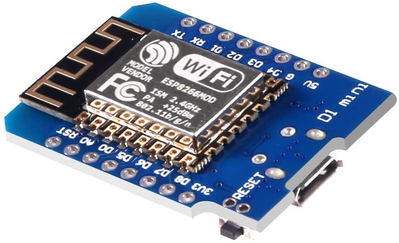
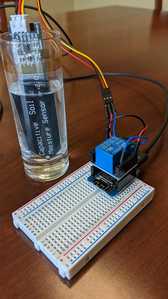
Here is my first test project. It uses...
WeMos D1 Mini 8286
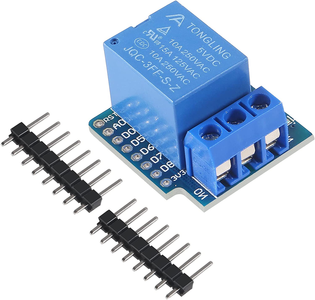
WeMos Relay Shield - This takes care of all the 3.3 to 5V requirements of the Relay. The regular relays that came with the kit require 5Vs to trigger.
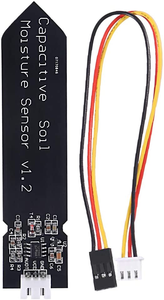
Capacitive Soil Moisture Sensor - Although the picture says 1.2, mine are 2.0
Wiring up was trivial - Relay just plugs in.
- Sensor red to 3.3V
- Sensor black to ground
- Sensor yellow to A0.
3 lines of code = InqPortal = Complete IoT, App, Web Server w/ GUI Admin Client, WiFi Manager, Drag & Drop File Manager, OTA, Performance Metrics, Web Socket Comms, Easy App API, All running on ESP8266...
Even usable on ESP-01S - Quickest Start Guide
Beta version 0.9 of InqGarden.ino
Features
- This supports all the typical web-server stuff to serve up the client side application (web page).
- Automatic calibration - Simply have the sensor dry, then dunk it in water. Make sure you don't go above the line or you short out the electronics. This will set the upper and lower limits for the Analog input. These values are persisted, so you don't have to calibrate it but once.
- You can configure how dry it is when the pump is started and how wet it is when the pump is turned off. These settings are also persisted.
- You can configure the interval how often to check the moisture. For testing, I did every second, but in the real-world, you probably could use a lot longer. This setting is also persisted.
112 lines of code.
#include <InqPortal.h>

const char* VERSION = "0.9";
#define YOUR_SSID "Your SSID"
#define YOUR_PW "Your Password"
#define DEFAULT_HOST_SSID "InqGarden"
#define RELAY_PIN D1
#define LOG_LEVEL 1
#define NOT_CALIBRATED 512

struct InqGardenPersisted
{
	u16 calAir;		// Analog value when most dry.
	u16 calWater;	// Analog value when most wet.
	u16 pumpOn;		// % moisture to turn pump on
	u16 pumpOff;	// % moisture to turn pump off
	u16 interval;	// Seconds between moisture checks
};

InqGardenPersisted config = { NOT_CALIBRATED, NOT_CALIBRATED, 30, 80, 1000 };
InqPortal svr((u8*)&config, sizeof(InqGardenPersisted));

u16 moisture = 50;

void setup()
{
	svr.heading("L0", "Status");
	svr.publishRO("V", NULL, sizeof(VERSION), "InqGarden Version",
        [](){ return (char*)VERSION; });
	svr.publishRO("Moist", &moisture, "Moisture (%)");
	svr.publishRW("On", NULL, "Manual Pump On/Off", getPump, setPump);

	svr.heading("L1", "Calibration and Settings");
	svr.publishRW("CalAir", &config.calAir, "Calibration Air",
		NULL, setAir);
	svr.publishRW("CalWater", &config.calWater, "Calibration Water",
		NULL, setWater);
	svr.publishRW("PumpOn", &config.pumpOn, "Turn Pump On (%)");
	svr.publishRW("PumpOff", &config.pumpOff, "Turn Pump Off (%)");
	svr.publishRW("Interval", &config.interval, "Reading interval (seconds)",
		NULL, setInterval);

    svr.begin(DEFAULT_HOST_SSID, NULL, YOUR_SSID, YOUR_PW);

	pinMode(RELAY_PIN, OUTPUT);
	setInterval(1);
	checkMoisture(NULL);
}

void checkMoisture(void*)
{
	u16 m = analogRead(A0);

	// Automatic calibration of sensor.
	// Dry off in air, let it take a reading.
	// Dunk in water, let it take another reading.
	if (m > config.calAir)
		config.calAir = m;
	if (m < config.calWater)
		config.calWater = m;

	// If both have not been calibrated, we don't let it go on.
	if ((config.calAir == NOT_CALIBRATED) ||
		(config.calWater == NOT_CALIBRATED))
		return;

	// Calculate % moisture.
	moisture = (config.calAir - m) * 100 / (config.calAir - config.calWater);

	// Turn on/off pump accordingly
	if (getPump())
	{
		if (moisture >= config.pumpOff)
			setPump(false);
	}
	else if (moisture <= config.pumpOn)
		setPump(true);

    svr.send("lulu", "Moist", moisture, "On", getPump());
}

void setInterval(u16 seconds)
{
	// Change the interval for checking the moisture.
	config.interval = max((u16)1, seconds);
	svr.onInterval(checkMoisture, (u32)config.interval * 1000);
}

u8 getPump()
{
	return digitalRead(RELAY_PIN);
}

void setPump(u8 on)
{
	// Manual override to turn pump on/off.
	digitalWrite(RELAY_PIN, on);
}

void setAir(u16 cal)
{
	if (cal > NOT_CALIBRATED)
		config.calAir = cal;
}

void setWater(u16 cal)
{
	if (cal < NOT_CALIBRATED)
		config.calWater = cal;
}

void loop(){}
3 lines of code = InqPortal = Complete IoT, App, Web Server w/ GUI Admin Client, WiFi Manager, Drag & Drop File Manager, OTA, Performance Metrics, Web Socket Comms, Easy App API, All running on ESP8266...
Even usable on ESP-01S - Quickest Start Guide
@inq As a gardener, I have no idea why you would use a glass of water to calibrate with. moist soil is a lot less water and more soil. Secondly, how quickly do you think it changes, 4 hours is probably enough, but let's settle at 2 hours. Now if it's a hydronic garden then my comments are rubbish, totally different.
First computer 1959. Retired from my own computer company 2004.
Hardware - Expert in 1401, and 360, fairly knowledge in PC plus numerous MPU's and MCU's
Major Languages - Machine language, 360 Macro Assembler, Intel Assembler, PL/I and PL1, Pascal, Basic, C plus numerous job control and scripting languages.
Sure you can learn to be a programmer, it will take the same amount of time for me to learn to be a Doctor.
Beta Version 0.9 of index.html
This is the client side application visible/controllerable on any browser on your network.
Features
- Allows you to edit all configurable parameters of the server. They're persisted on the server once configured.
- History Graph of the moisture content and when the pump was on/off.
- Most of this was auto generated by the InqPortal Admin. It took me about 5 minutes to decide and delete some generated code and change a couple of parameters.
112 lines of code.
<!DOCTYPE html>
<html>
<head>
  <title>Inq the Garden</title>
  <meta name='viewport' content='width=device-width, initial-scale=1'>

  <script src='InqPortal.js'></script>
  <script>
    window.onkeydown = (ev)=>{ if (event.keyCode == 13) set(); return true };
  </script>

  <link rel='stylesheet' type='text/css' href='InqStyle.css'>
  <style>
    .gap { margin:0.2em 1em 0.2em 1em }
    .panel{ padding:1em 0.5em 0.5em 0.5em; background-color:white; }
    .rht { float:right; margin-right:1em; }
  </style>
</head>
<body class='space'>
  <button onclick='set();' class='btn rht'>Update</button>
  </br>
  <div class='space'>
    <table><tbody>
      <tr>
        <th colspan="2" class="center">Status</th>
      <tr>
        <td>Moisture (%)</td>
        <td id="Moist"></td>
      </tr>
      <tr>
        <td>Manual Pump On/Off</td>
        <td>

          <input class="center" style="width:15em;" id="On" type="checkbox">
        </td>
      </tr>
      <tr>
        <th colspan="2" class="center">Calibration and Settings</th>
      </tr>
      <tr>
        <td>Calibration Air</td>
        <td>
          <input class="center" style="width:15em;" id="CalAir" type="number">
        </td>
      </tr>
      <tr>
        <td>Calibration Water</td>
        <td>
          <input class="center" style="width:15em;" id="CalWater" type="number">
        </td>
      </tr>
      <tr>
        <td>Turn Pump On (%)</td>
        <td>
          <input class="center" style="width:15em;" id="PumpOn" type="number">
        </td>
      </tr>
      <tr>
        <td>Turn Pump Off (%)</td>
        <td>
          <input class="center" style="width:15em;" id="PumpOff" type="number">
        </td>
      </tr>
      <tr>
        <td>Reading interval (seconds)</td>
        <td>
          <input class="center" style="width:15em;" id="Interval" type="number">
        </td>
      </tr></tbody>
    </table>
  </div>
  <div id='divHisto' class='panel space'>
    <canvas id='histo' ></canvas>
  </div>

  <script type='text/javascript' src='chart.js'></script>
  <script type='text/javascript' src='InqHisto.js'></script>
  <script>
    // onModifyResult() is an optional event that allows you to modify
    // incoming published variables before they populate the UI.  It also
    // allows you to intercept them and use them for your own custom UI as
    // we use in this example to populate the Histogram.

    onModifyResult = function(p, v)
    {
        if (_hist) _hist.plot(p, _t, v);
        switch (p)
        {
            case 'ti': _t = v; break;
        }
        return v;   // Any unmodifed variables need to be returned also.
    }

    // These two variables are needed to create the histogram.
    // Server time data was sent.
    var _t;
    // The histogram object
    var _hist = new InqHisto('histo');
    // Configuring the histogram object.
    _hist.config('Moisture (%), Moist, Pump, On', 5, 1, 1);
    // On Resize() is necessary to adjust height of histogram
    function OnResize()
    {
        var h = $('divHisto');
        h.style.height = (window.innerHeight - h.offsetTop - 40) + 'px';
    };
    window.onresize = OnResize;
    OnResize();
  </script>
</body>
</html>
3 lines of code = InqPortal = Complete IoT, App, Web Server w/ GUI Admin Client, WiFi Manager, Drag & Drop File Manager, OTA, Performance Metrics, Web Socket Comms, Easy App API, All running on ESP8266...
Even usable on ESP-01S - Quickest Start Guide
Sample, artificially moistened, so I didn't have to wait days! 😉
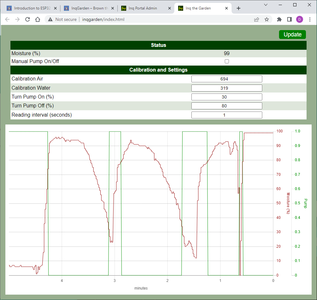
This is the custom GUI for configuring and viewing history (see index.html above). The upper section shows the current soil moisture and allows you to view and modify the sensor calibration parameters and to adjust the pump on/off points.
The lower graph shows some simulated data. The red line shows the moisture and the green line just shows on/off state of the pump. Note how the pump comes on when the moisture falls below 30% and turns off once the moisture reaches 80% as defined by the settings.
3 lines of code = InqPortal = Complete IoT, App, Web Server w/ GUI Admin Client, WiFi Manager, Drag & Drop File Manager, OTA, Performance Metrics, Web Socket Comms, Easy App API, All running on ESP8266...
Even usable on ESP-01S - Quickest Start Guide
@inq You will need to add a DB of some sort. Some plants require near constant moisture levels, some need to almost dry out. Some need different amounts of water when setting seed or fruit etc. Not as simple as 'if dry make wet', MUCH more complicated.
First computer 1959. Retired from my own computer company 2004.
Hardware - Expert in 1401, and 360, fairly knowledge in PC plus numerous MPU's and MCU's
Major Languages - Machine language, 360 Macro Assembler, Intel Assembler, PL/I and PL1, Pascal, Basic, C plus numerous job control and scripting languages.
Sure you can learn to be a programmer, it will take the same amount of time for me to learn to be a Doctor.
@inq As a gardener, I have no idea why you would use a glass of water to calibrate with. moist soil is a lot less water and more soil. Secondly, how quickly do you think it changes, 4 hours is probably enough, but let's settle at 2 hours. Now if it's a hydronic garden then my comments are rubbish, totally different.
I'm just following the instructions of the sensor. But as I understand it, we're calibrating the sensor to the full range of all possible moisture readings. When out in the air, it has "zero" moisture. When totally covered in water, it has "100%" moisture. Soil doesn't enter into the equation at this point.
That is why the pump on/off settings are configurable. In that way, knowledgeable gardeners make the decision at what point to let range.
I'm guessing (I certainly don't know) my wife's bog plants would want to turn on pump even below 90% and off at 100%, while dessert plants would probably be turned on at 10% and turned off at 20%.
3 lines of code = InqPortal = Complete IoT, App, Web Server w/ GUI Admin Client, WiFi Manager, Drag & Drop File Manager, OTA, Performance Metrics, Web Socket Comms, Easy App API, All running on ESP8266...
Even usable on ESP-01S - Quickest Start Guide
@inq Right, every plant is different and needs its own program. Also, different amounts at different stages of growth and development and time of year or more properly life cycle. Gardeners keep this DB in their heads (with the assistance of notebooks and now computers)
First computer 1959. Retired from my own computer company 2004.
Hardware - Expert in 1401, and 360, fairly knowledge in PC plus numerous MPU's and MCU's
Major Languages - Machine language, 360 Macro Assembler, Intel Assembler, PL/I and PL1, Pascal, Basic, C plus numerous job control and scripting languages.
Sure you can learn to be a programmer, it will take the same amount of time for me to learn to be a Doctor.
I have 4 Earth Boxes...
Each EB will have it's own sensor, as well as own pump. I'll have a holding tank for each pair of pumps so that I can monitor the pH. My plants require a strict pH range.
@inq It would appear that you got the 'good' sensors and will need no alterations. I still would recommend that you coat all of the sensor electronics with a resin or silicone, as well as use adhesive shrink tubing to waterproof those electronics (like in the video I referenced to you before).
I forgot to mention that I will be using shielded wire (3 strand) for both the sensors and the pumps. 👍
I have 4 Earth Boxes...
Each EB will have it's own sensor, as well as own pump. I'll have a holding tank for each pair of pumps so that I can monitor the pH. My plants require a strict pH range.
@inq It would appear that you got the 'good' sensors and will need no alterations. I still would recommend that you coat all of the sensor electronics with a resin or silicone, as well as use adhesive shrink tubing to waterproof those electronics (like in the video I referenced to you before).
Would you mind posting it, since you found it and shared it with me. I think it was important, for people to get the 2.0 versions after viewing that article. Also, you might want to mention the specific vendor, so people might use caution.
The link I purchased and got version 2.0 was, but it was a total kit with pieces a real garden won't use: "https://www.amazon.com/gp/product/B09BMVS366/"
I thought I'd post how I was going to approach my wife's gardening situation in this thread also. I think it contrasts with yours, but illustrates nicely how we can mix and match different system architectures. I think we can all help each other with however we want to approach these type of projects.
3 lines of code = InqPortal = Complete IoT, App, Web Server w/ GUI Admin Client, WiFi Manager, Drag & Drop File Manager, OTA, Performance Metrics, Web Socket Comms, Easy App API, All running on ESP8266...
Even usable on ESP-01S - Quickest Start Guide
As mentioned, I think the architecture someone might use is heavily influenced by their own situation. Here are the challenges I have and how I "think" I want to approach it. Things will change! 😆
My wife's garden is about 500 feet from and about 50 feet lower than the house. We have a stream nearer the house. She simply drops a garden hose in the stream and uses gravity to supply a manifold of lines that water the whole garden. We don't need anything very accurate... excess just flows down the garden and out the other side.
My thoughts... use three different kinds of MPU nodes.
Sensor Node - I want to take advantage the fact that sensors take almost no energy and for moisture, checking once an hour is probably overkill. Although I have never played with the sleep modes, I have bookmarks of sample projects that claim running an ESP8266 for over a year on a single AA battery. I only need it to last a growing season and I can recharge, ready for next year.
Parts
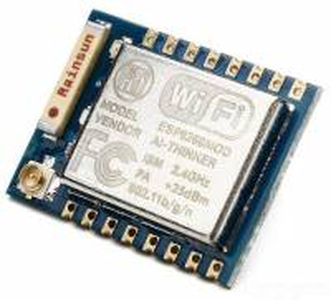
ESP8266 ESP-07 and external antenna - Since I'm nearly 500 feet away from the house, I may have communications problems. These have the ability to attach an external antenna. Hopefully, that'll get me that far.
Battery / DC-DC converters TBD - I understand this is a tricky subject... even though the MPU is sleeping, it still needs energy and if the converter is inefficient, all the energy is wasted... just waiting for the MPU to wake up.
Capacitive Moisture Sensor v 2.0.
I'll 3D Print a case that seals all the Capacitive sensor electronics and the MPU and other circuitry. The whole kit-and-kaboodle with the sensor sticking out the bottom and antenna sticking out the top should be about 12 inches long and about 1 inch in diameter. I'll make several of these nodes that will allow us to see how water flows through the garden and adjust the manifold system. They'll radio their readings once an hour while the pumps are off and once a minute while they're on... so we can check how things are watering and when to turn them off.
Valve Node
It's even simpler - It'll be an ESP8266 WeMos
All it has to do is run some kind of water hose compatible valve. I'm thinking it might have to be powered by an AC adapter, but being close to the house, that shouldn't be a problem.
Server Node
I "think" this will merely be a Raspberry Pi that host. I think I can connect all these pieces via WiFi and using MQTT. Fortunately, we have experts here so I can ask questions when I run into trouble. I'm hoping I can see how to work the MQTT Sensor Node that will wake up, send in their data to the MQTT Broker on the RaspPi. And the Valve Node will routinely check in and ask if it's time yet? 🤣 Fortunately, @byron has a great thread to teach MQTT! - https://forum.dronebotworkshop.com/technology/mqtt-broker/
I already have all pieces except the valve... so now it's time to hit the books on how to actually do all this.
VBR,
Inq
3 lines of code = InqPortal = Complete IoT, App, Web Server w/ GUI Admin Client, WiFi Manager, Drag & Drop File Manager, OTA, Performance Metrics, Web Socket Comms, Easy App API, All running on ESP8266...
Even usable on ESP-01S - Quickest Start Guide
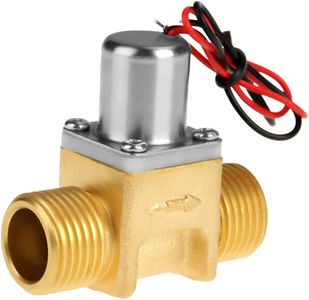
@inq FYI, I have 2 water valves, they look identical, but one is 120VAC the other 12VDC. They are both NC (normally closed) so only consume power when you want water to flow.
First computer 1959. Retired from my own computer company 2004.
Hardware - Expert in 1401, and 360, fairly knowledge in PC plus numerous MPU's and MCU's
Major Languages - Machine language, 360 Macro Assembler, Intel Assembler, PL/I and PL1, Pascal, Basic, C plus numerous job control and scripting languages.
Sure you can learn to be a programmer, it will take the same amount of time for me to learn to be a Doctor.
@inq FYI, I have 2 water valves, they look identical, but one is 120VAC the other 12VDC. They are both NC (normally closed) so only consume power when you want water to flow.
I've seen some that use a built-in servo or stepper motor. I'll need to look through my bookmarks and hopefully find them. They only use electricity when opening/closing. Doesn't use any power once it gets open/closed. I think it was only 5V since it doesn't do it very fast, and I imagine the little motor is heavily geared for the necessary torque. Depending on what power source I run, that may not much of a concern although AC will be easier than 12VDC since that would require a third voltage converter. The MPU will take either 3.3 or 5VDC.
3 lines of code = InqPortal = Complete IoT, App, Web Server w/ GUI Admin Client, WiFi Manager, Drag & Drop File Manager, OTA, Performance Metrics, Web Socket Comms, Easy App API, All running on ESP8266...
Even usable on ESP-01S - Quickest Start Guide

