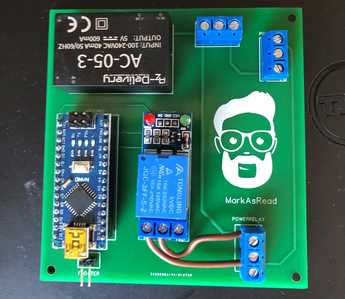
So I started a project at the beginning of this year to solve a water management issue I have in my garden. In a couple of weeks I had a version in production that did what it needed to do. Got a custom PCB made and I was a very proud and happy tinkerer!
But then... I started thinking about what else I could add and do with it.
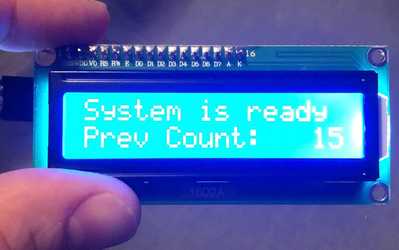
So for version 2 I added an LCD Screen on it so I could keep track of how many time the system got triggered. But since I only power it on when it is raining I lose the total count.
Introducing version 3! Storing the trigger count in the EEPROM on the Arduino Nano and adding some extra lines to the LCD bit.
Now for Version 4, I want to add a button that turns the LCD on and off to check the count whenever I want.
I've added the source code if anybody is interested.
Any tips on making the code compacter would be very much appreciated or any pointer on getting the button to work too. 🙂
@markasread
It looks pretty good !
If the problem with the button is that it seems to vary between on and off rapidly when pressed (or released) then Google "button debounce" for a complete set of descriptions and cures. If that's not the problem, please describe the problem.
As for making the code "compacter", there's not much code to compact 🙂 but, to be excessively picky ...
1) - you don't need the variable "liter" just use "lcd.print(counter * 25);"
2) - you don't need the variable i either.
- delete the "i=counter++;" line
- replace i with counter in the rest of the code section
- change {EEPROM.update(0, counter); to {EEPROM.update(0, ++counter);
Reasons:
1) the calculation will be completed and then the print will use that value
2) the "i = counter++" creates a copy of the counter value and then increments counter. Since i is now equal to the value that counter had, we can just use the value counter itself (without incrementing it yet). Changing counter to ++counter in the EEPROM update increments the value counter and then sends it to the function. If you find it clearer, use {EEPROM.update(0, 1+counter);
It seems that you're familiar with the value++ which uses the value and then increments it. The prefix form ++value first increments the value and then uses it, just the opposite of value++ concept.
Anything seems possible when you don't know what you're talking about.
Thanks for that, I'll have a look at you suggestions in the coming days. I have been able to add the button and, sometimes, it does what I want it to do. More debugging hooray!
I'll drop an updated version of the code soon.
What is the nature of the problem with your button ?
Try Googling "button bounce" to understand the most common form of problem.
Anything seems possible when you don't know what you're talking about.
@will The problem is that it doesn't always executes the LCD on and LCD off.
Must have to do with the placement of that bit of code. That it is waiting for a certain state or something.
Can you post the code please.
Anything seems possible when you don't know what you're talking about.
There you go.
What I have noticed is that the if (buttonState_2 == HIGH) only works after else if (buttonState == HIGH) has run.
But I need it to always run as by default the LCD will display bit in the VOID SETUP.
I don't think you can put an IF statement in VOID SETUP.
Also I still need to implement your suggestions.
Any help is very much appreciated.
There you go.
Thanks, I've reviewed the code.
What I have noticed is that the if (buttonState_2 == HIGH) only works after else if (buttonState == HIGH) has run.
But I need it to always run as by default the LCD will display bit in the VOID SETUP.
That's because you only display values to the LCD in the buttonState == HIGH branch. You need to move the commands to display these values into the buttonState_2 == HIGH branch right after you turn on the backlight. Then display the values, pause and then turn the backlight off again.
The (buttonState == HIGH) branch only needs to turn off the relay and write to the EEPROM (but you can still turn off the CLD backlight, just to be sure 🙂
I don't think you can put an IF statement in VOID SETUP.
You can, Setup() is not that restrictive.
Also I still need to implement your suggestions.
What else is on the list ?
PS - the "else if (buttonState == HIGH) {" can be replaced with "else {". Since the main test is for LOW, the only remaining possibility is HIGH, so a simple else is sufficient.
PPS - HIGH is equivalent to the logic state true, so you COULD also just say "if (buttonState)" which is exactly the same as "if (buttonState==HIGH)". Some people prefer to leave the =HIGH because they feel it helps demonstrate that they're using the pin value as opposed to a logic value.
Anything seems possible when you don't know what you're talking about.
So I finally got some time to really dive into it, I'm happy to say that I've successfully implemented the suggestions Will made into my final version of this setup!
So very happy with the way it turned out!
Now I'm going give myself so time to think it over whether I'm going to order a new PCB which incorporates the LCD and the button or move on to version 5!
Which will be an IOT version, cause IOT things are cool! 🙂
Thanks for all the help!


