#include

Servo myservo;  // create servo object to control a servo
// twelve servo objects can be created on most boards

int pos = 0;    // variable to store the servo position

// Hook up HC-SR04 with Trig to Arduino Pin 10, Echo to Arduino pin 13

#define trigPin 10
#define echoPin 13
float duration, distance;

void setup() {
  myservo.attach(9);  // attaches the servo on pin 9 to the servo object
  pinMode(trigPin, OUTPUT);
  pinMode(echoPin, INPUT);
  Serial.begin (9600);
}

void sendPulse(){
  // Write a pulse to the HC-SR04 Trigger Pin

  digitalWrite(trigPin, LOW);
  delayMicroseconds(2);
  digitalWrite(trigPin, HIGH);
  delayMicroseconds(10);
  digitalWrite(trigPin, LOW);

  // Measure the response from the HC-SR04 Echo Pin

  duration = pulseIn(echoPin, HIGH);

  // Determine distance from duration
  // Use 343 metres per second as speed of sound

  distance = (duration / 2) * 0.0343;

  // Send results to Serial Monitor

  Serial.print("Distance = ");
  if (distance >= 400 || distance <= 2) {
     Serial.println("Out of range");
  }
  else {
    Serial.print(distance);
    Serial.print(" cm   ");
    Serial.println(pos);
    delay(500);
  }
  delay(500);

}
void loop() {
  for (pos = 10; pos <= 150; pos += 5) { // goes from 0 degrees to 180 degrees
    // in steps of 1 degree
    myservo.write(pos);              // tell servo to go to position in variable 'pos'
    delay(15);                       // waits 15ms for the servo to reach the position
    sendPulse();                     // send pulse print distance
  }
  for (pos = 150; pos >= 10; pos -= 5) { // goes from 180 degrees to 0 degrees
    myservo.write(pos);              // tell servo to go to position in variable 'pos'
    delay(15);                       // waits 15ms for the servo to reach the position
    sendPulse();                     // send pulse print distance
  }
}
Just posted the latest Arduino sketch to scan and read sonar values. I have trouble figuring out how to insert it in a post so I have left it as above. It scans back and forth 5 degrees at a time print the degree and distance values after each move. It is very slow probably due to the delays and/or baud rate of the Serial connection? Probably I need to store a whole scan in one array and then send it providing the serial buffer is large enough.
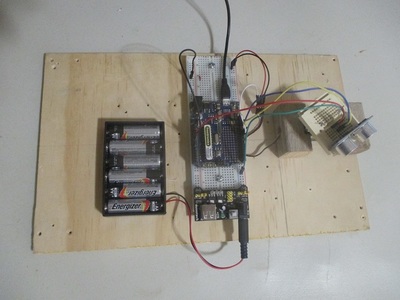
I used some screws and spare plywood to make a solid base for the setup.
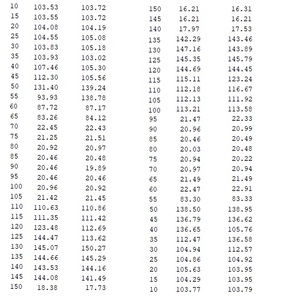
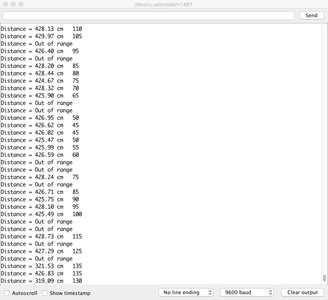
This is a print out of two scans 10 to 150 and two scans 150 to 10. I use 150 because the servo seems to grind as if trying to go beyond its limit with a 180 value.
I still haven't written a program to give the data a graphical display, will probably do eventually.
Is there anyway to delete unused images that have been uploaded? I accidentally uploaded a .bmp instead of a .jpg version of an image.
@casey
Thanks for sharing. You've omitted the servo.h library at the top of the sketch but I have added it and attached the .ino file for straight download.
This was exactly what I was planning to do today, but I have been pipped at the post.
I am considering a graphical visualisation tool but as I can't seem to get .NET working, I am thinking about Python or Java for cross-platform utilisation.
Not sure why the servo.h vanished as it is in the file I copied, thanks for adding it. One reason to share is for feedback as to how to make it better 🙂
Problem with c# is, I think, it is only for Windows? I notice a lot of projects now use smart phones so being able to program them I think would be useful.
I have trouble figuring out how to insert it in a post so I have left it as above.
I found the best way to post Arduino code is to first use the "Copy as HTML" feature in the Arduino IDE. After selecting all the text right-click and choose "Copy as HTML" from the pop-up menu.
Then here on the forums use the source code button at the top of the post editor {:} and paste the Arduino code into there and click OK. That should post the code correctly formatted including the same color scheme that is used in the Arduino IDE.
DroneBot Workshop Robotics Engineer
James
@casey
This was exactly what I was planning to do today, but I have been pipped at the post.
Had to look this one up. ?
pipped at the post: To be defeated or overcome by someone by a very narrow margin or at the final, crucial moment, especially in a race, competition, or athletic event. Primarily heard in UK, Australia, Ireland.
New phrase from across the pond. Always learning things here. ?
Pat
Pat
The most exciting phrase to hear in science, the one that heralds new discoveries, is not “Eureka!” (I found it!) but “That's funny …”
Author: Isaac Asimov
Study the data. You might find simply comparing a reading with the one before it and the one after it will reveal a blip and simply replace that with an average of the two on either side of it. Also check if there is any electronic noise that could be eliminated with a capacitor or separate power supply?
You might be able to use distance data to recognise not only where you are in a room but which room it is, providing the rooms are of different dimensions, and also be able work out the orientation of the robot to those walls by the nature of the return signals. A sonar scanner set up higher than any furniture might be required.
I really need to make a portable version of a sonar measuring tape using a LCD display so I can walk around and turn around and see how the reading change.
The bottom line is, as I know you are aware of, is to study the data to work out the algorithms required.
@casey @robo-pi
I have been looking at repeatability of ultrasonic values received, I thought that it may be the HC-SR.04 that was showing spurious readings so I relaced it. The results did not get better. So I detached the servo, but I did not disconnect it, to see the repeatability in a static state. Still, the readings were all over the place until I disconnected the ground on the servo, only then did get readings with hardly any spurious results.
Maybe, the servo motor is interfering with the HC-SR04.
Any thoughts?
@casey @robo-pi
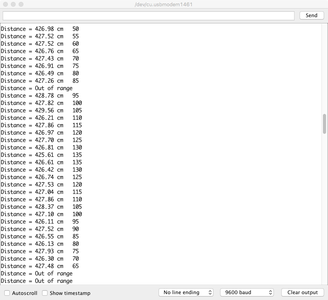
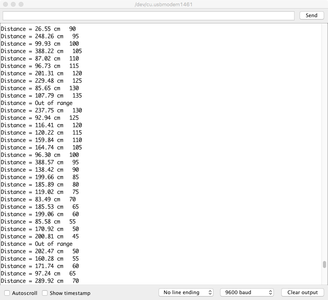
I have the HC-SR04 in static position pointed at the other end of the room.
Readings without the servo attached.
Readings with the servo attached.
The wall is about 4.3m from the sensor!
Placing an object at a short distance < 50cm, with the servo attached, only throws up the occasional spurious reading.
My conclusion is that mapping the surrounding topography with ultrasound modules may prove to be severely inaccurate, probably unusable.
Additionally:
A 100µF smoothing capacitor seems to be giving me more reliable results with the servo attached. Sightly more than 80% correct.
Readings with the capacitor and servo attached.
I would not conclude that mapping the surrounding topography with ultrasound is unusable, it may just require the right kind of algorithms to deal with the data which I suspect is most accurate when bounced directly off a flat wall. It practice I might use it as an adjunct to other sensors, in the meantime it is something to experiment with. I will have to try using a smoothing capacitor as well!
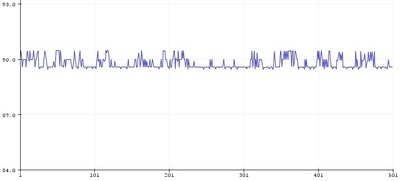
This is a plot using the Arduino IDE Plotter. The sonar device is pointing directly at a flat wall 90cm away. As you can see it is returning values that are between +0.5 and -0.5 of the actual distance.
I am running the first sketch in the tutorial,
https://dronebotworkshop.com/hc-sr04-ultrasonic-distance-sensor-arduino/#1
@casey
Take the get distance sketch or what ever one use the record and playback sketch for the SD card reader for the servo separate the 2 power supplies and that removes the noise a little crude but effective ??
@casey
Take the get distance sketch or what ever one use the record and playback sketch for the SD card reader for the servo separate the 2 power supplies and that removes the noise a little crude but effective ??
@casey
Take the get distance sketch or what ever one use the record and playback sketch for the SD card reader for the servo separate the 2 power supplies and that removes the noise a little crude but effective ??
@casey
Let me qualify what I mean by "unusable". In a static setup, I believe the results you are getting of +/- 0.5 cm are, considering the fact that these ultrasonic sensors cost less than 2 dollars and are probably mass-produced in China with not necessarily the highest-quality discrete components, pretty accurate.
A capacitor is unlikely to increase the accuracy of the ultrasonic sensor. I added a capacitor to stabilise the supply when the servo moved. The reason for this was, that when I initially started playing around with the servos, I powered the servo from my bench power supply with common ground connected to the Arduino. What I noticed was the following, my power supply was set to 200mA max., and when the servo was activated, the red warning light on the power supply would light up. Therefore, to overcome the initial torque in the servo motor, the servo was pulling in excess of 200mA. My reasoning to add the capacitor was to help during this initial power surge if I was running both servo and ultrasonic sensor directly from the Arduino.
As can be seen, by my result tables above, I was experimenting at probably the maximum range of the sensor, which would account for "lost" sound pulses.
"Unusability", was referring to the radar type build at the beginning of this post, rather than the static build.

