Hello
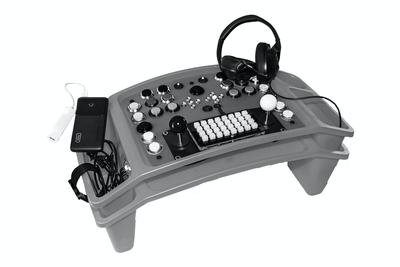
As my first project I thought I would build my 7 year old grandson a "space cockpit" as he is an aviation and space enthusiast.
My goals were to produce something robust (so he could drop it without damage), self powered (so he isn't forced to plug it in),
visual (flashing lights), manual (joysticks) and controllable sound (with headphones so his parents won't hate me for the constant noise).
This being my first project I wanted to try and use modular components and avoid bespoke Arduino stuff. My first choice was the lap desk that
you can get at Michaels. By sandwiching two together I protected the components and made it portable for use in the house or especially in the car.)
For the lights and joysticks I chose the standard arcade button kits you can get on Amazon. Easy to work with as they have a central encoder board
and JST pins and wires already in the kit. But, getting the button to illuminate on press vice constant on, took a bit of work. You have to change the pins
so the LED power source is the button press line (swapping pin 1 and 2). Then using the joystick signal out for each direction (up, down, right, left) I fed
a series of Adafruit fast flash multi-colour LEDs. These LEDs have a changing pattern (both speed and colour) with great intensity. Press joystick forward and
the upper LED lights. Press it forward at 45 degrees and both the top and right LEDs flash. I used an Adafruit power boost board as the power controller for
the LEDs not associated with the arcade buttons and added some illuminated switches to control a "master power on" and "gyro stabilizer LEDs for each joystick cluster).
Finally, I added an Adafruit Neo-Trellis 4x8 matrix button pad to add vibrant colour (neo pixels are very sharp) and add sound with stored .wav files with "space" sounds.
They have a Star Trek themed application that you can modify. Overall power is a 1000 mah USB power charger and 3 port hub so he can plug and play where ever.
Power consumption is very low so he can get 20+ continuous hours of play per charge. Plenty for road trips.
I then added a realistic check list formatted after real life fighter aircraft check lists with laminated pages in a flip book style.
He'll get it for his next birthday when they come to visit us over the summer.
What did I learn - many things from working with wire, soldering irons, crimpers, fitting boards to a framework, power estimation and management, some MicroPython and
lots of patience. I think I'm ready now for some more microprocessor based projects and getting into more IoT dimensions.
So I hope this was useful and may even give some ideas for similar grandchild type projects.
Richard

