I am considering using the wheels from a Roomba and the battery for a simple robot but I do not have a charger for the battery. I have the supply and dock but I doubt I can reuse the main circuit board as the charging circuit. Ideas?
There will be a battery charging circuit on the board but I would suggest you build your own version.
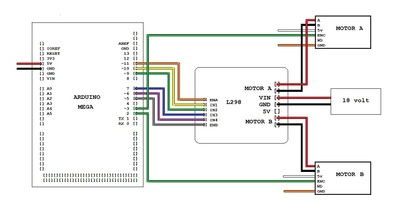
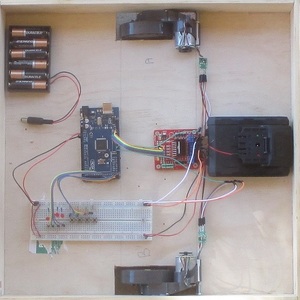
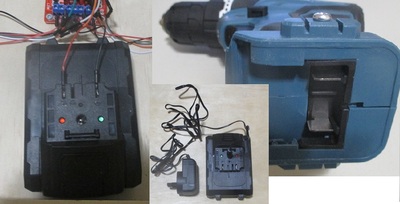
In fact I am using Roomba motors from a defunct Roomba robot in my current robot base. The batteries were the reason it was defunct so I was given it to play with. As the batteries were no good I am using a 18v lithium ion battery used for a portable drill. It comes with a charger and I assume the internal circuits to tell when it needs a charge and when to stop charging. If you don't monitor the charging process you will damage the Roomba batteries. There is also a sensor reading the temperature of the batteries so they don't catch alight (or melt the batteries).
Today I did some more work on the laptop to arduino interface controlling the motors. I might also try using a RPi instead of the laptop. The reason for the laptop is computing power including vision.
@casey
Thanks for the detailed reply and photos. I have a Ryobi 18v battery I can use. I was hoping to use the Roomba battery. I believe I have a good one that I would like to put to use but the charging circuit is the problem. I am trying to keep the project costs down so I would build an external charger but probably not buy one. How did you attach to the drill battery contacts? I will be using an Ardunio Uno at first unless I reach some limitation. I do have a couple of RPis here if necessary. I haven't removed the wheels yet so I don't know if there is a label on the motors for voltage or current requirements. I did a search in the forum but didn't see others using Roomba parts. Thanks for replying. I am interested in your progress.
As you can see I just pushed the leads into the battery where the metal tabs would have been pushed in when attached to the drill. When I get around to making a more professional looking base there will be an on/off switch and the ability to lock onto a charging station.
The motors are pulsed with the L298 and seem to work ok.
If you are going to use the iRobot base there is no reason to remove the wheels. There is no easy way to insert them into a base of your own. I just glued them in!! It is simply an experimental base. Should I get anywhere with the electronics and software I can lift them out and place them in another robotic base.
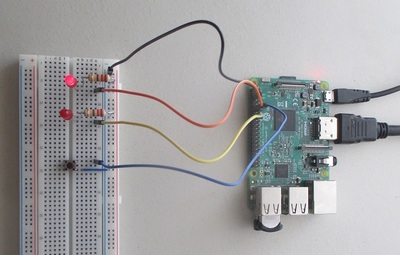
Although I started out with an Arduino Uno I quickly converted to the Mega for the convenience of the extra pins. I have also been experimenting with programs for an RPi to make use of its usb connection to an Arduino and also making use of its gpio pins.
I would also be interested in your progress. It will be interesting to see how many on the forum actually end up with some kind of self controlled autonomous robot that can do something interesting.
@casey
I am just getting started so the Uno seems like it will work. I would like to add wireless internet access to it at some point using esp8266 possibly. That might cause me to switch boards. What L298n controller board is that. I normally see smaller ones on Amazon
A wireless internet connection is something I will worry about if I ever get an autonomous robot up and running.
I never buy things over the internet or Amazon. I buy from Jaycar or Altronics.
https://www.jaycar.com.au/arduino-compatible-stepper-motor-controller-module/p/XC4492
@casey
I just looked at the mega and I see why you went with it. I might get the ELEGOO one. Add me on facebook if you want and we can chat more directly if you want. I have used the Particle Photon before so I might incorporate that to make the wifi easier.
I am not on facebook or any other social media apart I guess this forum and some programming forums.
Posting here or some other similar forum would connect you I assume with others of like interest and potential source of shared ideas.
https://forum.dronebotworkshop.com/introductions/hi-2/
What is your ultimate goal for your project? What is it you want your robot to actually do?
@casey
I wish I had some grand plan for the robot but I don't. This is for a learning experience more than anything. I use to do a lot of interfacing and programming back in the 6502 processor days on the Sym-1 and Rockwell AIM-65. That might pre-date most in the forum. Now that I am retired, I want to get back into electronics and learn new stuff since I now have more time. I want to have an onboard camera viewable remotely and to be able to control the robot movement remotely. It also needs to not run into things. I might use the Roomba base to hold the wheels if I can modify it to hold the boards. That is one reason I was hoping to reuse the battery. Also I only have the two drive wheels and the third wheel. I don't have a second one to get 2 more wheels. I don't have the original bumper plate with the bumper sensors but I have the rest of it. It was partially disassembled when I rescued it from the trash. Only the bumper was gone.
Ouch! The front bumper would be messy to replace. In that case I would probably do what I did anyway and build another base. There may be a better method of mounting the motors then gluing them onto the base like I did. Now if only I had a 3d printer 🙂 My thoughts were that this was just a test base and I would probably build another version with different motors.
I notice it says the motor is safe to run continuously at 18v
https://www.irobotweb.com/-/media/MainSite/PDFs/About/STEM/Create/Create_2_Wheel_Hack.pdf
My impression is that there are a number of retired members on the forum.
I did some interfacing with the c64 which used the 6502 processor. Back in those days I loved doing everything in assembler for speed!!
Controlling the robot remotely is a good first step although for most it is probably the last step. If the AI is not making use of the video images then a simple security wireless camera would do the trick. The coolest "robots" are those semi autonomous flying drones with a HD camera that sends back video to your smart phone and is also controlled via the smart phone.


