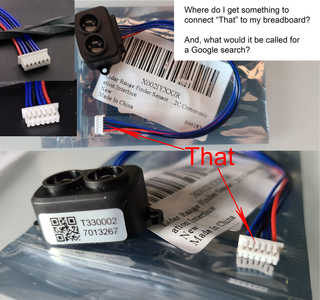
It's hard to tell when it's sitting on a reflective surface (the bag).
It looks like the bastard child of a molex and jst connector, so try googling them to see if you can find a match for it.
Anything seems possible when you don't know what you're talking about.
It's hard to tell when it's sitting on a reflective surface (the bag).
It looks like the bastard child of a molex and jst connector, so try googling them to see if you can find a match for it.
The adapter I have and shown in pic has two female connectors/plugs consisting of openings for 6 pins. They are really tiny, Can't push any of the wires that I got with my kit into them.
I am looking at the Molex webSite and they refer to pitch like "pitch sizes from 2.50 to 5.08mm pitch"pitch sizes from 2.50 to 5.08mm pitch". Does that possibly refer to width of wire?
I have a message out to MakerFocus the manufacture. If I don't get this resolved soon it will be returned, I got it through Amazon.
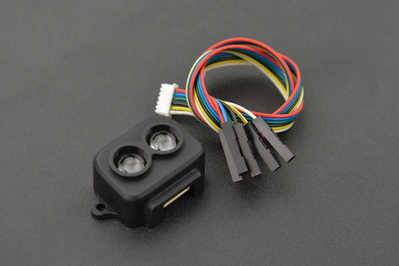
I am looking at one at DFROBOT. It has a cable with one end being female connector/plug and the other end is 6 separate male connectors that I think will go into a breadboard.
Learning, Learning, Learning, ...
Here is hopefully a better pic for "HELP" TopicI am looking at the Molex webSite and they refer to pitch like "pitch sizes from 2.50 to 5.08mm pitch"pitch sizes from 2.50 to 5.08mm pitch". Does that possibly refer to width of wire?
That "pitch" is the distance between the wires. Normal PCBs, breadboards, headers, ICs and the like are all 2.54mm which is 0.1 inches.
I googled "6 pin plastic connector" and the ones that looked closest were molex kk ...
https://www.moneymachines.com/product/6-pin-molex-kk-type-connector-housing/
and ...
Anything seems possible when you don't know what you're talking about.
and ...
This particular connector has a 1.5 pitch.
I measured mine with calipers, best I could with magnifying glasses on. For a measurement between two pins I get 1.2mm and across 5 pins 6.36mm and that divided by 5 is 1.27mm. Of course you can wiggle the calipers just a wee, wee bit and get different readings.
And there are connectors with 1.2mm,1.25mm so at least now I know enough to do some searching.
I posted a question about pin size on product questions section. If I don't get any info from attempts to contact seller there are options:
1) send it back
2) These connectors are cheap and could buy a few sizes.
I now feel intelligent talking about Pitch, ha ha!
The adapter I have and shown in pic has two female connectors/plugs consisting of openings for 6 pins. They are really tiny, Can't push any of the wires that I got with my kit into them.
They look a bit like the connectors in the link below. Hard to tell, but these sort of sensors are often used in drones so looking at the sort of connectors drones use may prove fruitful
https://www.unmannedtechshop.co.uk/product/df13-connector-pack-pack-of-10/
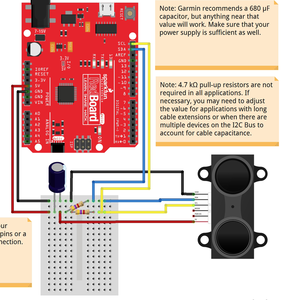
Did the LIDAR come with any info on the 6 wires ? I see there ..2C connect mentioned on your packaging so I guess at i2c. The following pic of a LIDAR 6 wire i2c connection may be the sort of thing you need to do
If you know what the 6 wires are for then you could snip the connector and crimp dupont connectors to the wires.
Dont forget that the LIDAR may only be 3.3v logic level, and it probably wont work well with water and would need a non reflective float arrangement.
But I would consider sending it back and getting a properly documented sensor from SparkFun or Adafruit.
I have a message out to MakerFocus the manufacture.
I should have looked more closely at previous posts and I see pinout wiring showing for a similar looking module on the MakerFocus site. So maybe you just need to snip off that connector
FYI@will
I should have looked more closely at previous posts and I see pinout wiring showing for a similar looking module on the MakerFocus site. So maybe you just need to snip off that connector
One of the customer reviews on Amazon @$24.99.
I cut the cable (I did not have a matching connector to use the supplied female - female cable), crimped on pins to connect to my ESP32, and connected it to my ESP32 dev board.
Pin 1 - Red - 5V
Pin 2 - Blue - SDA - GPIO 21
Pin 3 - Blue - SCL - GPIO 22
Pin 4 - Black - Ground
Pin 5 - Blue - Configure - connect to Ground to use I2C
Load the TF-Luna library from Github
Load the demo code from the library, and it ran.
I mounted it to a weatherproof electrical box with 2 screws through the tabs.
During testing it worked on various surfaces (walls, cloth, my hand, water level in my water barrel, even bits of lint on my kitchen floor)
The results from the sensor measure up to 9 meters or 900 cm
Crimping the pins gave me a bit of variation on distance measurements. I measure 10 times, average the results, and track minimum and maximum. The window was 5 - 7 cm. For example, an distance of 105 cm with a minimum of 103 cm and a maximum of 107 cm
After soldering the pins on, the measurements are much better. The window range is down to 1 cm. For example, an distance of 105 cm with a minimum of 105 cm and a maximum of 106 cm
End of customer review.
Interesting
5V,
bits of lint on kitchen floor,
impressive accuracy
Sparkfun Their most inexpensive $39.95 Lidar -TFMini-S -Micro LiDAR Module
https://www.sparkfun.com/products/16977
Adafruit Most inexpensive Lidar $59.95 Garmin LIDAR-Lite Optical Distance LED Sensor – V4
https://www.adafruit.com/product/4441
DFROBOT Most inexpensive Lidar $24.90 TF-Luna (ToF) Micro Single-point Ranging LiDAR
https://www.dfrobot.com/product-1995.html
DFROBOT $43.90 TFmini-S LiDAR(ToF) Laser Range Sensor. I believe this is one Bill demoed – in fact they reference his video in product description
DFROBOT has 6 selections up to $249.90
If I return the one I have then possibly get the DFROBOT $24.90, Looks like it has a workable adapter situation. Then I might abandon Lidar if a waterproof situation works out. But Lidar is impressive and maybe just a bit of fun to play with, If I can get an adapter for the one I have for a few bucks will be thinking about it.
I can see that testing is going to take a lot longer than I expected 🙂
If the part cost less than $5-$10 I'd say just cut the end off and solder the wires to headers on a PCB, but since the cost is higher, I think I'd trade it in for something else (especially if highly recommended).
Since you're married, I'd suggest that you avoid pointing it at the floor 🙂 🙂
Anything seems possible when you don't know what you're talking about.
I can see that testing is going to take a lot longer than I expected
If the part cost less than $5-$10 I'd say just cut the end off and solder the wires to headers on a PCB, but since the cost is higher, I think I'd trade it in for something else (especially if highly recommended).
Testing is going to take a serious commitment with serious time. With that thought I will need to treat my time very judiciously. Stay out of the "Bunny Holes" and I should only pursue Lidar if a waterproof option does not work.
Then I will need to ask is Lidar better than the HC-SR04?
Maybe, just maybe, in accuracy but not at all sure.
I do feel that the Lidar Sensors are more waterproof that the HC-SR04 but that analysis can wait until there is a need.
Testing is going to take a serious commitment with serious time. With that thought I will need to treat my time very judiciously. Stay out of the "Bunny Holes" and I should only pursue Lidar if a waterproof option does not work.
I agree that test design and implementation is serious business.
What I was saying is that I expected a part would arrive and time would then be consumed writing a test sketch or two and arranging a test strategy (and, perhaps a physical test platform).
What I did NOT expect was getting the sensor and then having to spend extra time and effort to determine the type of cable that it uses before being able to even start the testing phase.
Anything seems possible when you don't know what you're talking about.
What I did NOT expect was getting the sensor and then having to spend extra time and effort to determine the type of cable that it uses before being able to even start the testing phase.
Further along in this process I will accumulate lots of experience. One thing when buying something know that it comes with needed hardware and/or know how you plan to get it hooked up. For sure you or Byron would have been off and running in not too much time. Like you said:
I'd say just cut the end off and solder the wires to headers on a PCB
I am sure I will get to that stage but now don't own a soldering gun, don't even have solder, don't have a scrap of PCB and NO experience at doing something with a PCB. Watched some videos and nothing scared me!
So once the decision is made on what distance sensor will suit this situation best I will be off to building my test (and to be used as the final) Measurement Stack this winter in my nice warm garage/wood shop/do anything shop.
In the process of doing that I will accumulate the needed tools, miscellaneous hardware and building skills. For sure will need some practice at soldering, working with tiny wires, etc. Ive got lots of experience with 14 & 12 gauge and way back when at one of my jobs I was relied on for hooking up the 440 volt equipment and that wire was really thick. Tiny wires, tiny pliers, tiny wire strippers, etc.
Then I will need to ask is Lidar better than the HC-SR04?
Maybe, just maybe, in accuracy but not at all sure.
FYI the unsubscribed @will 😀
I think you will find you could use a smaller diameter tube with the LIDAR, but that may not be of much significance in your set up. More accurate, maybe, though I'm suggesting you don't need to be that accurate.
The way I suggest you may be using these sensors is simply to see it there's enough water in the tank for x minutes worth of watering for a zone. If not enough, then the parameters as to how long to wait until the next water level check are read (which could vary according to the air temperature and how many unwatered zones you have left), or to make the decision how much city water to let in.
City water may not be so critical as I originally understood, as you may have plenty of unused allowance (though of course you very much bias the use of river water). To get a better handle on the criticality of city water I think you really need to keep some sort of monitor on your current city water usage to gauge how close you may be getting to your limit. The fact you have a limit indicates there must be a meter somewhere to show the actual usage, and if its like mine, it may be in a most inconvenient place to read. Nevertheless this meter reading could be read periodically (monthly?) and entered into your control system as a date/reading value to enable an rough average daily usage to be calculated and compared the to total allowance. This would enable you to automatically bias longer watering wait times in favour of triggering the city water use as the usage gets nearer the limit. (all done automatically by your control system)
BTW I've a feeling you will be in great need of a soldering iron and all that paraphernalia as your project progresses, so you may as well bite the bullet now, put your soldering station order in, snip those wires, and enjoy the testing. I hope you have a saw and some screws to build the soundproof boxes for your pumps. 😎
Tiny wires, tiny pliers, tiny wire strippers, etc.
Magnifying lenses on a headset are mandatory for old folk.
If you're that new to soldering, then let me suggest that you use male and female headers and IC sockets wherever possible.
The reason is that some electronic parts don't like to be overheated and, as a neophyte solderer, you're likely to incinerate some parts through leaving the iron on too long or shorting the circuits (been there, done that, got the T-shirt).
The advantages of headers is that they're much harder to destroy by overheating or other forms of soldering malpractice, are far cheaper than any other component you're likely to need and also it's easy to remove broken or non-functional parts and replace them with new, or at least undamaged parts.
Also, if you're using very expensive parts (or only need the thing over the summer, for instance) you can easily salvage the part just by pulling it off the header for reuse elsewhere or later re-installation.
Anything seems possible when you don't know what you're talking about.
Tiny wires, tiny pliers, tiny wire strippers, etc.
Magnifying lenses on a headset are mandatory for old folk.
So are steady hands and nerves of steel, but they're hard to come by 🙂
Anything seems possible when you don't know what you're talking about.


