
Notifications
Clear all
General Discussions
62
Posts
6
Users
16
Likes
4,851
Views


2020-11-28 5:07 pm
That is an awesome project dude !
I managed to satisfy all four of these. So I'd say that's a WIN for me.

Yup, I'd call it a win !
Might not fit what somebody else wants, but it does exactly what YOU NEED from it, which is what I'd call a win
What about a case ?
What are you using to hold it all together ?
You don't have a 3D printer, so you must be using some other way to sorta box it all up

Topic starter
2020-11-28 5:47 pm
What about a case ?
The 3.5" displays I bought came with clear plastic cases. However, these cases are designed to fit RPi 4. So I am modifying them for use with the Pi Zeros.
What are you using to hold it all together ?
The case snaps together and can also be taken back apart just as easily. I've screwed the Pi Zero down to the floor of the case. The case came with hardware to mount the Pi on standoffs.
You don't have a 3D printer, so you must be using some other way to sorta box it all up
There are quite a few things to taken into consideration to be sure. In fact, since I'm building two of these I might make a video of the second build using the first build to actually shoot the video. 😎
There are also several different ways to go with this. My first thought was to have it all self-contained as a single package (i.e. the Camera, Pi Zero and touchscreen all combined together). However, that actually turns out being fairly awkward for several reasons.
- I'm using an AC adapter for power rather than batteries. (so I'll have the power cord to deal with)
- I'm also using an external USB hub. (So that's even more junk hanging off the pi)
- So in the end having the camera attached to the Pi case can become quite cumbersome.
So instead of going for a totally portable camera I've decided to use a long cable between the Pi and the camera and let the camera be more flexible on its own.
I've decided to use these camera to HDMI converters, so I can use a nice HDMI cable between the camera and the Pi. This adds some more cost to the project, but it will be so much easier to deal with the camera alone when positioning it for a shot.
Because the Pi Zero only takes up half the space within the case there's enough room to mount this camera-to-HDMI connector inside the case with the Pi. This way I can just plug the HDMI cable right into the Pi Case.
I'll have a 6' HDMI cable going to the camera. The camera came with a nice mounting case too. So all I need to do at that end is attach a mount that I can affix to a tripod.
It certainly won't be as portable as it could be. But I'm not worried about that kind of portability. It's still portable in the sense that I can set this up anywhere I need to shoot videos. The current plan is to film machining projects on the lathe and milling machine. So these cameras will basically just be set up by those machines with the camera on a tripod or some other mount.
After I have the first one finished, I might use it to film a video constructing the second one.
Might not fit what somebody else wants, but it does exactly what YOU NEED from it, which is what I'd call a win
Exactly. Plus there are certainly options available to make it into a portable single unit that's battery operated. I'm not going to bother going that route because I don't mind plugging it in. And I kind of like having the camera at the end of an HDMI cable. That will make the actual camera quite a bit smaller and perhaps a bit easier to position in tight spots.
So yeah, not a design for everyone. But the tkinter software I wrote should work no matter how it is physically constructed. So that much of the project is more versatile.
DroneBot Workshop Robotics Engineer
James
Spyder reacted
2020-11-29 12:32 am
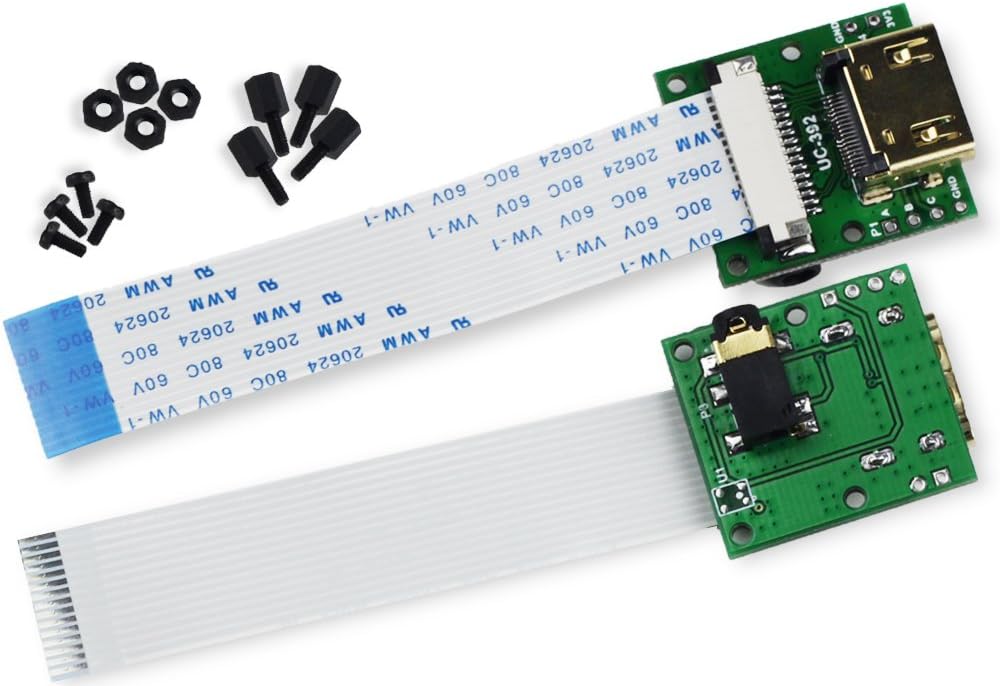
That CSI-USB looks pretty cool. I'm going to have a need for one shortly (I think. Look for new post on it) Different model I think. The one suggested in the article is obviously out of stock (of course)
What is that black thingy on the back ? Is that a jack ? What's it for ?
And the big question...
What size are the mp4 files you're creating ?
On avg, mb per minute
Topic starter
2020-11-29 1:09 am
That CSI-USB looks pretty cool
It's actually CSI to full-size HDMI connector. It allows you to use a standard HDMI cable to connect the camera to the Pi so you don't need to use a long delicate flat ribbon cable. I like it because it's pretty durable. You can mount the camera on a tripod away from the Pi and not have to worry so much about the cable being accidentally damage.
In fact, I actually use this same set up with my Jetson Nanos and their cameras. It's just a nifty way to be able to move the camera around without worrying about keeping it close to the SBC. In fact, I'm using 15 foot cables on my Jetson Nanos. That's a bit of overkill but it allows me to place the camera just about anywhere without having to worry about dragging the Jetson Nano along with it.
I'll only be using 6' cables for these cameras. In fact, I could probably get by with 3' cables, but they are pretty close to the same price so why not get the longer ones? Better to have too much cable than not enough.
What is that black thingy on the back ? Is that a jack ? What's it for ?
It's a standard 3 connection audio/aux jack. There is nothing connected to it other than the HDMI part of the connector. They say that you can use this to pass any 3 signals you like, audio, data, GPIO pins, etc.
Of course if you want to use it for audio you'll need to supply the actual audio signal. I don't currently have a use for the these jacks. I won't be recording audio on these videos. I'll dub in a voice-over later. There's too much noise when the lathe or mill are running anyway. So I'll just grab the video I need and then talk over it when I do the video editing.
I'm not sure how you would sync audio with the video anyway? I didn't really pay attention to see whether raspivid has any audio options. I didn't even bother to look since I wasn't worried about recording audio from the beginning. As I say, too noisy in the shop anyway.
But yeah, apparently there are three conductors on the HDMI cable that the camera doesn't use, so they included this audio style jack for the maker to come up with a brilliant use for those extra three signals. 👍
DroneBot Workshop Robotics Engineer
James
Topic starter
2020-11-29 8:36 am
~~~
Satisfaction with a Raspberry Pi
it may seem simple by my oh my!
when it comes together it's oh so sweet
goose pimples flow o're this Dronebot geek
~~~
I'm currently waiting for some parts to arrive before I can finish the first camera build. So in the meantime I cloned the SD card and stuck it in another Pi Zero along with plugging in another touchscreen display. I fired it up and it's works exactly like the first one. 😎
Yes, I know. What else should I expect? That's what it's supposed to do. 🤣
None the less it feels really good to see the second unit working without any hassle. I have so much on here. My remote desktop and WiFi credentials, the enabled camera, the touchscreen software, my Python TK camera GUI program. Along with various other installed software like Pillow, MP4Box, etc.
It took a lot to get this up to where it is. It's really nice to be able to just clone an SD card and have a second Pi Zero fire up and see everything working without a hitch. So the second camera only needs to be physically built in terms of the case and connectors, etc. The software is finished.
The project is coming along. 🥂
DroneBot Workshop Robotics Engineer
James
Spyder reacted
2020-11-29 12:59 pm
Now yer that much closer to mass-production, eh ?
Do you think this method might be helpful in ripping my VHS tapes ?
I'm currently using a combination of RCA-HDMI connected to an HDMI-USB, and piping it into a program called Bandicam, which... works, but I have to draw a bounding box around the picture, and then capture that picture
I've tried other software, but, I want the output to be mp4, which, for some reason, isn't easy to find, or work with if you CAN find it

2020-12-01 4:48 pm
I have a 3.5 inch touch screen already that is connected to a RasPi 3 that I haven't used in ages, guess all I need now is the Arducam (even have a set of the csi-to-hdmi adapters).
There was an adapter that connected the HDMI port of the PI to the touchscreen that came with my screen, but I'm guessing to use the Pi Zero, you had to use a short HDMI cable. Is that correct?
And if the Arducam is connected to the Pi Zero, there will be a need for a CSI cable for the Zero.
SteveG
Topic starter
2020-12-01 7:45 pm
There was an adapter that connected the HDMI port of the PI to the touchscreen that came with my screen, but I'm guessing to use the Pi Zero, you had to use a short HDMI cable. Is that correct?
That's my understanding as well. Touchscreens that have HDMI connectors usually come with either standard size HDMI connector for RP1 3, or a micro HDMI connector for the RPI 4. Oddly the Pi Zero uses a Mini HDMI connector. So yes, you will most likely need a cable to make that adaptation from mini to full-size.
This was one reason I got the GPIO type display. I didn't want to have to deal with trying to adapt a Mini HDMI connector to the display.
And if the Arducam is connected to the Pi Zero, there will be a need for a CSI cable for the Zero.
Yes, that's another little quirk. The Pi Zero uses a smaller CSI cable connector. So you'll need to remove the ribbon cable from one of your CSI-to-HDMI connectors and replace it with one that is necked down for the Pi Zero. Lots of little annoying details. 🤣
DroneBot Workshop Robotics Engineer
James
Topic starter
2020-12-20 4:34 am
DroneBot Workshop Robotics Engineer
James
DroneBot Workshop and codecage reacted
2020-12-20 12:27 pm
Great work @robo-pi! I'm using your code on my Raspberry Pi Video Camera and it works great. The "Kill" button will be a wonderful addition. I'll give it a shot. Might make a great Christmas Day project to improve one of my toys then use it to record some of the "playing" with the other new toys that Santa brings!
SteveG

2020-12-21 2:02 pm
Are you creating a separate GUI over the top of the original?
You might want to avoid multiprocessing, and use threading (recommended) instead for GUI work.

2020-12-22 12:33 am
Thanks for your nice example code, its a most satisfying project example. A short while back I did get tkinter buttons working with my rpi camera using the import picamera module as opposed to using a sub process command line, but I'm not sure if this is applicable for your camera and certainly not worth changing your code for.
It is not often clear as to whether multi-processing or multi-threading will give the best results though the rule of thumb of course is for i/o bound use threading and for cpu bound use multi processing. A tip may be that you can easily switch between the two with by just changing one line of code if you use the concurrent.futures module where one would just change the following -
with concurrent.futures.ProcessingPoolExector as executor
- to
with concurrent.futures.ThreadingPoolExecutor as executor
and all the rest of ones code can remain the same making a comparison benchmark easy to do. But thats just some thoughts for some future projects and I not saying it's of much relevance to the code you show.
If only I could be as diligent as you with all those excellent comments. It all make for a very good example of just how readable and understandable a nice bit of python code can be. And finally I see a good use of a lambda that actually adds to the readability, short and sweet and they are a treat. 😎 👍
Topic starter
2020-12-22 1:12 am
Hi guys, thanks for the comments. I'm no expert on Python, Tkinter, threading, or multiprocessing. I just hack my way though this stuff and I'm using a ton of web resources when I don't know how to do something, which is pretty much with every line of code I write. 🤣
When I get something hacked together that actually works, I run with it. Knowing full-well it's most likely not the best way to do things.
So I've offered this code up as "food for thought". Just something that someone might use to get their feet wet. Especially if they know even less than me about Python, Tkinter, raspivid, etc.
There are also always many different ways to write programs. If you have any code examples that you would like to share, please feel free to post your code for others to see. I might switch over to using your code myself. 😊
My code could be cleaned up quite a bit, just by going over it with the intent of cleaning it up, even if I continue to use the same basic modules and methods. So I make no claim that my code is efficient, or even professional. All I can lay claim to is that it appears to do what it's supposed to do.
I am trying to learn more, but my mind doesn't retain information very well anymore. So I tend to learn general ideas and principles, but then when it comes time to actually use them I'll no-doubt need to go back to the web resources to learn the precise implementation anyway.
Are you creating a separate GUI over the top of the original?
You might want to avoid multiprocessing, and use threading (recommended) instead for GUI work.
No, I'm not creating a separate GUI over top the original. I'm just running raspivid as a separate process. Raspivid has no GUI.
I do believe I have some understanding of when to best use threading versus multiprocessing.
It's my understanding that threading is best used within a program where you want to have various parts of the same program running in parallel.
Multiprocessing, on the other hand, is best used when you want to launch a totally separate process from within your program. That's what I'm doing. I'm launching raspivid from within the Tkinter GUI loop. This way raspivid can do its thing while the Tkinter GUI loop continues to run, thus allowing me to use a Tkinter Button to then stop the raspivid process.
So I think I'm using the correct tool. Just not sure if I'm using it in the most efficient way possible. My purpose here is not to speed anything up, but rather just to allow the Tkinter window to remain active after having launched raspivid.
My original Tkinter window would freeze up and become unresponsive the moment I launched raspivid. And it wouldn't regain control until I used the desktop "pkill" icon to kill raspivid. But now, by using multiprocessing, the Tkinter window remains active and so I can use a Tkinter Button to kill raspivid.
All I know is that it works. 😎 Whether it's the proper way to do things I have clue. 😮 🥂
I'm no expert. I'm just a hack.
DroneBot Workshop Robotics Engineer
James
Topic starter
2020-12-22 1:22 am
If only I could be as diligent as you with all those excellent comments. It all make for a very good example of just how readable and understandable a nice bit of python code can be.
I've started commenting my code profusely, because I got tired of going back to my old code and having to try to figure out what the heck I was doing back then. 🤣
Also, in the case of this particular code, I wrote in comments with the intention of making the code into a post. So I tended to write the comments as if I was trying to explain the code to someone else.
Actually, that's probably the best way to always write comments. You should always try to write comments as if you are explaining what you are doing to someone else who might not know. Think of how easy that's going to be for you to read when you come back to your own code much later. 👍
DroneBot Workshop Robotics Engineer
James
2020-12-22 4:20 am
Are you creating a separate GUI over the top of the original?
You might want to avoid multiprocessing, and use threading (recommended) instead for GUI work.
No, I'm not creating a separate GUI over top the original. I'm just running raspivid as a separate process. Raspivid has no GUI.
No, I'm talking about your tkinter GUI program... isn't this about your tkinter GUI? For example, when you run your code, and click the "Record Video" button, it creates another GUI (program instance) directly on top of the original one, that you can drag out of the way with your mouse. Click the button again will create a third GUI, and so on - Each of these GUI instances reside in their own memory space.
Maybe you and @codecage can try it out as described and let us know your findings?, because that's exactly what your code does when I run it.
Anyway, what you want instead is:
import threading
[snip]
# Then replace your line with the following
p = threading.Thread(target=Start_recording, args=(command,))
You should also think about disabling the button after clicking it too:
btn_Record.config(state = DISABLED)
I do believe I have some understanding of when to best use threading versus multiprocessing.
It's my understanding that threading is best used within a program where you want to have various parts of the same program running in parallel.
Multiprocessing, on the other hand, is best used when you want to launch a totally separate process from within your program.
Threading = Concurrent threads within the same process (memory space)
Process = Parallel processes (independent instances of memory space)
Multithreading is recommended for GUI work.
Multiprocessing is recommended for I/O CPU bound work.
I'm launching raspivid from within the Tkinter GUI loop
Which appears to be spawning a new GUI each time the button is pressed, at least that's my experience when I run your code.
All I know is that it works.
The button works for me too, in every instance of the GUI...