Hello everyone,
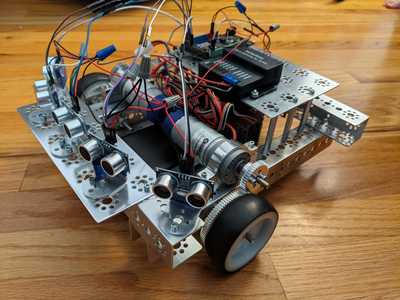
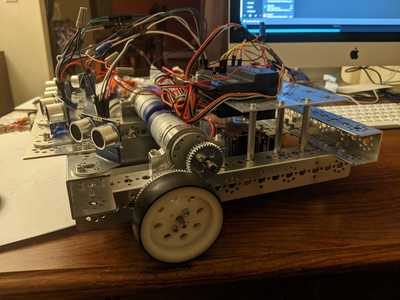
I wanted to create a build thread for my project to document where it is currently and where I want to go with it. My project is very similar to the DB-1 but I have made some modifications. Namely that it is a 3 wheel holonomic design intended to reduce drag. My software goal behavior is very sensitive to error in wheel movement as the odometry is based on it. The other difference is that I currently only use 1 Arduino Mega for low level control instead of separate controllers for the actuators and sensors. I do plan on adding higher level controllers to manage future mapping and planning, more on that later.
While I very much enjoy the hardware build, my personal passion is the software aspect. I have been creating a video series titled "Robotic Programming" aimed at teaching implementation of algorithms to design an autonomous mobile robot.
This video gives an overview of Henry's construction and software used for his navigation:
There are a couple of earlier videos in the series that discuss motor control and ultrasonic sensor use. You can create an "object following" behavior by following the second video Here is a link to the playlist for the series:
I will be adding to this series step by step working up to the complete algorithm (called potential fields) that you see Henry IX using in the first link.
Potential Fields Controller:
The algorithm is based on research done by Michael Goodrich and others and you read the paper here: https://citeseerx.ist.psu.edu/viewdoc/download?doi=10.1.1.115.3259&rep=rep1&type=pdf
Essentially it is made up of the 2 core behaviors I mentioned earlier, go-to-goal and object avoidance. I will look at each briefly below.
Go to Goal:
Essentially you can localize on a differential drive holonomic robot using the following math.
b = distance between center point of contact point of wheels
𝚫𝛳 = Sᵣ - Sₗ 𝚫x = 𝚫S cos(𝛳 + 𝚫𝛳 / 2)
B 𝚫y = 𝚫S sin(𝛳 + 𝚫𝛳 / 2)
then to find your angle to goal (assuming you have it's coordinates)
goalOrientation = atan2(Ygoal - y, Xgoal -x)
once you have your angle and the angle to goal you simply get the difference as you usually would, but make sure to account for angles!
float error = goalOrientation - theta;
error = atan2(sin(error), cos(error));
you can also use the magnitude of the error to control speed like so..
sqrt(pow((yGoal - y), 2) + pow((xGoal - x), 2))
Object Avoidance:
Obstacles are are just vectors (direction, magnitude) that you sum into the speed of the motors. How you determine magnitude is highly subjective to the tuning of that robot. For Henry IX, I choose to use an exponential approach, specifically .01x^2. Usually direction is just the orientation of the obstacle to the robots current pose. (if the object is to the robots left, it "pushes" right by having a - effect on the right motor and a + on the left, etc. The goal "pulls" the same way, if the goal is to the left its magnitude is applied as a + on the right motor and a - on the left. Again here how much weight you apply to the push is subjective. You may give more or less push depending on the angle from the robot.
Summation in Plant:
Finally, the "pull" of the goal force and the "push" of the obstacles are all all summed in the plant to determine the wheel speed of the robot at that moment.
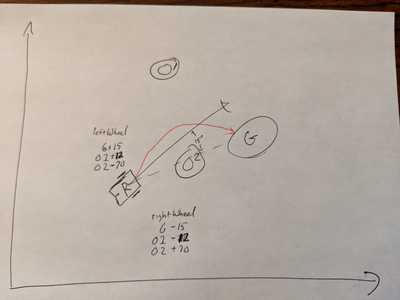
To help visualize the problem, if the current pose of the robot looks like the following:
You determine the error between the angle to goal and the robots current angle, and the repulsive forces of all the obstacles observed and sum it into the wheel speed. So, as a made up example, lets say there is a 15 degree error in angle (robot is at 45 degrees and goal is @ 60) and there are 2 obstacles currently observed by the ultrasonic sensors they have the following vectors [-25, 60], [+10, 30] (angle (with direction), distance)
for the sake of nice round numbers let's say we set our motors with a base speed of 100
leftSpeed = 100;
rightSpeed = 100;
then we sum the "pull" of the goal using the orientation of the goal to determine the direction and which motor gets the + and -.
leftSpeed = 115 (100 + 15), rightSpeed = 85 (100 - 15)
now the obstacles : note that one of the ways you tune your approach is in how you determine the magnitude based on the orientation of the obstacle and the distance, to make this simple lets just imagine that ours will treat any obstacle oriented within +/- 20 with a multiplication factor of 1 and anything more than +/- with a multiplication factor of .3. We will use this proportional multiplier on the magnitude from the distances so let's just use 100 as the farthest we care about and we will subtract the distance read from 100 to get the magnitude. That means that the we define how the obstacles affect the robot as such:
obstacle 1 : 100 - 60 = 40 (magnitude) * .3 (more than 20 degrees from robots pose) = 12
obstacle 2 : 100 - 30 = 70 (magnitude) * 1(less than 20 degrees from robots pose) = 70
Now we sum these values in remembering to use the direction of the obstacle to determine the direction we apply the forces.
obstacle 1: leftSpeed = 127 (115 + 12), rightSpeed = 73 (85 - 12)
obstacle 1: leftSpeed = 57 (127 - 70), rightSpeed = 143 (73 + 70)
So at this point the robot is banking left, temporarily further away from the goal because the magnitude of obstacle 2 has far more impact. As the robot rounds obstacle 2 you would see it adjust angle an head straight at the goal.
Future:
Now that the 1st level of Henry IX is complete I plan on building a higher level Planning / Mapping layer most likely driven by a Jetson, though this has not been finalized yet, preforming tasks such as SLAM and visual odometry. I might also include voice interaction with a google AIY voice kit and a long way off I might integrate a 5DOF robot arm but that is pretty far out at this point. I will add new posts to better describe these features as I get closer to actually doing them 😉
Some pictures:
/Brian
While I very much enjoy the hardware build, my personal passion is the software aspect.
And I think Bill @dronebot-workshop has stated that he does not so much like the software aspect, but his passion is the electronics and hardware side. Maybe you guys should get together and collaborate on a super DB1++ , just saying 😀
Excellent post, I will be looking forward to watching your thread and your YouTube series. Very interesting topic.
DroneBot Workshop Robotics Engineer
James
Yes, I believe so. I am defiantly going to be evaluating it for the visual odometry and it would probably offer a good slam solution as well.
The software engineer in me however might end up re-engineering the wheel just to have the experience 🙂
/Brian
I'm not a genius. Will I be able to keep up ?
I'm not a genius. Will I be able to keep up ?
I too have a few concerns with the actual video tutorials. I have a lot of those 2-wheel $13 robot chassis I would like to work with. But the video appears to be addressing the other small robot that he uses which is much more expensive and uses different software entirely.
So while the concepts are much the same, the physical robots do have quite a bit of difference in how they are programmed and which boards they use. I am using Arduino mega on my chassis.
DroneBot Workshop Robotics Engineer
James
From watching his videos it appears that what he is doing is attempting to incorporate PID with higher level obstacle avoidance and goal setting so the overall concepts can be applied to any of these robots. But for us trying to follow along it can be very helpful if we're actually on the same page with the exact same hardware and software. So this is more of a problem for those of us who can easily get lost in the programming details using different robot hardware, software, and controllers. The overall ideas may be the same but the individual programming content can be quite different.
DroneBot Workshop Robotics Engineer
James
I read the Potential Fields Tutorial document you referenced in your post. Very informative; especially for someone who is more of a visual learner. I understand the concept, but the math is hard to program into my sliderule 🤔
I understand the concept, but the math is hard to program into my sliderule

The math can be easy or hard depending on how you're looking at it and your understanding of it.
If you're just typing these equations in trying to use them without understanding what they represent you won't know what's going on.
But if you understand the geometry of these equations you can see that you actually have the freedom to use and manipulate these equations in ways that makes it very easy for you to use them.
So you need to get on the friendly side of the math if you want to make any progress here. It's just trigonometry, it really is fairly easy once you grasp the ideas.
@briang seems to have a good understanding of the geometry's involved and because of this he may assume that his viewers also have this understanding which may not be the case.
DroneBot Workshop Robotics Engineer
James
I'm not a genius. Will I be able to keep up ?
Absolutely!
If you run into questions along the way, ask. And I will be breaking down each part and discussing separately.
/Brian
...
So while the concepts are much the same, the physical robots do have quite a bit of difference in how they are programmed and which boards they use. I am using Arduino mega on my chassis.
Yes, there are differences in the tuning of the robot but it most certainly works. Here I have a (poorly tuned) potential fields algorithm running on the same type of robot (It is actually one of those elegoo robot car kits assembled on the 12$ 3 wheel chassis instead of the 4 wheel one)
https://photos.app.goo.gl/rM585S31uaxqToLE9
The motor control if different, and as you can see I mounted an ultrasonic on a servo, but as you said the math is the same. The tuning is completely different but as you gain experience it becomes easier to "picture" the math in your head and get a good start.
So other than the fact I mounted the servo, and the code that deals with it's rotation. Moving Henry IX's code to Henry VII here would require different code (or library) for low level motor control and rethinking all the tuning dials.
/Brian
From watching his videos it appears that what he is doing is attempting to incorporate PID with higher level obstacle avoidance and goal setting so the overall concepts can be applied to any of these robots. But for us trying to follow along it can be very helpful if we're actually on the same page with the exact same hardware and software. So this is more of a problem for those of us who can easily get lost in the programming details using different robot hardware, software, and controllers. The overall ideas may be the same but the individual programming content can be quite different.
You can use PID to smooth out response but it is necessary, especially integral and derivative. I chose to include the PID graphic in the video largely because I was talking about tuning and that is the first algorithm I teach my students how to tune. (More reflex association on my part).
But, that does not alter the discussion on your point. Of course, I agree, using the exact same hardware is beneficial, and the tuning will be a lot less painful. That said, if I do my job correctly how to tune will be understood and once enabled, it would not be that bad. There are lots of variables, even the physical angles of the sensors can change things dramatically. The the henry IX video I talked about how much the algorithm was thrown off just by changing my gear reduction (he had definitely lost his grace). That said though all of these things are achievable and given the smallest changes can can big impact, I would not worry too much about trying to avoid it, I have a feeling you will end up doing it anyway.
/Brian
I read the Potential Fields Tutorial document you referenced in your post. Very informative; especially for someone who is more of a visual learner. I understand the concept, but the math is hard to program into my sliderule 🤔
It looks worse than it is, I promise! As you invest more time it becomes more natural just like anything else. I like to draw out the problem like I did in the original post, it helps me "see" the problem as the robot does and using numbers that are real for a particular robots motor speeds, distances on obstacles, planned multipliers for magnitudes allows you to "debug" why the robot is not performing well and fix it.
I would be lying to you if I told you that annoying tuning problems won't pop up though no matter how many times you do it. Some times (like henry IX with his original gears) I get it right the first time, other times I watch them dumbly spaz out and crash into things and spend some hours (or days) getting it right.
/Brian
So you need to get on the friendly side of the math if you want to make any progress here. It's just trigonometry, it really is fairly easy once you grasp the ideas.
I think this is a great statement. I could not agree more. Time invested will lead to you results. Time, basic trig, and a bit of Arduino coding abilities are the only prerequisites
@briang seems to have a good understanding of the geometry's involved and because of this he may assume that his viewers also have this understanding which may not be the case.
While it is impossible to fully bring yourself back to the place you were before you knew something, with effort I believe you can get close. I honestly think there is a more important aspect then me being able to recant the path I took to achieve the knowledge. Every student learning something has their own way of absorbing the information and their own life experiences which they are calling on for reference. Different students will often have completely different questions absorbing a concept. I honestly believe success relies more on the student first believing in themselves and then asking the questions they need to "connect their dots". While maybe we all have the same human equivalent of the A* learning algorithm, everyones maps and heuristics are different.
/Brian


