I'm turning on a relay using pin 6 on an Uno using a infrared code.
digitalWrite(in1,HIGH)
I'd like this pin to stay HIGH until I'm done with it.
Can I get this pin to toggle to LOW using the same infrared code with an IF statement? The more I think about it the more confused I get.
This message was approved by Recycled.Roadkill. May it find you in good health and humor.
Sure, use the following code:
if (I_want_this_pin_to_go_low)
{
digitalWrite(in1,LOW)
}
But it will only go low if I_want_this_pin_to_go_low is true.
DroneBot Workshop Robotics Engineer
James
Your question is too terse to give a proper answer. You will have to give more details of exactly what you are doing and the hardware involved.
What is this "infrared code"? Is it generated by a tv remote? A different code for each button. If you want the same code to toggle a relay on/off you need a variable to remember the last state of the pin. So if your infrared code for turning this particular pin HIGH or LOW is 0101 then it might look something like this:
     if (code == 0101){

        if (pinState == 0){
            digitalWrite(relayPin, HIGH);
            pinState = 1;   // remember last state
        }else{
            digitalWrite(relayPin, LOW);
            pinState = 0;   // remember last state
        }

    }
Your question is too terse to give a proper answer.
I was afraid that may be the case. I'll play a bit m0re and if I still have problems I'll clean up my code and post it.
Thank you for the help robo-pi and casey
This message was approved by Recycled.Roadkill. May it find you in good health and humor.
Your question is too terse to give a proper answer. You will have to give more details of exactly what you are doing and the hardware involved.
What is this "infrared code"? Is it generated by a tv remote? A different code for each button. If you want the same code to toggle a relay on/off you need a variable to remember the last state of the pin. So if your infrared code for turning this particular pin HIGH or LOW is 0101 then it might look something like this:
     if (code == 0101){

        if (pinState == 0){
            digitalWrite(relayPin, HIGH);
            pinState = 1;   // remember last state
        }else{
            digitalWrite(relayPin, LOW);
            pinState = 0;   // remember last state
        }

    }
Just two minor additions to your code. I would actually place the function outside of the main loop and just call when needed
byte pinState = 0; // declare pinState as global variable, initialise as zero

void setup(){
}

void loop(){
   toggleRelay();
}

void toggleRelay(){
if (code == 0b0101){
        if (pinState == 0){
            digitalWrite(relayPin, HIGH);
            pinState = 1;   // remember last state
        }else{
            digitalWrite(relayPin, LOW);
            pinState = 0;   // remember last state
        }
    }
}
Before anybody else notices the fundamental flaw in my last post, I will correct it myself.
byte pinState = 0; // declare pinState as global variable, initialise as zero

void setup(){
}

void loop(){
   if (code == 0b0101){
       toggleRelay();
   }
}

void toggleRelay(){

    if (pinState == 0){
        digitalWrite(relayPin, HIGH);
        pinState = 1;   // remember last state
   }else{
        digitalWrite(relayPin, LOW);
        pinState = 0;   // remember last state
    }
}
You might find this sketch useful. With it, you should be able to show on the serial monitor the IR code of any button on any remote control.
# include <IRremote.h>
int RECV_PIN = 11; // define input pin on Arduino

IRrecv irrecv (RECV_PIN);

decode_results results;

void setup (){
    Serial.begin (9600);
    irrecv.enableIRIn (); // Start the receiver
}

void loop () {
    if (irrecv.decode (& results)){
        Serial.println (results.value, HEX);
        irrecv.resume (); // Receive the next value
    }
}
This is what I ended up with. It does what's necessary but not exactly how I wanted to do it.
#include <IRremote.h>
#define G 16736925
#define R 16754775
#define UNKNOWN_G 5316027
#define UNKNOWN_R 2747854299
int RECV_PIN=12;
int grnPin=6; //Indicate N O contacts closed
int redPin=7; //Indicates N C contacts closed
IRrecv irrecv(RECV_PIN);
decode_results results;
unsigned long val;
void go(){
digitalWrite(grnPin,HIGH);
digitalWrite(redPin,LOW);
Serial.println("On!");}
void stop(){
digitalWrite(grnPin,LOW);
digitalWrite(redPin,HIGH);
Serial.println("Off!");}
void setup() {
pinMode(grnPin,OUTPUT);
pinMode(redPin,OUTPUT);
irrecv.enableIRIn();
Serial.begin(9600);}
void loop() {
if (irrecv.decode(&results)){
val = results.value;
Serial.println(val);
irrecv.resume();
switch(val){
case G:
case UNKNOWN_G: go();break;
case R:
case UNKNOWN_R: stop(); break;
default:break;
}}}
Parts and pieces of others code but two IR codes needed. Oh well. Thanks to those that contributed, I'm just too inexperienced to use it.
This message was approved by Recycled.Roadkill. May it find you in good health and humor.
So you were trying to use a infrared remote control although you never said exactly what you wanted to do with it.
One thing about libraries is that they enable you to do things but without understanding how it works.
I haven't experimented with the library myself and indeed the code flags that IRremote.h isn't there.
There are a few examples on using it here?
http://www.righto.com/2009/08/multi-protocol-infrared-remote-library.html
I really don't understand the purpose of this switch/case function
switch(val){
    case G:
    case UNKNOWN_G:
        go();
        break;
    case R:
    case UNKNOWN_R:
        stop();
        break;
    default:
        break;
}
case G and case R do absolutely nothing at all!
And for only two possible value outcomes, I would tend to stick to two "if" conditionals.
void loop() {

    if (irrecv.decode(&results)){
        val = results.value;
        Serial.println(val);
        if (val == 5316027){
           go();
        }
        else if (val == 2747854299){
           stop();
        }
        irrecv.resume();
    }
}
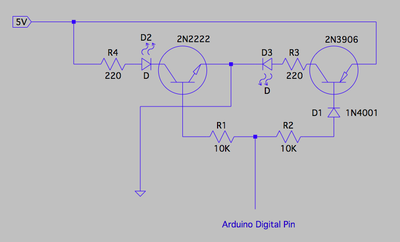
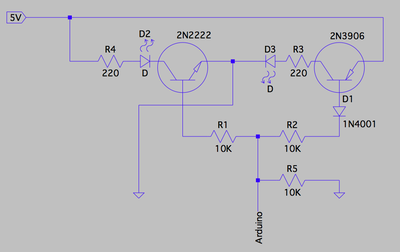
You might like to consider a hardware solution, that uses only one Arduino digital output pin and the toggle function that I mentioned in one of my earlier posts.
If the digital pin is high the leftmost LED is on and the rightmost LED is off.
If the digital pin is low the leftmost LED is off and the rightmost LED is on.
I was using this with a 555 timer, so for the Arduino, you may need a 10K pulldown resistor on the digital output pin.
Hi Pugwash. Thanks for sticking with this.
The code posted earlier is from Elegoo's IR controlled cars. I chose it because it offered IR control while it's pretty simple overall. The "case" designations are needed in this sketch because it won't work without it. I was hoping to pare down the sketch to the point where I might slip it in the code with the things I want to control.
I truly doubt that I'm gonna find my way through the arduino coding without a mentor so the best I have to work with is youtube, Bill's channel and Paul McWhorter are probably the best.
I guess there's no way you live down the street from me.
I'd mentioned earlier trading 3d prints for coding. I have lots of coding work for someone willing.
This message was approved by Recycled.Roadkill. May it find you in good health and humor.
Write down a list of hardware (sensors, relays etc) that you intend to use and description of what you want to achieve with this hardware configuration, and I will try to walk you through the programming side.
Your help is appreciated but I realized that any path I take to achieve what I want may not be the quickest or cheapest but I am enjoying bumbling my way around.
I'm in an unfortunate area where I know some stuff but often too advanced for basic stuff and too basic for more advanced stuff.
Again, many thanks.
This message was approved by Recycled.Roadkill. May it find you in good health and humor.


