@nsshore I see 2 problems. First you need to select the PICIO, then check the box show more ports, then you can select the UF2 (guessing at name) and upload the Blink sketch. After that I think you will see a 'normal' port. There may be some eject msgs in there as well, just roll with the punches. I went through this exercise yesterday with a brand new board. There might be another/better way but that is what I got to work. Good luck.
First computer 1959. Retired from my own computer company 2004.
Hardware - Expert in 1401, and 360, fairly knowledge in PC plus numerous MPU's and MCU's
Major Languages - Machine language, 360 Macro Assembler, Intel Assembler, PL/I and PL1, Pascal, Basic, C plus numerous job control and scripting languages.
Sure you can learn to be a programmer, it will take the same amount of time for me to learn to be a Doctor.
@zander Thanks Ron for the help. I have been checking the show all ports checkbox to no avail, I just did not have it checked when I did the screen shot. I do not know what PICIO is or where to find it. But here are my thoughts.
If there is not a documented, replicable process for using the PICO with Arduino IDE, and if someone with your experience and competencies "got it to work" then for me the message is that the two were not intended to work together and that for someone like myself who would rather make projects than try to make the tools work I should either switch to micropython, abandon the PICO as a platform, or find an IDE that is intended to work with both Arduino and PICO and eventually ESP32. I had hoped to try an ESP32 project but am loath to spend countless hours trying to simply connect to the board.
Anyway, if you see an easy way out of this then please let me know, I would really like to make it work but the current level of frustration is just not worth it.
Mike
@nsshore I have no problems but I am what is known as a hardened user, I just keep trying things until I get it to work. The Arduino IDE and PICO are definitely intended to work together that is why there is a boards file. Your comment about switching to micropython is quite telling to me. Either you are both a C/C++ programmer and a micropython programmer with at least 5 years of 50 weeks x 40 hours experience or you are kidding yourself.
Try the following.
1. Start the Arduino IDE
2. Select the raspberry pi PICO board.
3. Select the example sketch called blink
4. while holding down the button insert the pico.
5. Using the tools menu see if a port is available, you might need to check the show all ports. It may be called something weird like U2F or it may be the normal serial. Maybe take a screen snap and show it to me FIRST before selecting a port.
6. upload the sketch.
7. If it appears to hang, did the eject msg happen, if so pull the board and re-insert
8. Check ports again, you should now see a normal serial.
9. Upload.
First computer 1959. Retired from my own computer company 2004.
Hardware - Expert in 1401, and 360, fairly knowledge in PC plus numerous MPU's and MCU's
Major Languages - Machine language, 360 Macro Assembler, Intel Assembler, PL/I and PL1, Pascal, Basic, C plus numerous job control and scripting languages.
Sure you can learn to be a programmer, it will take the same amount of time for me to learn to be a Doctor.
@nsshore I sent you a DM or private message, but I am not sure you are qualified yet, you may need 2 more posts to get to 10. Reply to this to let me know if you got an email about this post and an email about the private post. Also let me know if you have read the private post, and if you responded.
First computer 1959. Retired from my own computer company 2004.
Hardware - Expert in 1401, and 360, fairly knowledge in PC plus numerous MPU's and MCU's
Major Languages - Machine language, 360 Macro Assembler, Intel Assembler, PL/I and PL1, Pascal, Basic, C plus numerous job control and scripting languages.
Sure you can learn to be a programmer, it will take the same amount of time for me to learn to be a Doctor.
@nsshore Well now I can't upload a sketch to my PICO. It worked yesterday but not today. ANYONE?
First computer 1959. Retired from my own computer company 2004.
Hardware - Expert in 1401, and 360, fairly knowledge in PC plus numerous MPU's and MCU's
Major Languages - Machine language, 360 Macro Assembler, Intel Assembler, PL/I and PL1, Pascal, Basic, C plus numerous job control and scripting languages.
Sure you can learn to be a programmer, it will take the same amount of time for me to learn to be a Doctor.
I think I'm losing my enthusiasm for the PICO 🙁
Anything seems possible when you don't know what you're talking about.
@will Me too. I think I have tried everything but nogo. It was working yesterday.
First computer 1959. Retired from my own computer company 2004.
Hardware - Expert in 1401, and 360, fairly knowledge in PC plus numerous MPU's and MCU's
Major Languages - Machine language, 360 Macro Assembler, Intel Assembler, PL/I and PL1, Pascal, Basic, C plus numerous job control and scripting languages.
Sure you can learn to be a programmer, it will take the same amount of time for me to learn to be a Doctor.
@zander Hi Ron, I did not get a private email and have not yet tried what you suggested but will shortly.
@nsshore You need to get 10 posts to send PM. When you login to here you should get a notify top right of this page about mail, you only get email if you subscribe.
I am now having same problem as you after it worked yesterday. The problem is I am leaving in 15 for dental procedure and will be sedated for most of rest of day so probably won't get a chance to look at this.
@dronebotworkshop Bill could you tell us step by step how you were able to upload and run sketches on a PICO?
First computer 1959. Retired from my own computer company 2004.
Hardware - Expert in 1401, and 360, fairly knowledge in PC plus numerous MPU's and MCU's
Major Languages - Machine language, 360 Macro Assembler, Intel Assembler, PL/I and PL1, Pascal, Basic, C plus numerous job control and scripting languages.
Sure you can learn to be a programmer, it will take the same amount of time for me to learn to be a Doctor.
@zander I followed the steps you outlined but no port appears. Tried unplugging and replugging multiple times, holding down the boot loader button and not holding it down, rebooting my pc, walking around my desk counterclockwise while chanting the names of all the available PICO boards forwards and backwards, and dripping chicken blood into the fire in the woodstove. No Port other than the bottle in the cabinet which I am opening as soon as I finish this message.
@zander I hope your trip to the dentist is less painful than trying to make this board work.
@nsshore If you were a little closer than Nova Scotia I would join you for some of that port. The same boards and same sketch I was able to upload last night now do not work. Very frustrating!!!
First computer 1959. Retired from my own computer company 2004.
Hardware - Expert in 1401, and 360, fairly knowledge in PC plus numerous MPU's and MCU's
Major Languages - Machine language, 360 Macro Assembler, Intel Assembler, PL/I and PL1, Pascal, Basic, C plus numerous job control and scripting languages.
Sure you can learn to be a programmer, it will take the same amount of time for me to learn to be a Doctor.
Hi
I had not used my PicoW to connect to the internet before tonight, but having seen the conversation and your frustration I decided to have a go. The product is a RPi and they have excellent documentation and an active forum specifically for the Pico and PicoW. The Pico and PicoW are different internally due to the way the had to configure pins to fit the WiFi, and as a result the Blink sketch for the Pico will not work on the PicoW.
If you load up the Raspberry Pi PicoW .uf2 file from this page
https://www.raspberrypi.com/documentation/microcontrollers/micropython.html
and flash it to your PicoW then run the following code it will connect to the WiFi
import time
import network
ssid = 'Public Name of your WiFi'
password = 'Private Password for Your WiFi'
wlan = network.WLAN(network.STA_IF)
wlan.active(True)
wlan.connect(ssid, password)
# Wait for connect or fail
max_wait = 10
while max_wait > 0:
if wlan.status() < 0 or wlan.status() >= 3:
break
max_wait -= 1
print('waiting for connection...')
time.sleep(1)
# Handle connection error
if wlan.status() != 3:
raise RuntimeError('network connection failed')
else:
print('connected')
status = wlan.ifconfig()
print( 'ip = ' + status[0] )
Good Luck
Non Sibi Sed Omnibus
@nsshore FYI @kids-taxi @will @dronebot-workshop @bwims @timbo
First of all, the Blink sketch does NOT work with the PICOW it does with PICO
(CREDIT to @kids-taxi for reminding us of that, but using the UF2 file is not the best way forward)
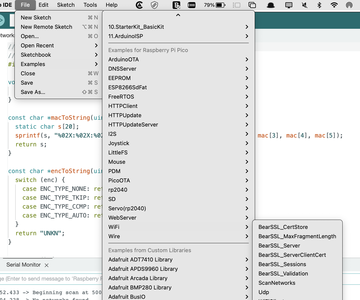
I am testing with Examples/Examples for Raspberry Pi Pico/WiFi/ScanNetworks.
This is the FIRST time only procedure per board.
1 while holding the button down plug in the PICOW
2 start the IDE
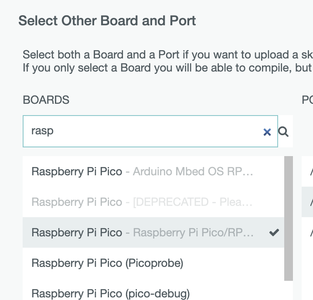
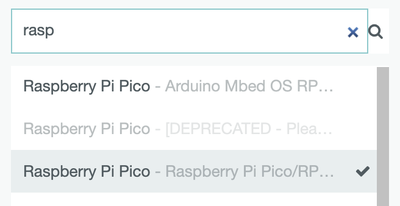
3 Select your board as PICO from the 'official' list see pic1 and pic3
4 Select the Example from Examples/Examples for Raspberry Pi Pico/WiFi/ScanNetworks. See 2nd pic
5 Verify and upload, it WILL FAIL, that is normal.
6. Unplug board, plug back in.
7. Look at Port selected it should be a serial now.
7 Verify and upload, it WILL WORK, check Serial for scan output, give it a second to start up.
8. From now on all you do is plug the board in, the special step of holding the boot sel button is a ONE TIME thing.
9. Pay close attention to read the faint greyed out text past PICO, I have 3 entries shown in 3rd PIC, you may not as I have extra boards but it is worth a check.
First computer 1959. Retired from my own computer company 2004.
Hardware - Expert in 1401, and 360, fairly knowledge in PC plus numerous MPU's and MCU's
Major Languages - Machine language, 360 Macro Assembler, Intel Assembler, PL/I and PL1, Pascal, Basic, C plus numerous job control and scripting languages.
Sure you can learn to be a programmer, it will take the same amount of time for me to learn to be a Doctor.
@nsshore It was way past my bedtime when I wrote the last post, Im sorry it was half finished so here is the rest:
This method I tried and tested after reading your post it works though it is using MicroPython instead of C/C++. I did it this way because I tried downloading the new Arduino IDE and loading the PicoW board but it would only give me Pico (that is without WiFi) and so it would not work, and secondly the method shown above works, is quick to do and it will tell you if the PicoW board you are using is functioning correctly.
So: download the .uf2 file
Hold the BootSelect button while inserting the USB to get the Drive icon in File manager
(If you look in the html file on the PicoW drive it will give you the RPi documentation link)
Drag and drop the .uf2 file onto the PicoW drive Icon it will take several seconds to replace the old file
open Thonny and check that the PicoW has been detected in the bottom right corner and is visible in the border after checking
copy and paste the code ( you might need to check the spaces as the forum stripped them out when I inserted it)
insert your credentials
hit the red button and then the green, it should be up and running in less than 10-12 seconds.
If you go to the RPi documentation pages you will find amongst a lot of others a Getting started with MicroPython and Getting Started with C/C++ PDF's if you know the board is functioning we can help with the rest 🙂
Non Sibi Sed Omnibus


